TL;DR
To bulk upload journal entries to QuickBooks Online, let Gemini build and balance your month-end entries in Google Sheets, then send them all at once with G-Accon. You'll pull your accounts and customers first, check every entry against them, and confirm each one landed with its own Journal Entry ID.
If you've ever typed depreciation, payroll accruals, prepaid amortization and reclassifications into QuickBooks one line at a time, you know how slow it gets and how easy it is to pick the wrong account or customer along the way.
This walkthrough shows you how to bulk upload journal entries to QuickBooks Online from start to finish, so you'll see every click and every screen. You'll pull your reference data out of QuickBooks, have Gemini build and check the entries, move them into an upload-ready tab, send them to QuickBooks Online and then make sure everything landed where it should.
The example uses a demo company called ACME Corporation and G-Accon's QuickBooks Online Journal Entry Upload Template, but you can follow the same steps with your own company file.
Jump to a section
What you need before you start
You only need a few things in place, and most accounting teams already have them:
- A Google Sheets file with the G-Accon for QuickBooks add-on installed and connected to your QuickBooks Online company
- Access to Gemini in Google Sheets through Google Workspace, which opens as a side panel inside Sheets
- Your raw journal entry data, whether it comes from Shopify, Amazon, other spreadsheets or another system
- A staging template with tabs for Journal Entry, JournalEntryUpload, Customer, Account and DetailedTransactions (the demo uses G-Accon's QuickBooks Online Journal Entry Upload Template)
Part 1: Pull your reference data from QuickBooks Online
Gemini can only check your entries against customers and accounts it can see, so start by using G-Accon to pull them from QuickBooks Online into Google Sheets. It only takes a few clicks.
Step 1Open Get Accounting Data
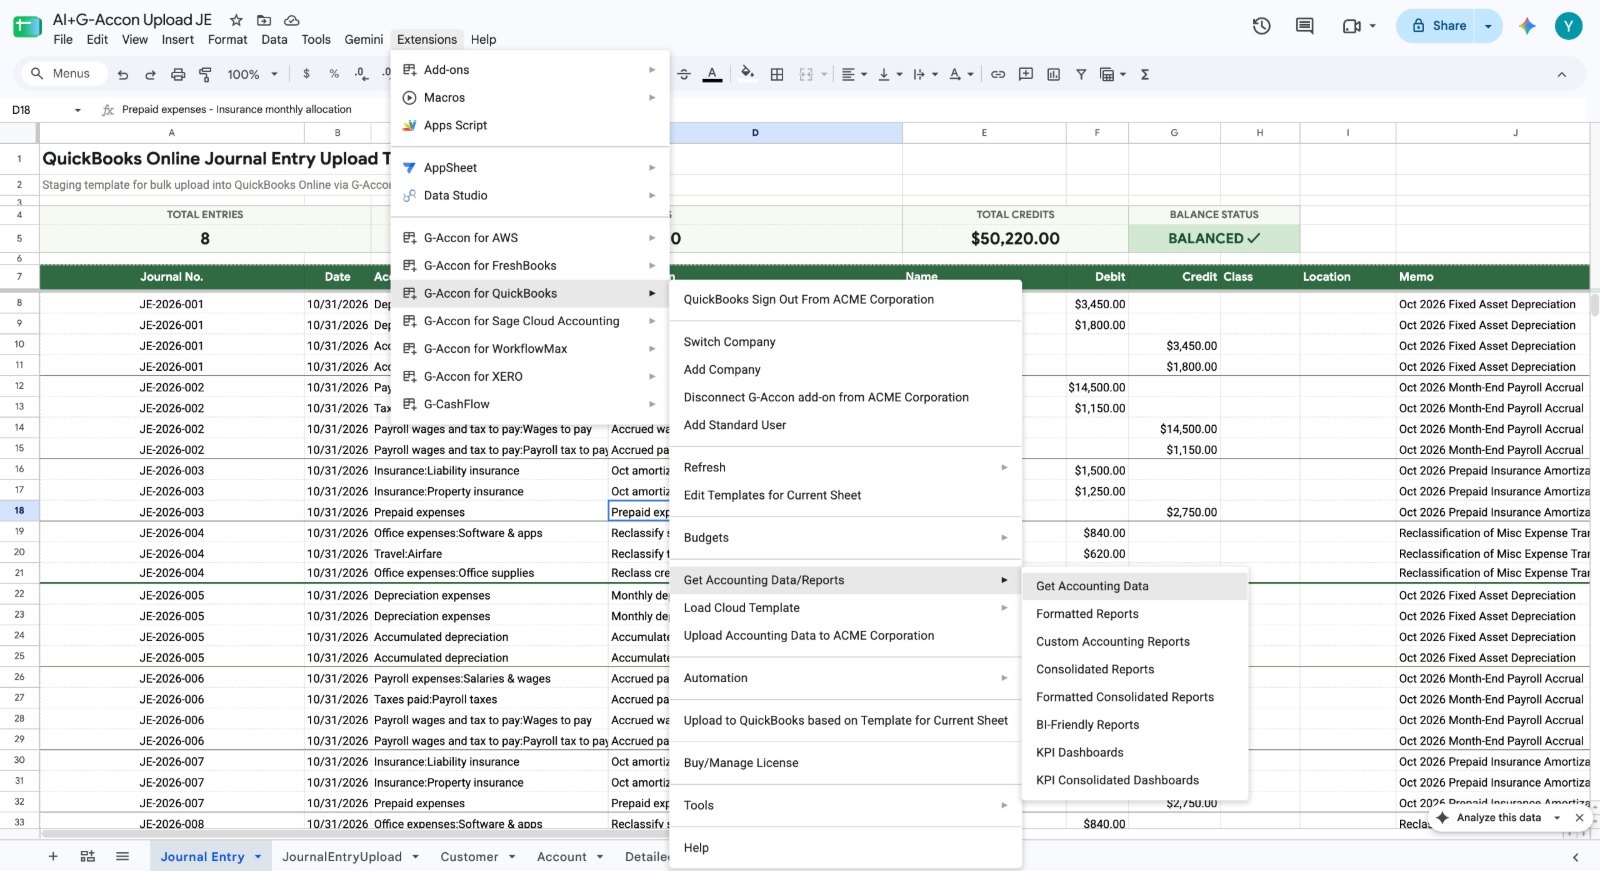
In your Google Sheet, go to Extensions → G-Accon for QuickBooks → Get Accounting Data/Reports → Get Accounting Data. From here you can download your Chart of Accounts, Customers, Employees, Vendors, Classes or Locations, depending on what your journal entries need.
Step 2Select the Customers table and its fields
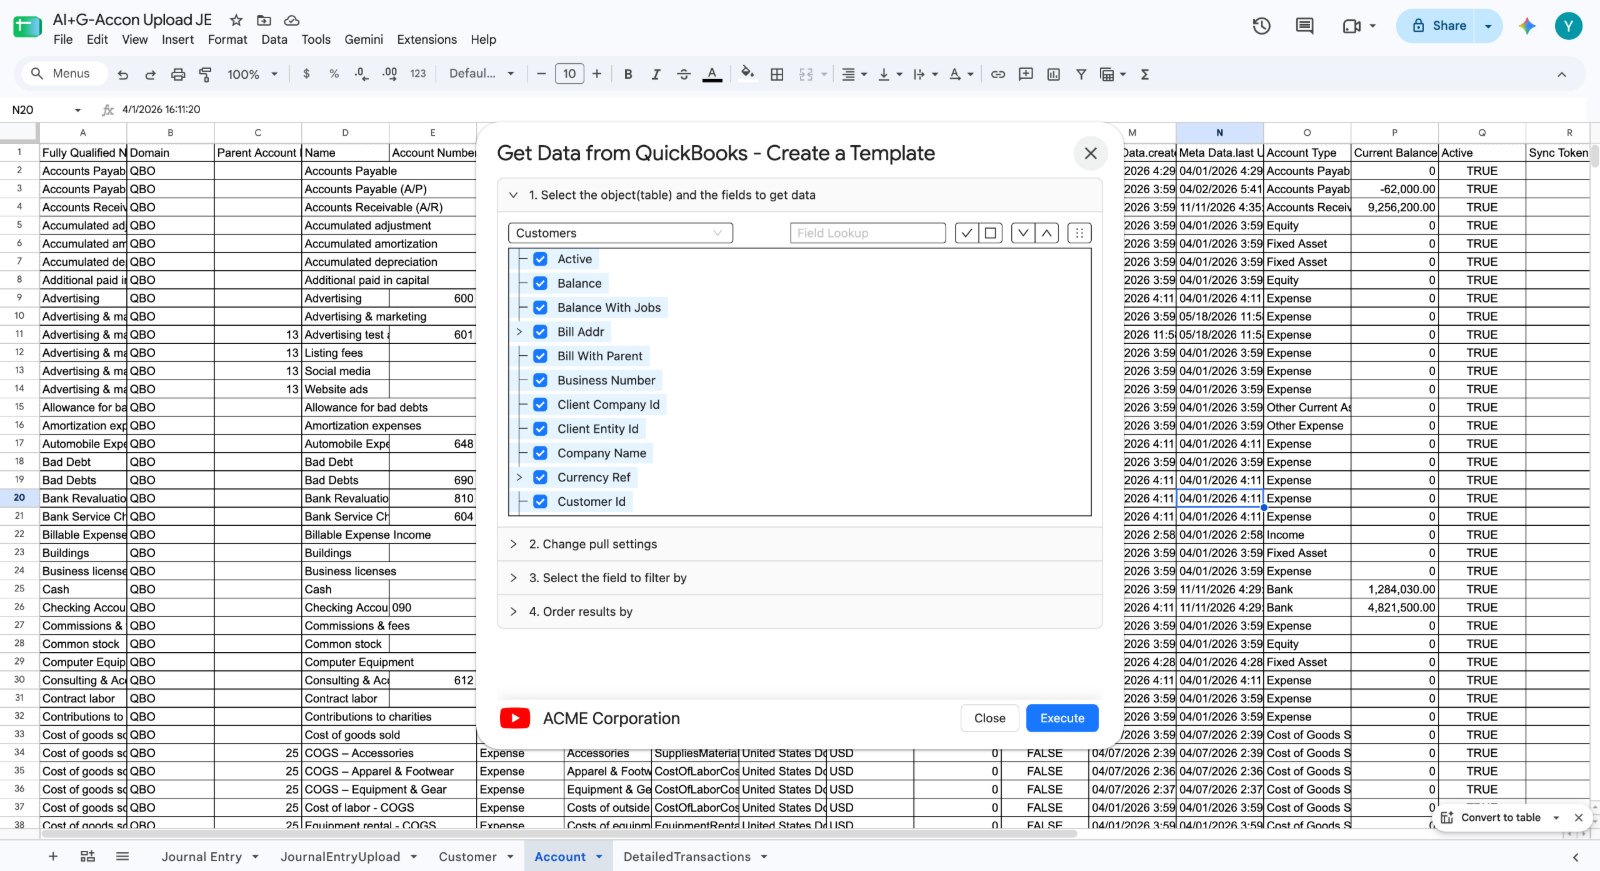
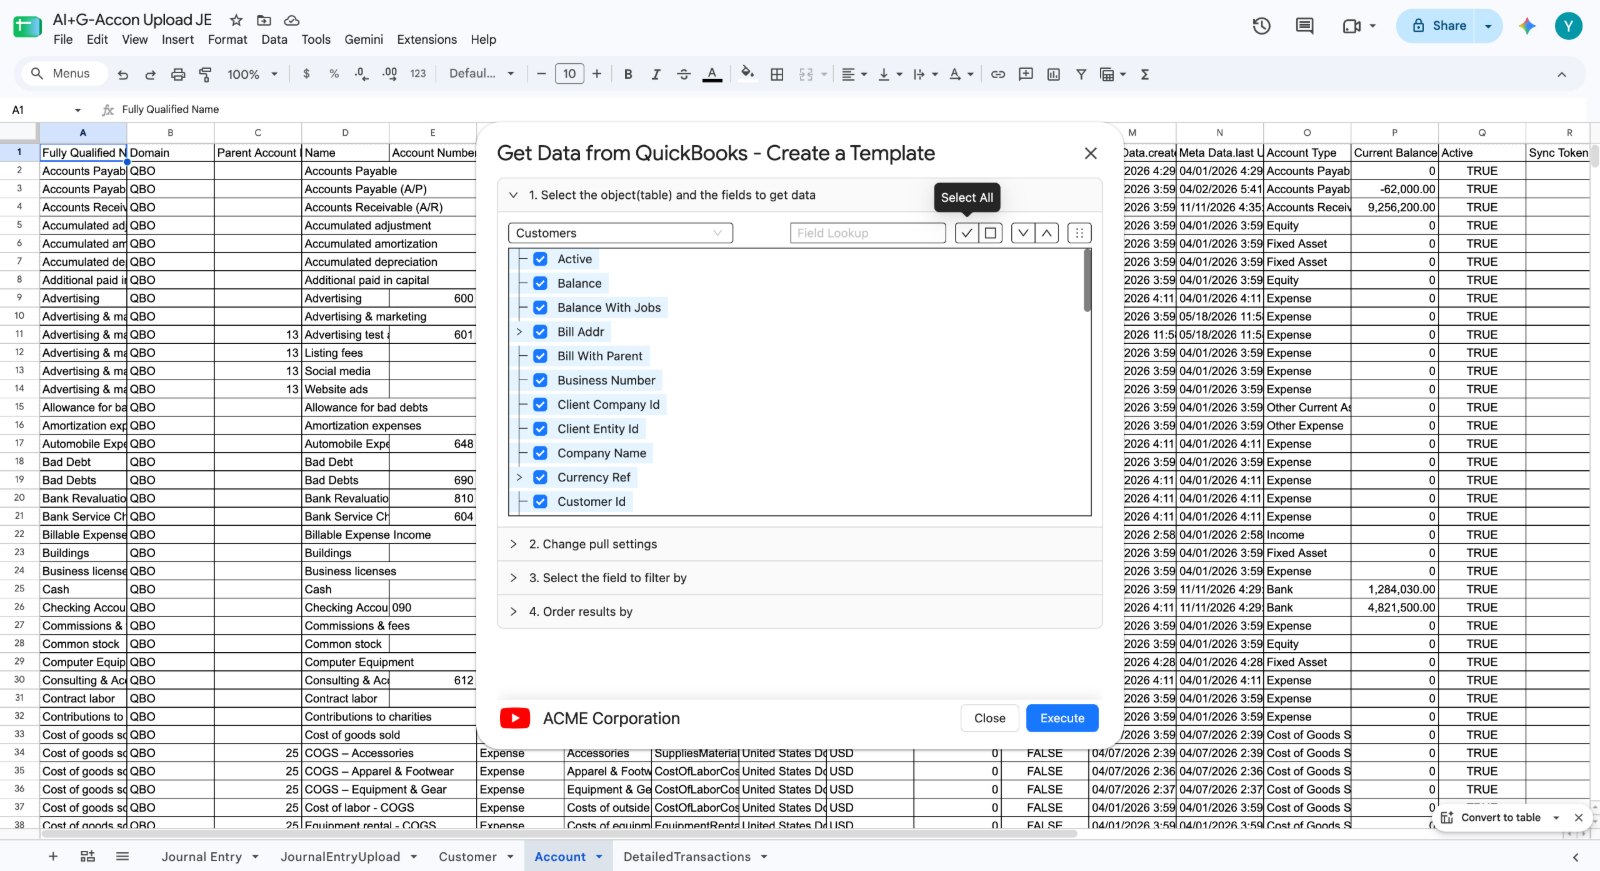
The Get Data from QuickBooks: Create a Template window opens. Under Select the object (table) and the fields to get data, choose Customers and tick the fields you want, such as Active, Balance, Bill Addr, Company Name, Currency Ref and Customer Id. When you're happy with the list, click Execute.
Step 3Review the downloaded customer list
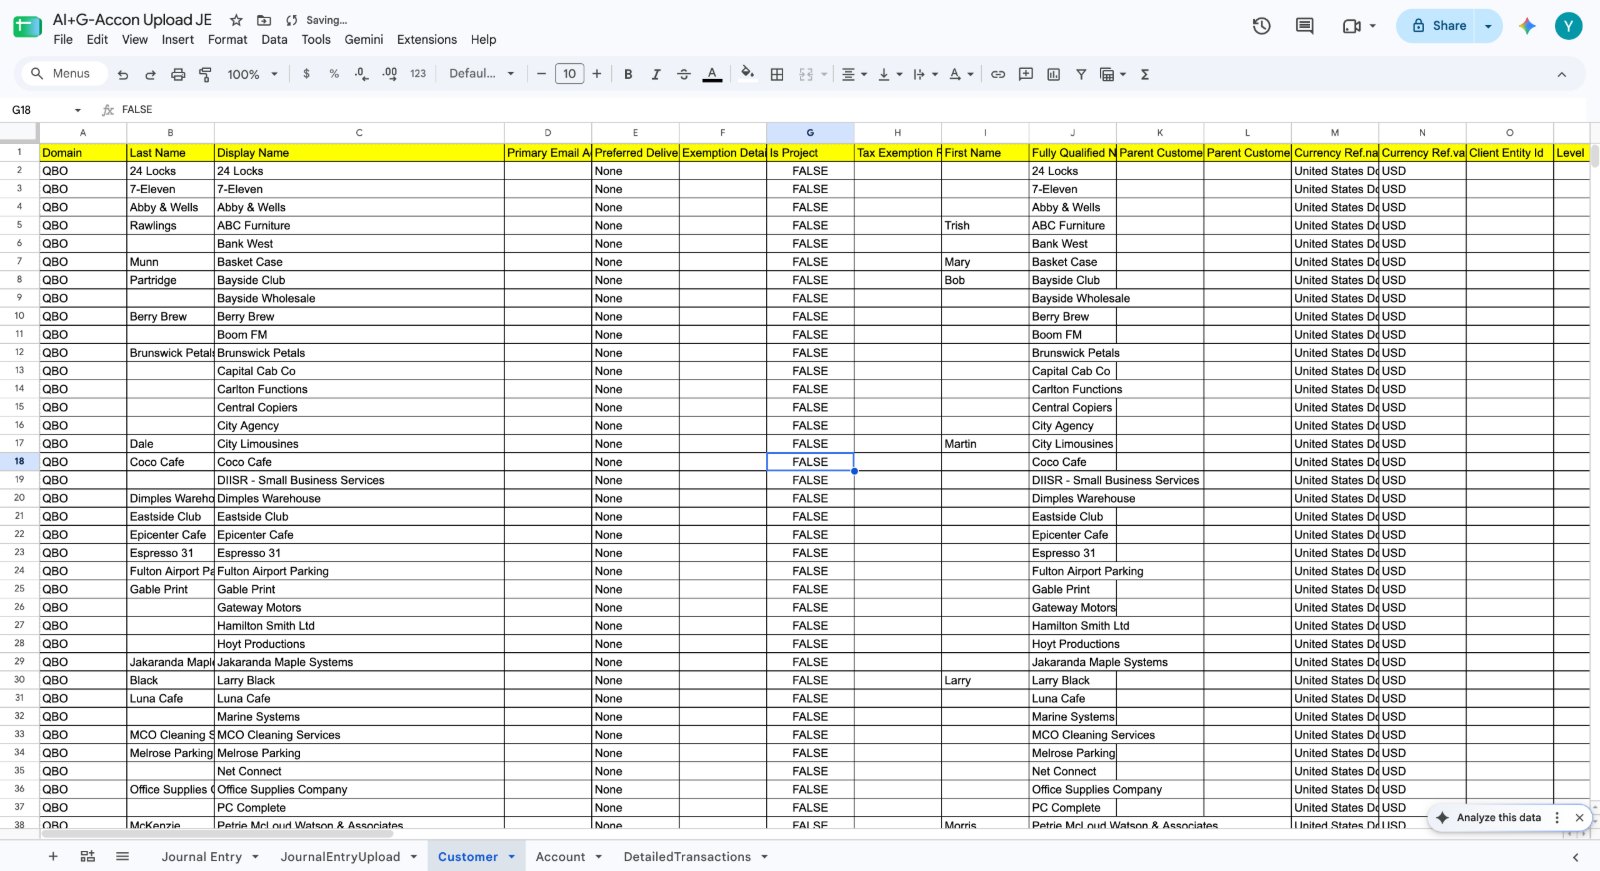
G-Accon drops the customer details straight into the Customer tab, with columns like Display Name, Fully Qualified Name and Currency Ref. You'll use this list later to make sure every journal line points to a real customer.
Step 4Download the Chart of Accounts the same way
Repeat the same process, but pick the Accounts table this time. Your Chart of Accounts lands in the Account tab, so Gemini can check every account name before anything gets uploaded.
Part 2: Prepare and check your journal entries with Gemini
Gemini can build balanced journal entries for you in Google Sheets and check every line against the customers and accounts you just downloaded. You describe what you need, and it does the heavy lifting.
Step 5Start with your journal entry data
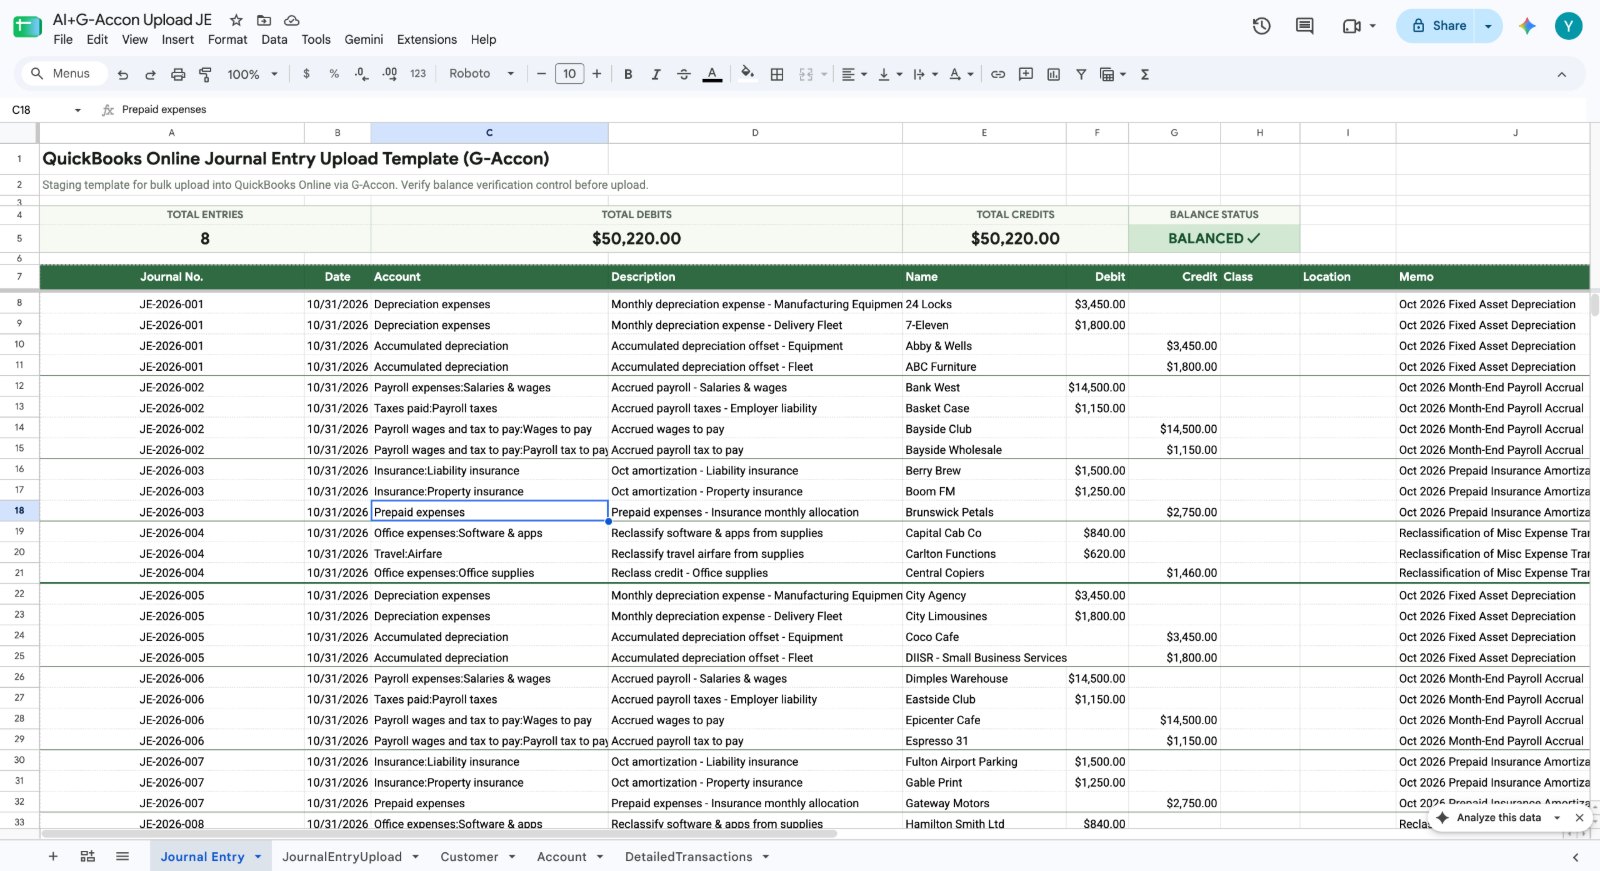
Open the Journal Entry tab. This is your staging area, with columns for Journal No., Date, Account, Description, Name, Debit, Credit, Class, Location and Memo. A summary row at the top shows Total Entries, Total Debits, Total Credits and a Balance Status. Your starting data can come from Shopify, Amazon, other spreadsheets or any outside system.
Step 6Ask Gemini to review and balance the entries
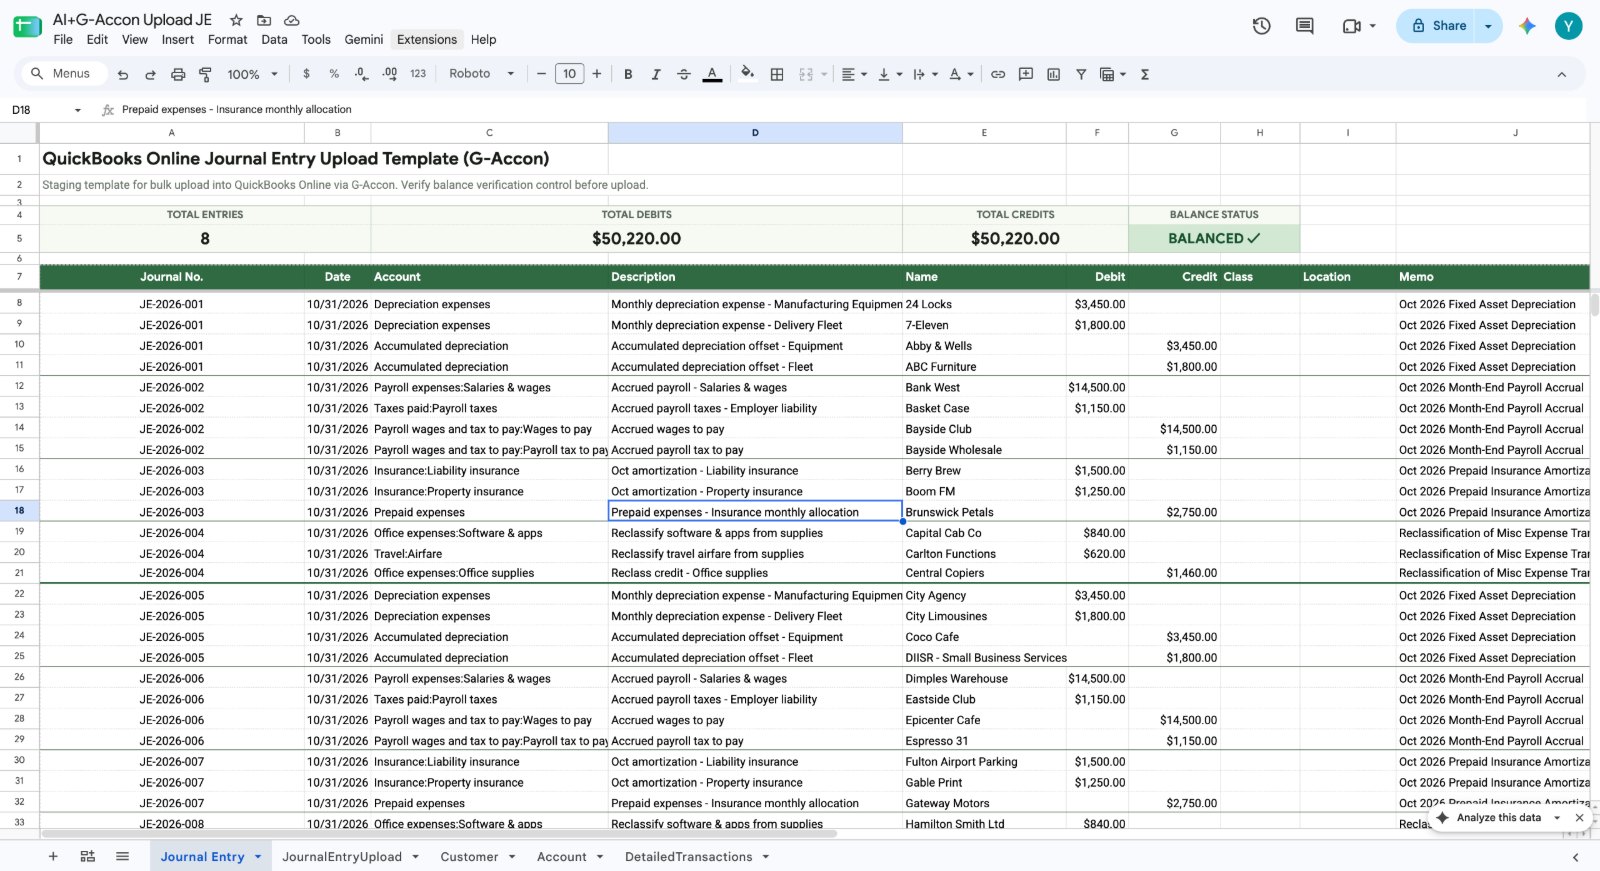
Open Gemini from the toolbar and ask it to review and balance your journal entries so total debits equal total credits. You can also ask it to check your data against the accounts, classes, locations, customers and vendors you downloaded in Part 1, which catches mismatched names before anything reaches QuickBooks.
Step 7Tell Gemini what entries you need
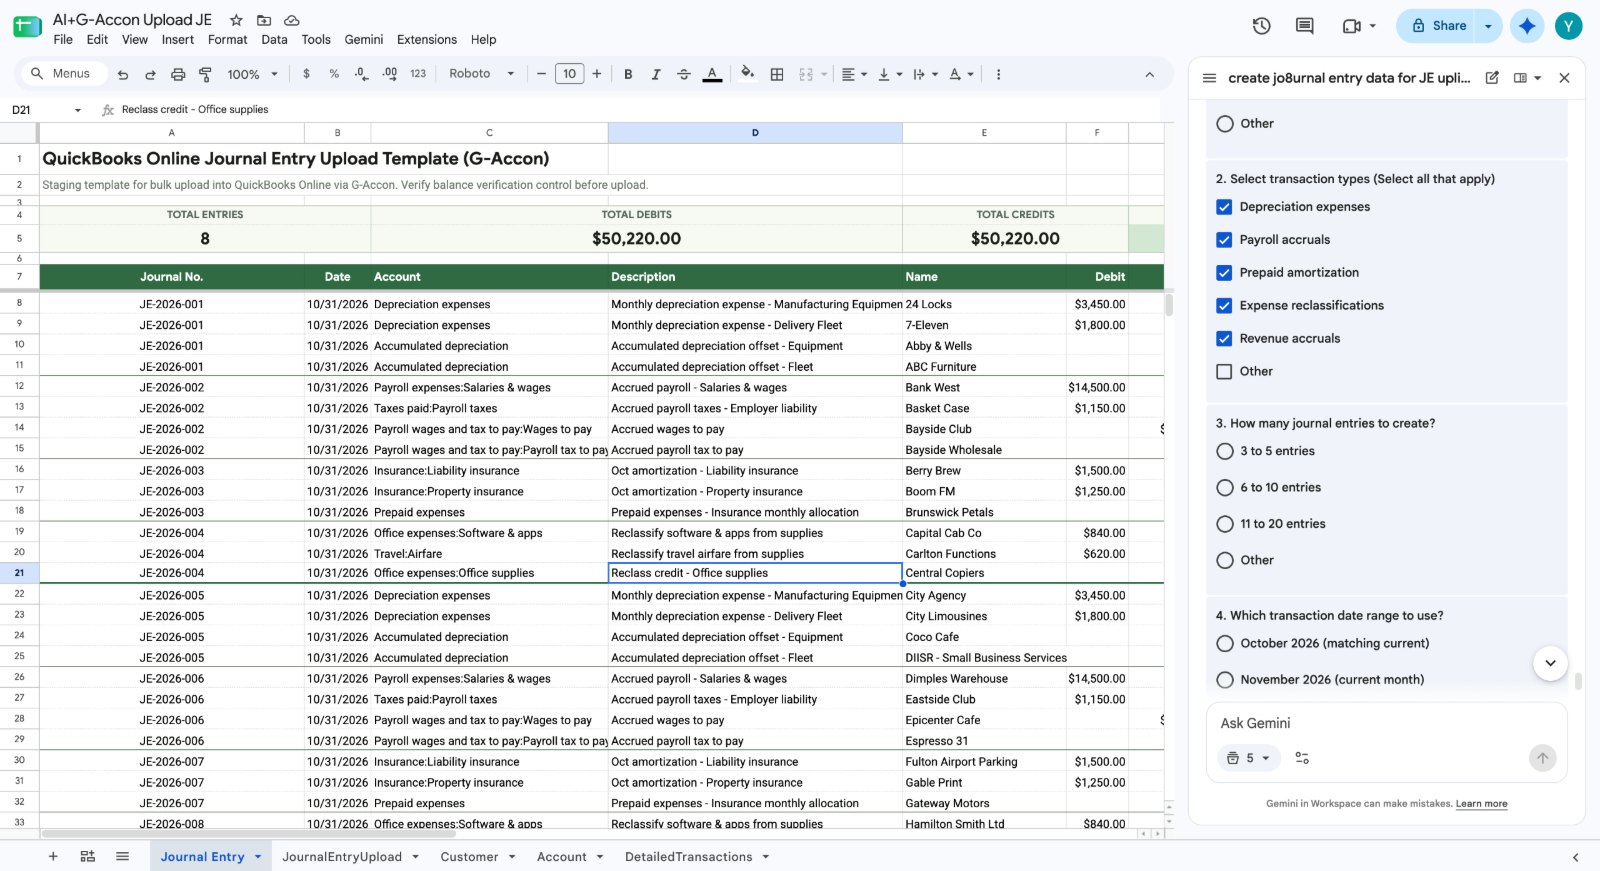
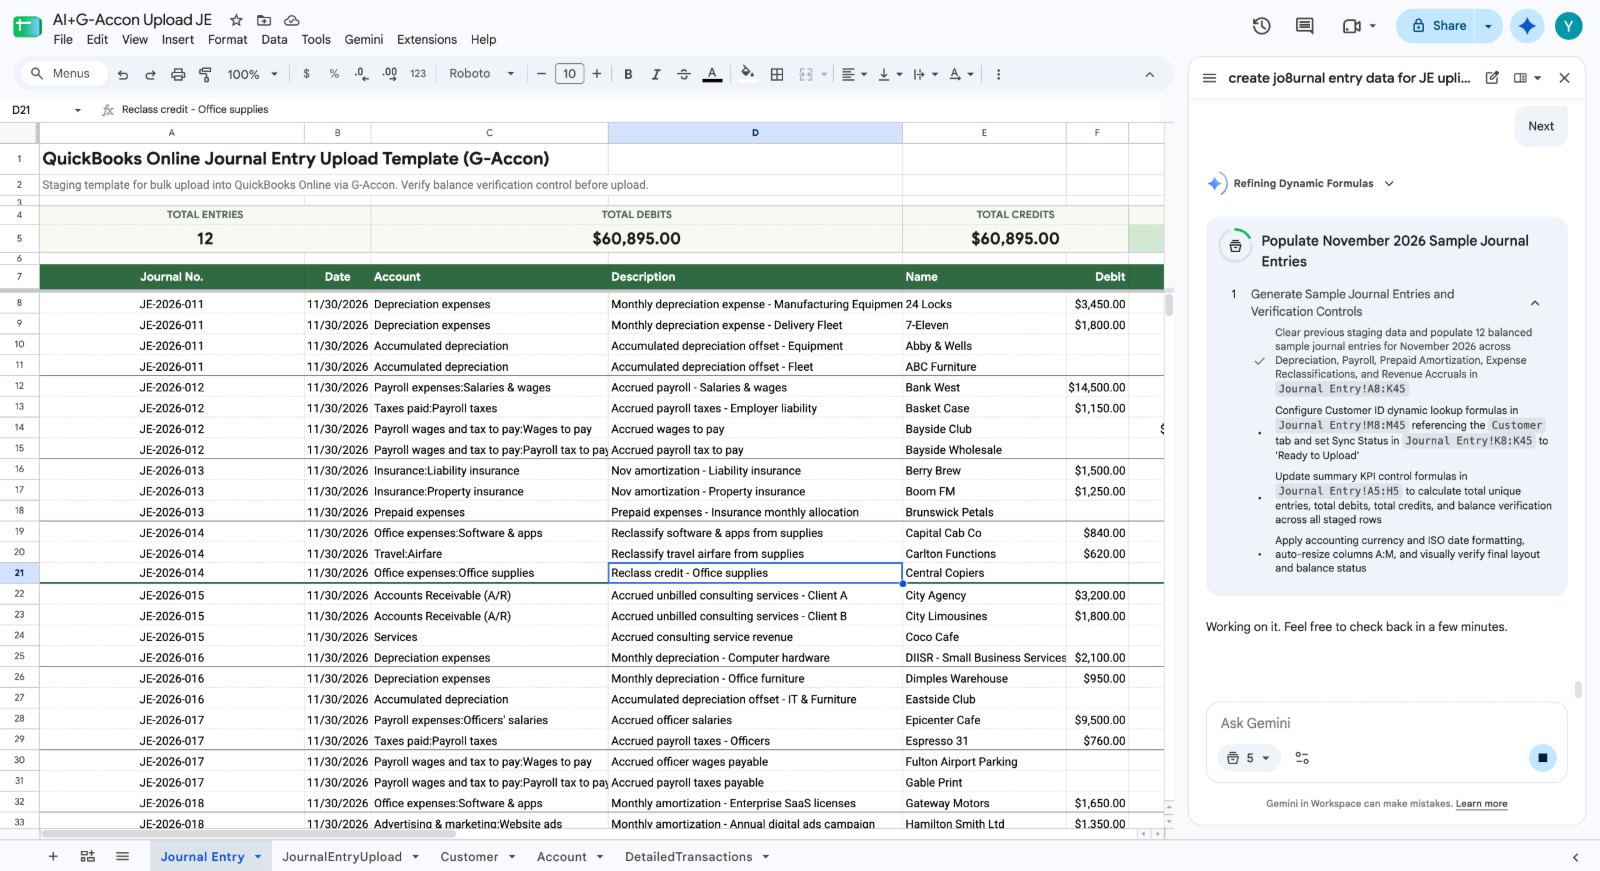
If you need a certain type of transaction, give Gemini a sample of your data and describe the entries you want. In the demo, Gemini comes back with a few quick questions in the side panel. It asks which transaction types to include, how many entries to create and which date range to use, and Depreciation expenses, Payroll accruals, Prepaid amortization, Expense reclassifications and Revenue accruals are all ticked.
Step 8Let Gemini build the entries
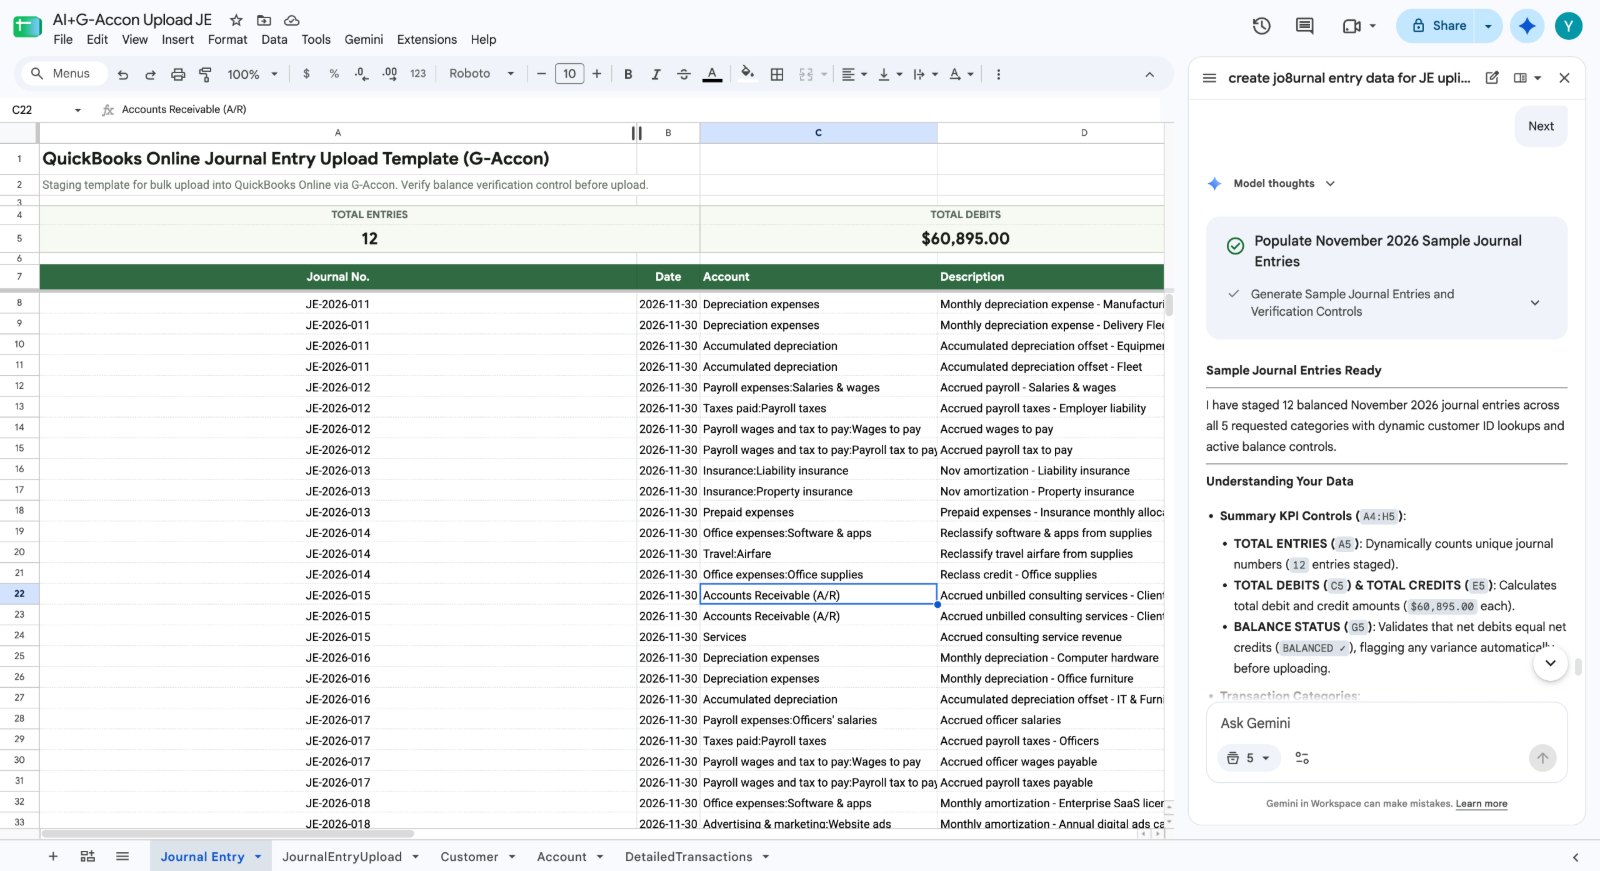
Gemini clears the old staging data and fills the Journal Entry tab with new entries. In the demo, it stages 12 balanced November 2026 entries and adds lookup formulas that match each line to a customer ID. The summary row updates too, so Total Debits and Total Credits both read $60,895.00.
Step 9Confirm the entries are ready
When Gemini finishes, its side panel explains what it built, including the summary totals and the balance check that flags any difference before you upload. At this point your entries are prepared, checked and ready to go.
Part 3: Move the entries into the upload tab
G-Accon uploads from a tab laid out the way QuickBooks expects, so the next job is moving your staged entries into that format. Gemini handles the move with a single prompt.
Step 10Check the Sync Status column
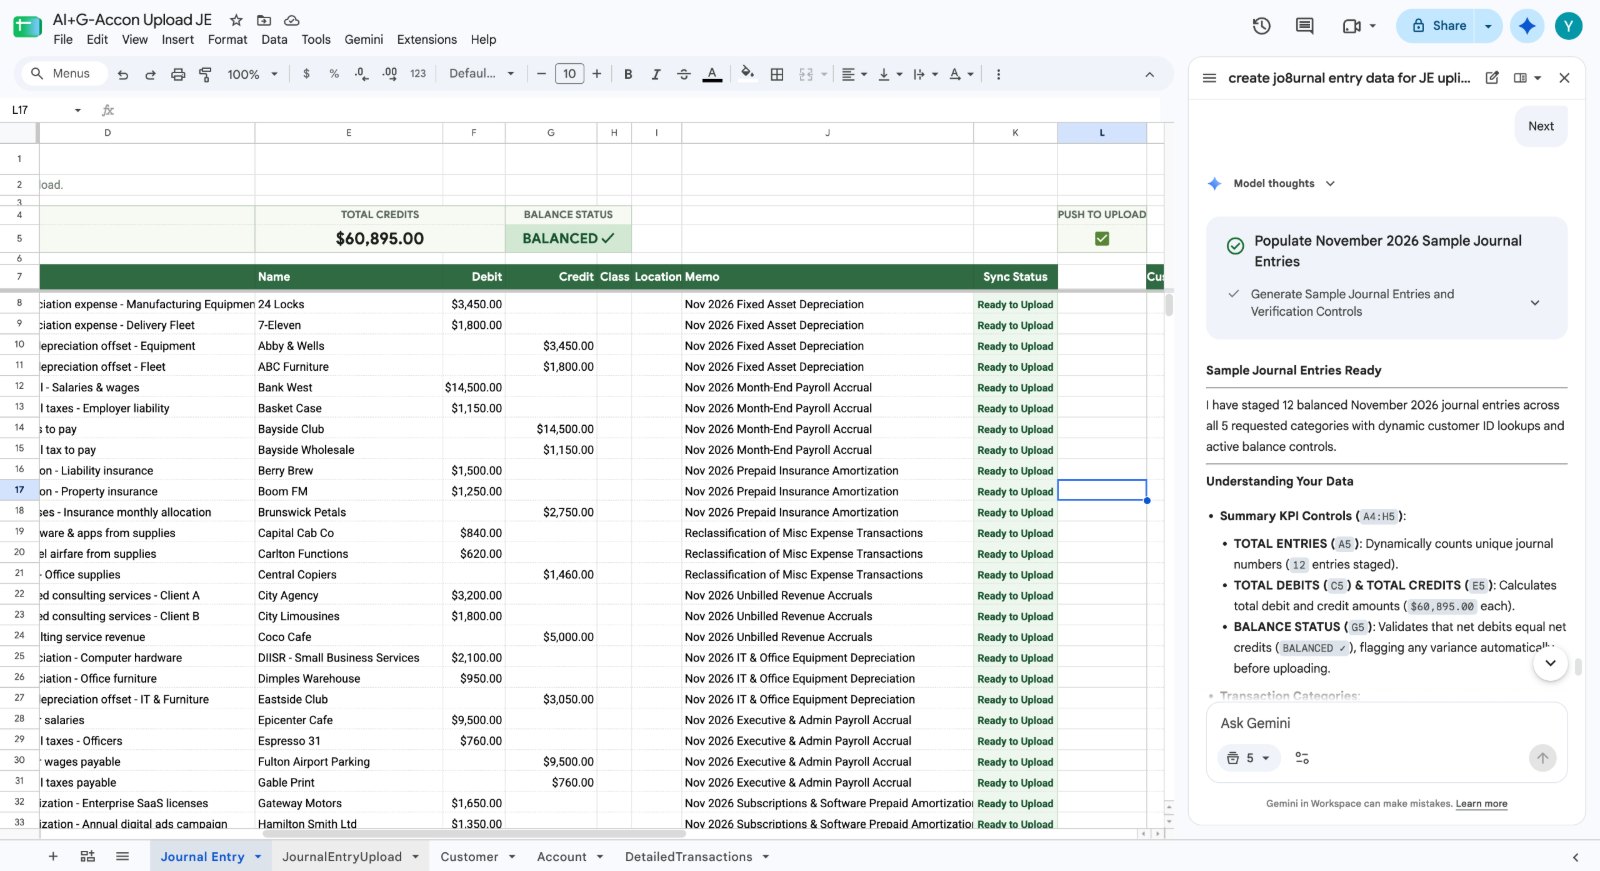
Scroll right on the Journal Entry tab and you'll find a Sync Status column with every line marked Ready to Upload, plus a Push to Upload checkbox near the top. That status tells you the entries are ready to move to the JournalEntryUpload tab.
Step 11Download the Journal Entries template
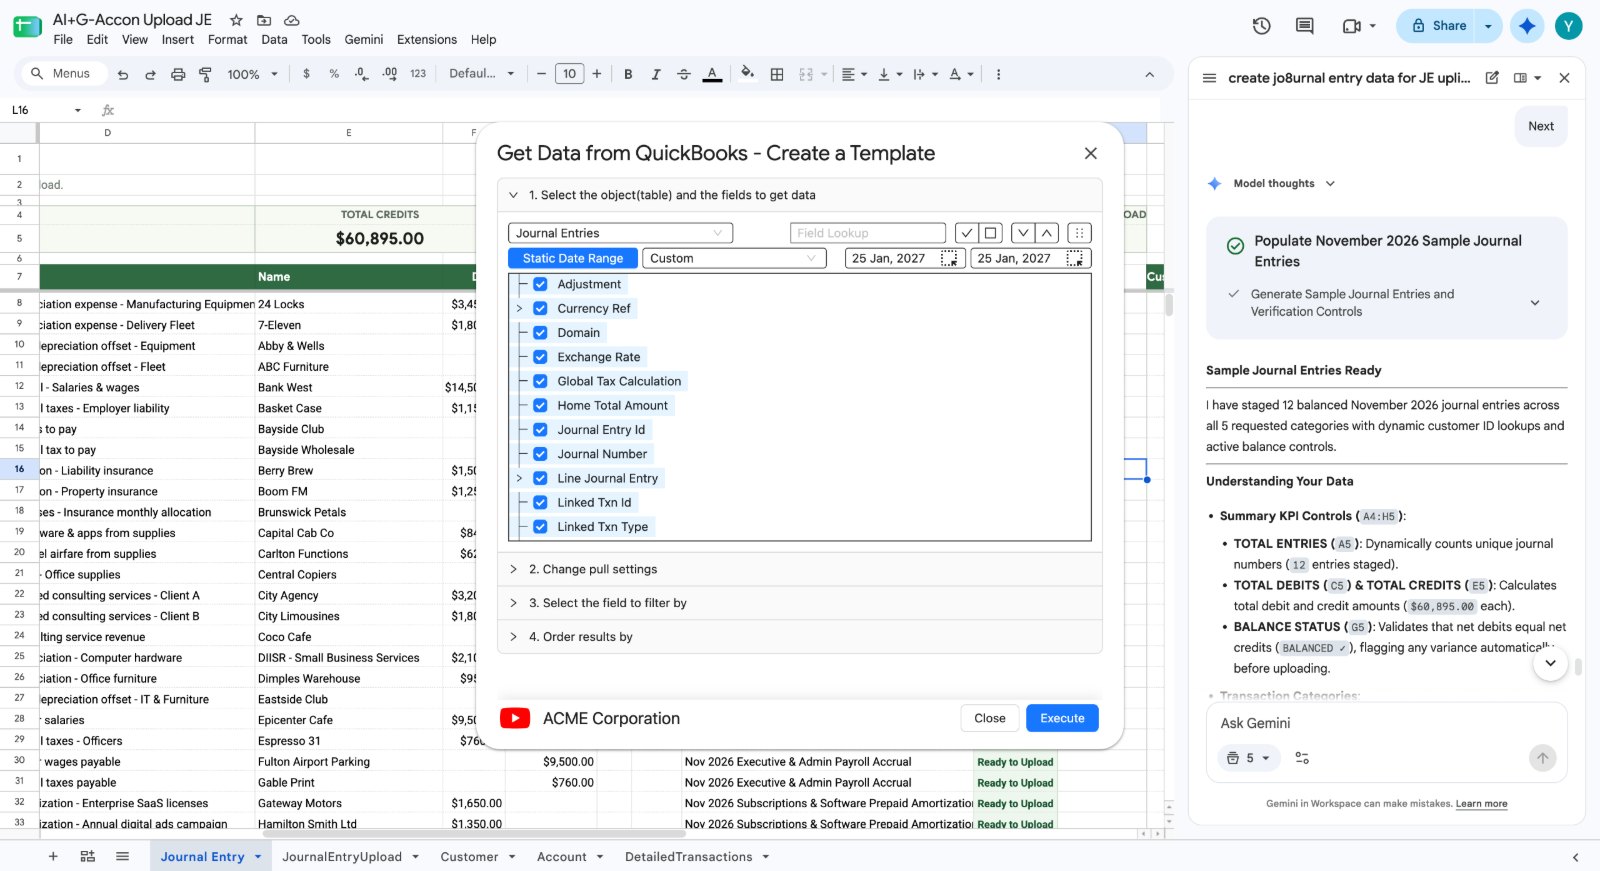
Go back to Get Accounting Data and this time pick Journal Entries as the object.
Tip: Set a custom one-day date range in the future (the demo uses 25 Jan 2027). Since nothing is posted on that date, you get the journal entry column layout without pulling in any of your existing entries.
Step 12Ask Gemini to move the entries
The JournalEntryUpload tab now has the right headers, such as Txn Date, Memo, Total Amount, Journal Number and the line account fields, but it's still empty. Ask Gemini to move the transactions from the Journal Entry tab to the JournalEntryUpload tab. In the demo, the prompt is simply “Transfer Journal Entries to G-Accon Upload Tab”.
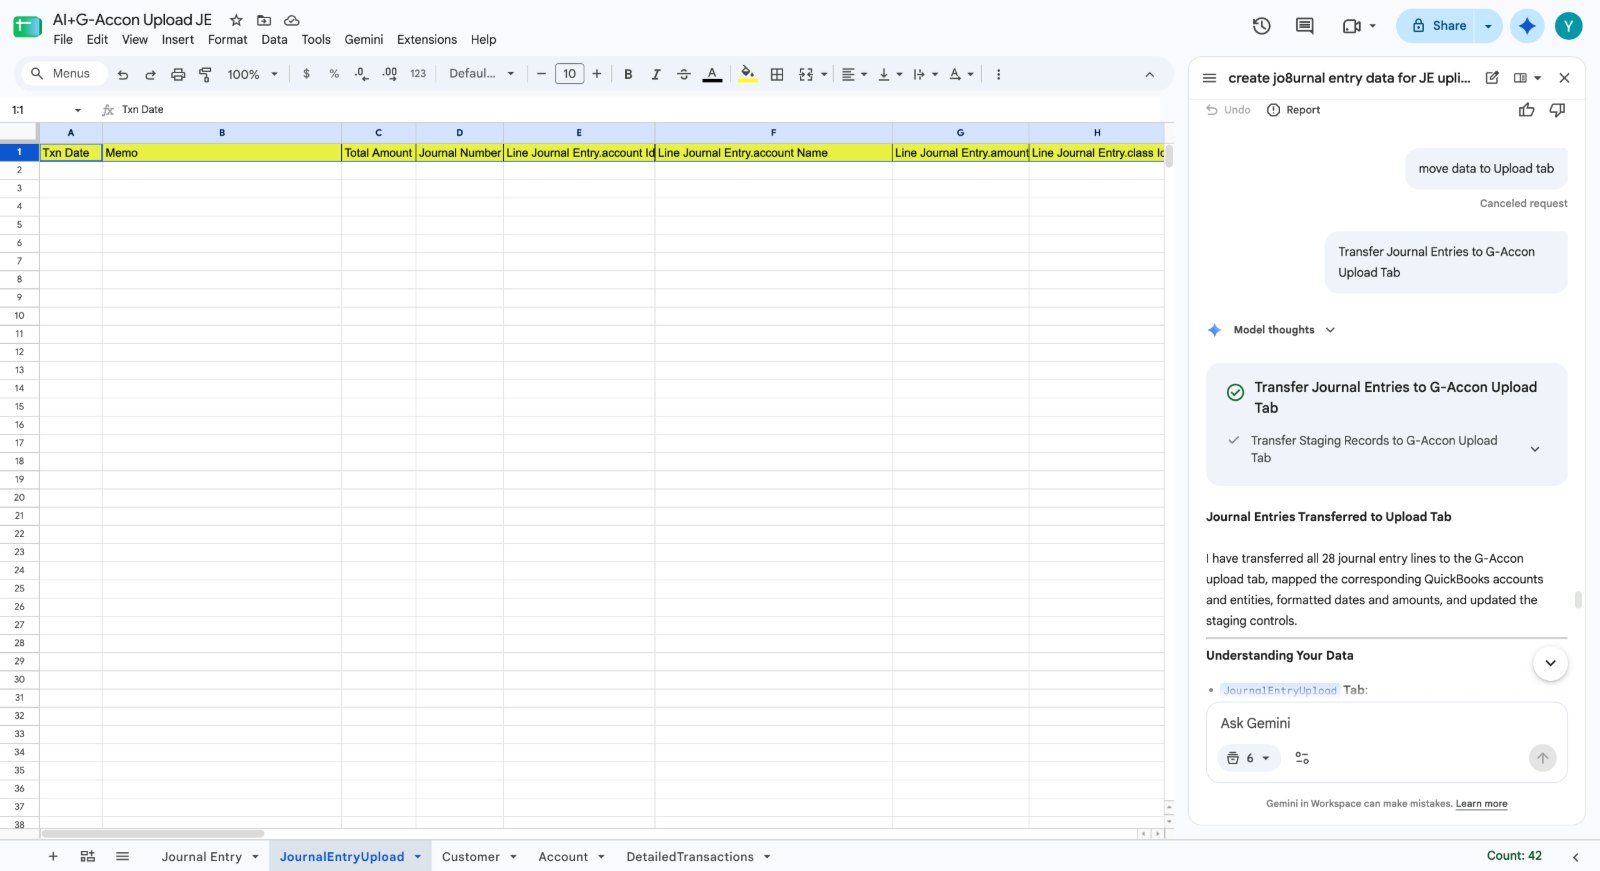
Step 13Review the moved lines
Gemini fills the upload tab, matches each line to the right QuickBooks account and customer, and formats the dates and amounts. In the demo, all 28 journal entry lines come across in one go.
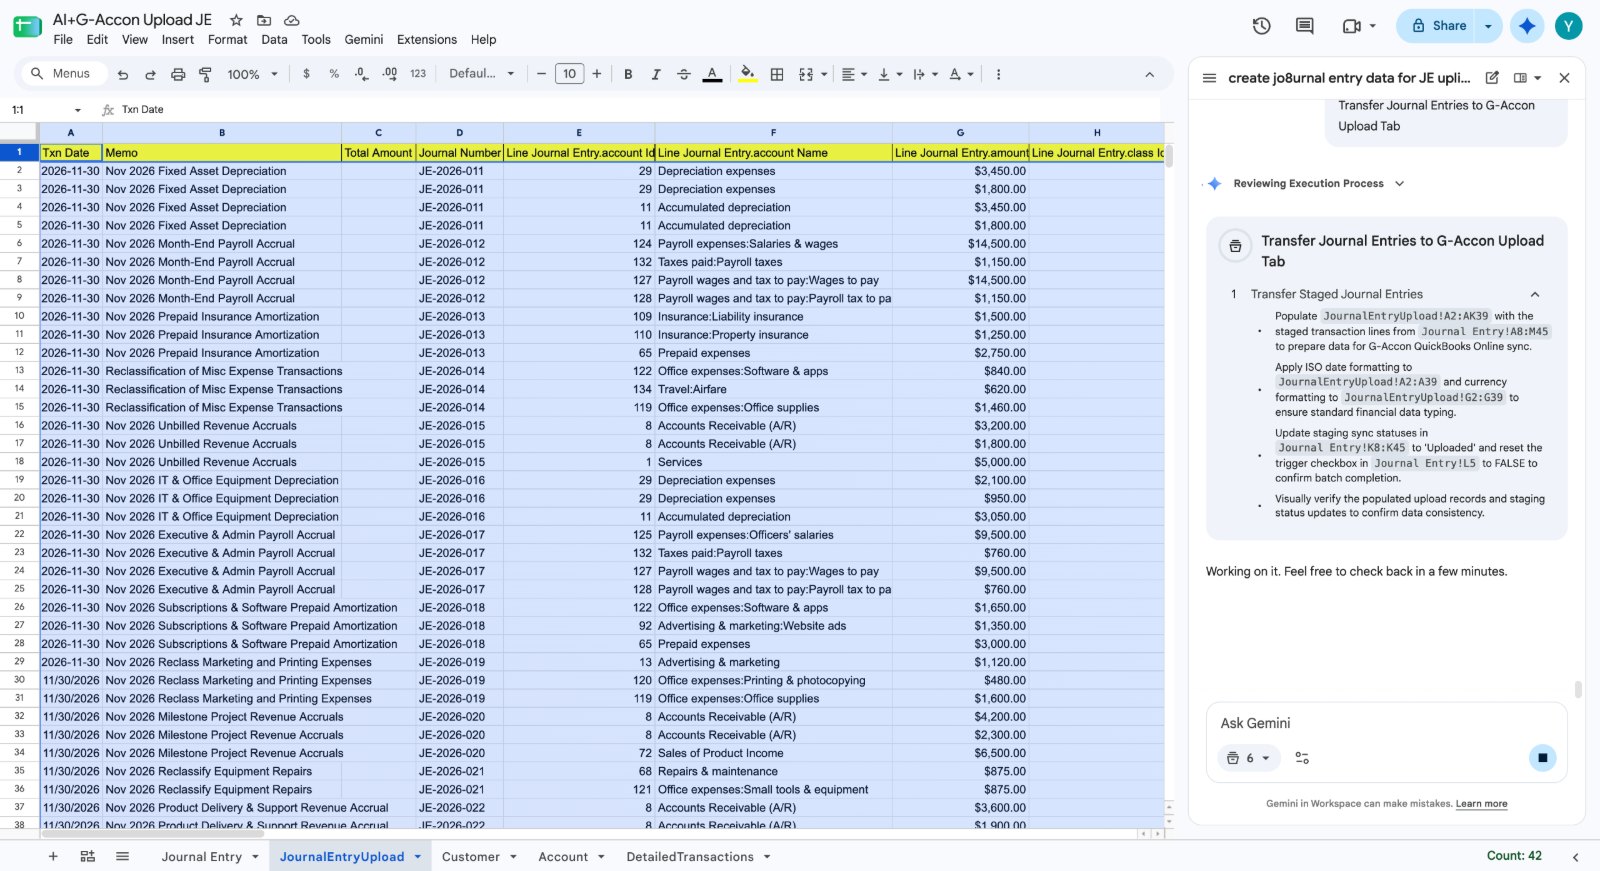
Step 14Watch the status change to Uploaded
Back on the Journal Entry tab, the Sync Status for each line switches from Ready to Upload to Uploaded. That tells you the entries now sit in the JournalEntryUpload tab, so you won't move the same lines twice.
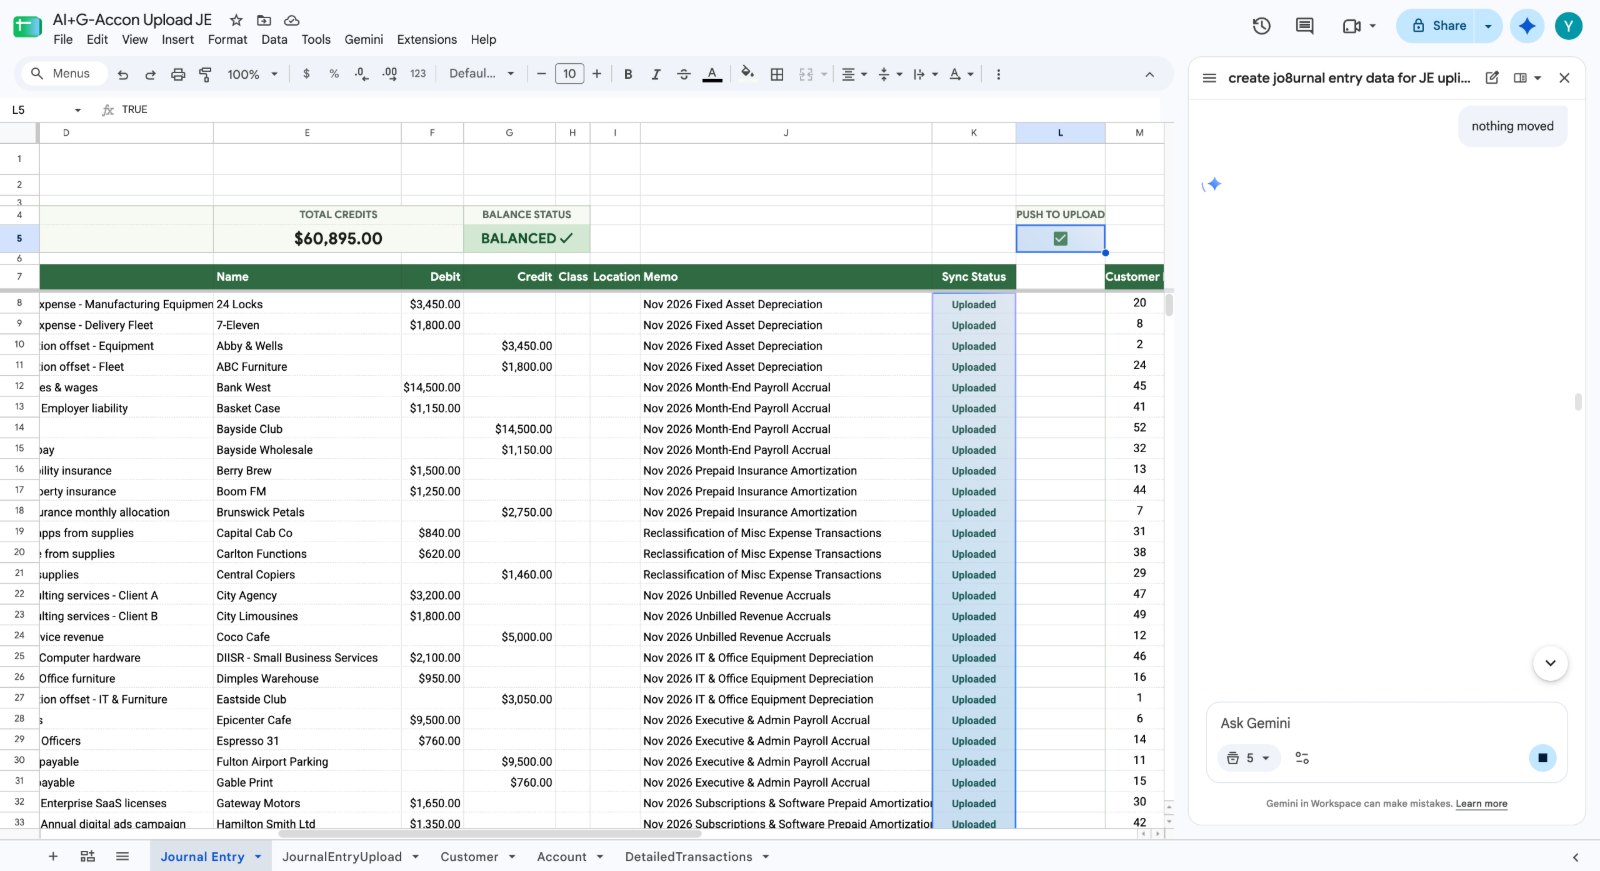
Part 4: Bulk upload journal entries to QuickBooks Online
G-Accon sends every journal entry in the upload tab to QuickBooks Online in one batch, so you never have to create a single entry by hand.
Step 15Open Upload Accounting Data
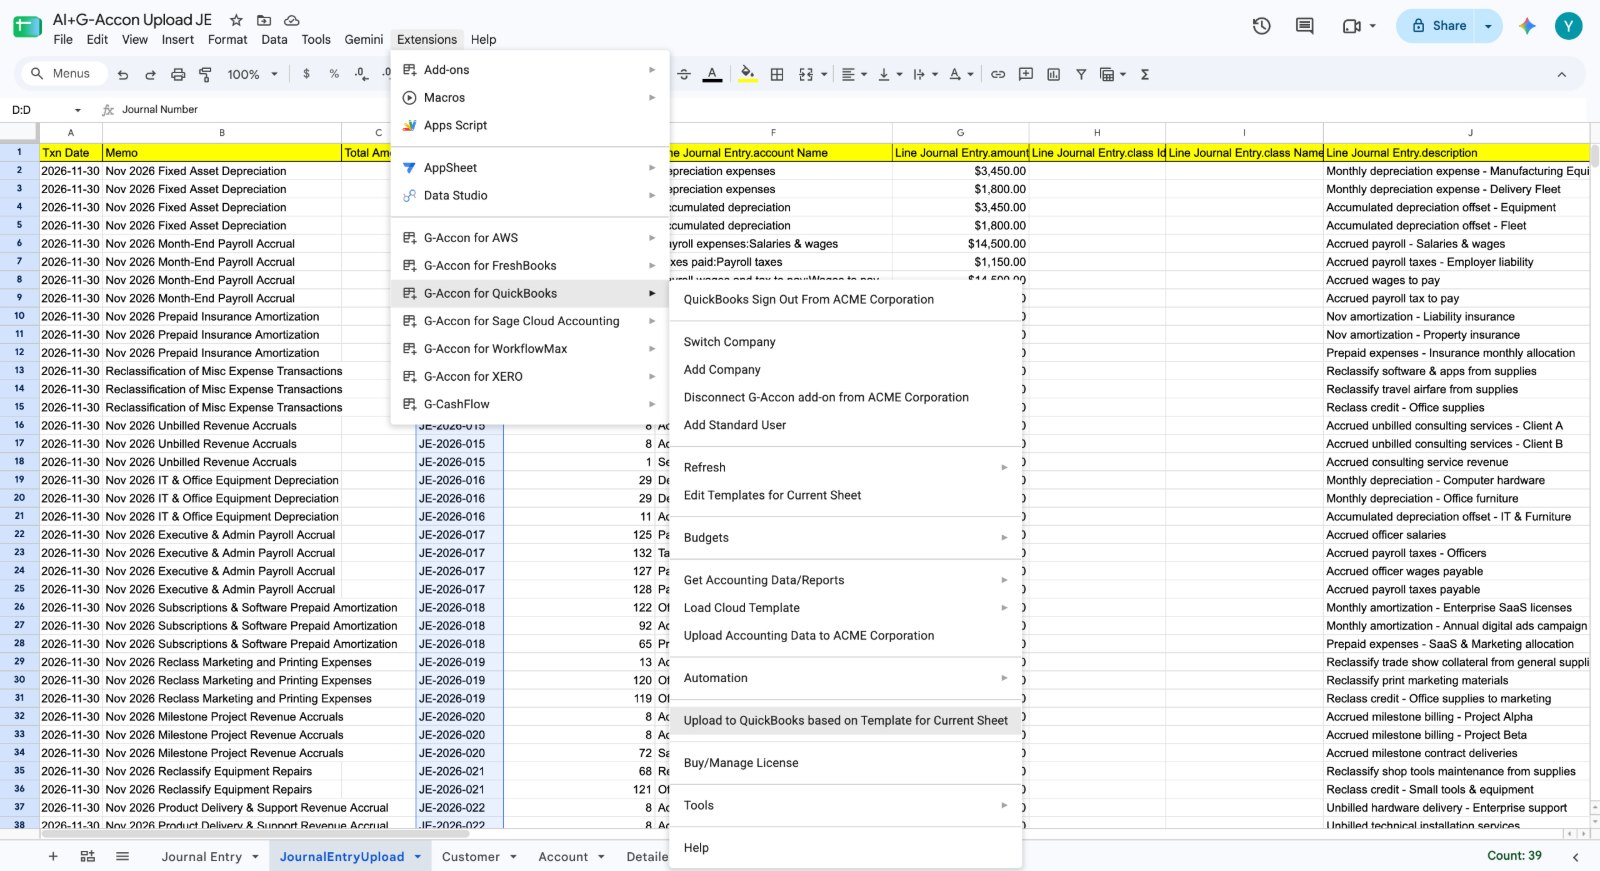
With the JournalEntryUpload tab open, go to Extensions → G-Accon for QuickBooks → Upload Accounting Data. You'll see your own company name at the end of that menu item.
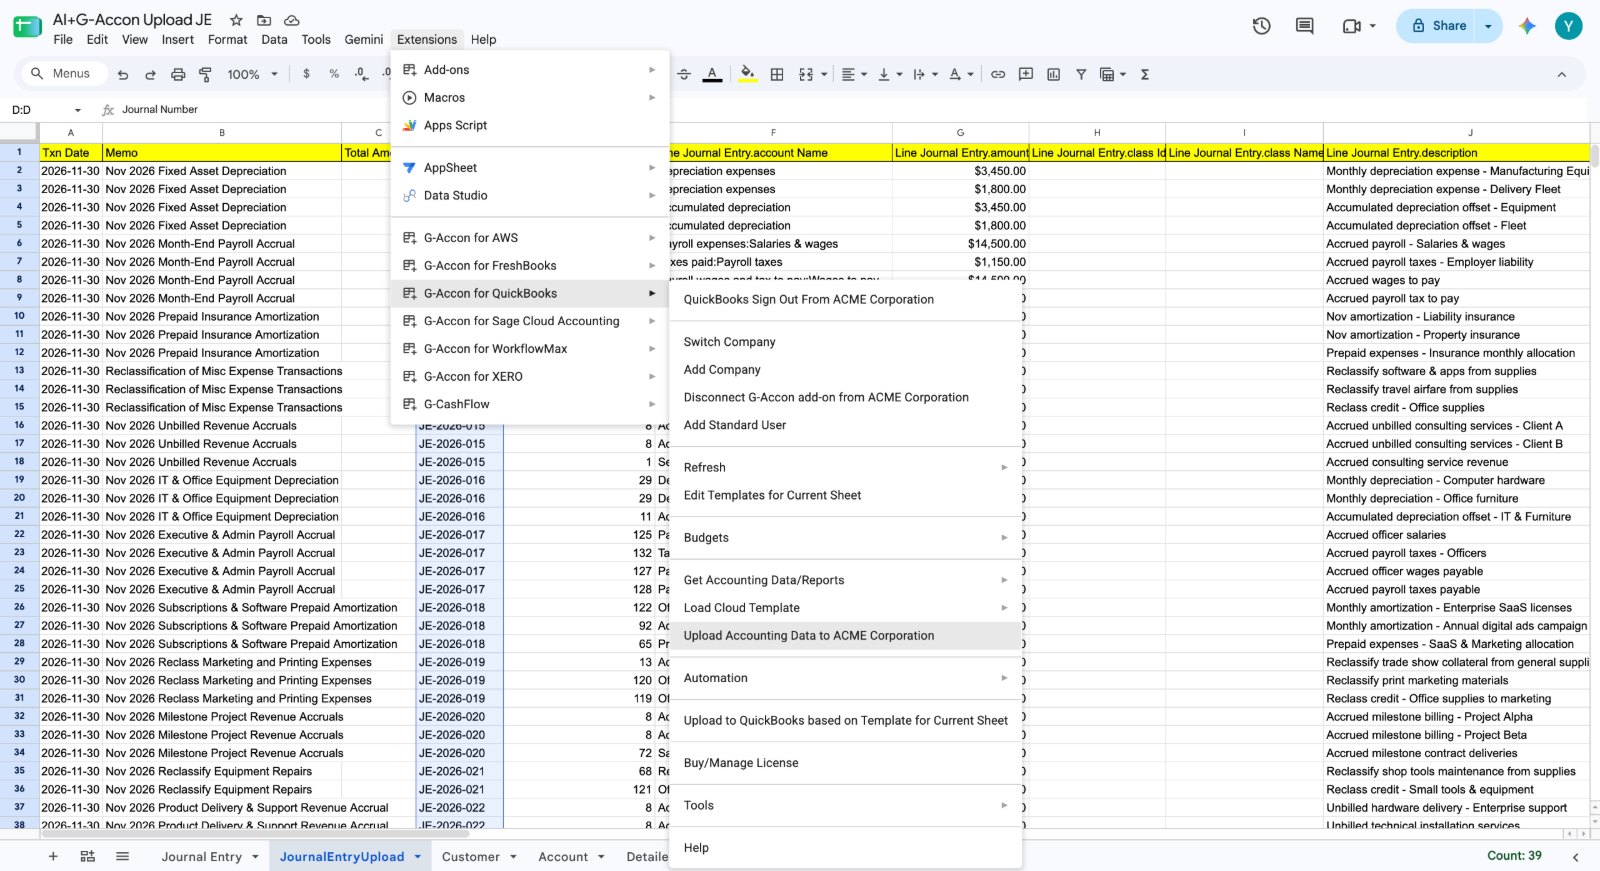
Step 16Map your columns and click Execute and Save
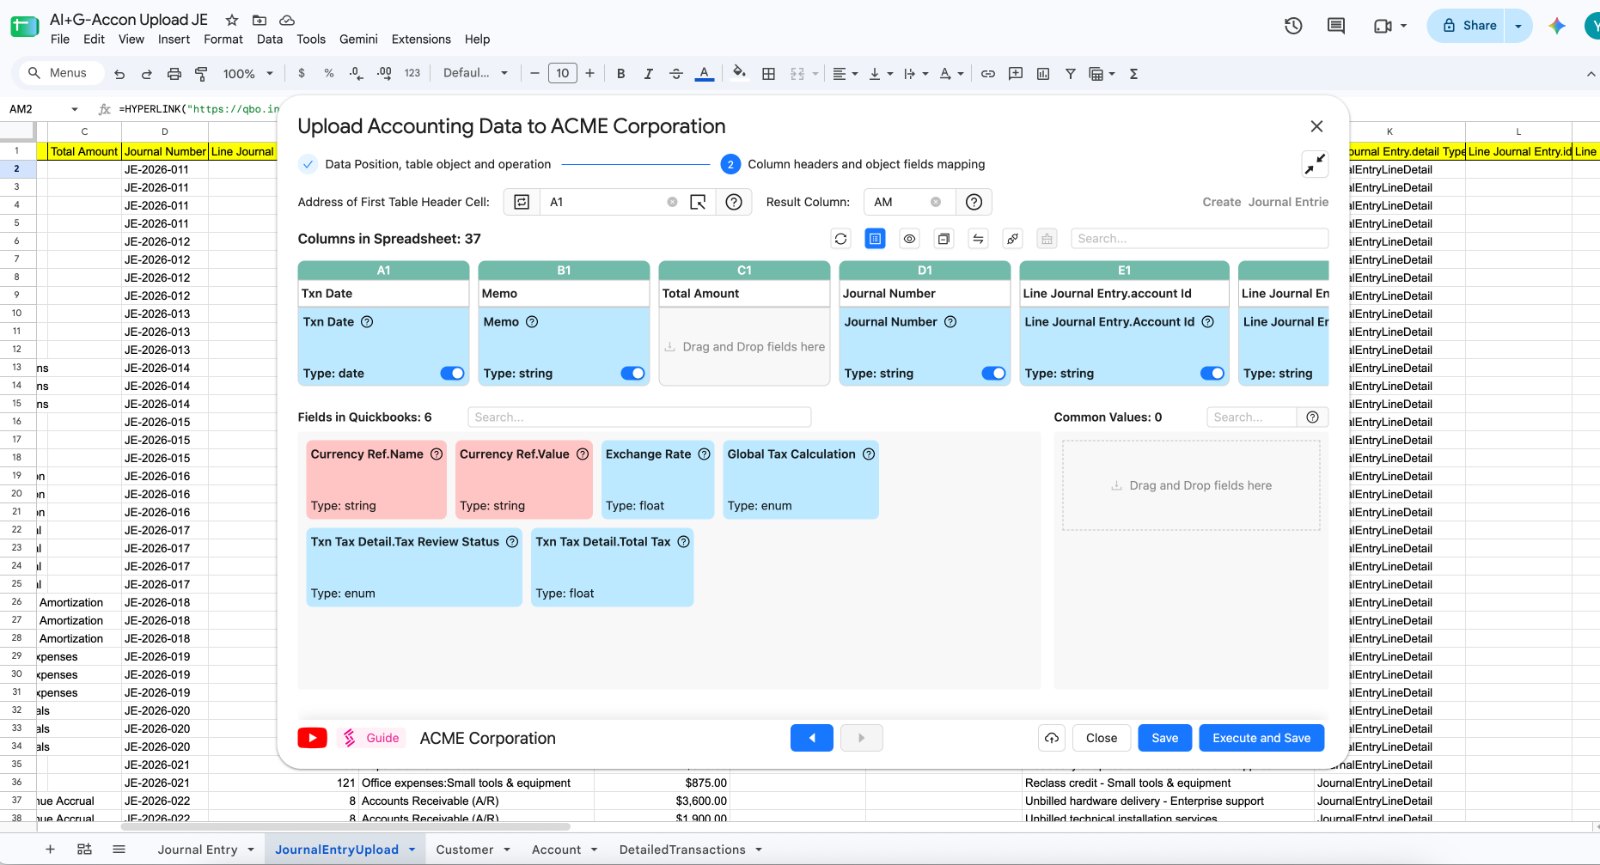
The Upload Accounting Data window shows your spreadsheet columns along the top (37 of them in the demo) and the QuickBooks fields underneath. G-Accon matches them for you, pairing Txn Date with Txn Date, Memo with Memo, Journal Number with Journal Number and so on. You can drag and drop any field that isn't matched yet. Once the mapping looks right, click Execute and Save to bulk upload journal entries to QuickBooks Online in one batch.
Step 17Speed up future uploads (optional)
Because you saved the mapping, you won't need to set it up again next month. Pick Upload to QuickBooks based on Template for Current Sheet from the same menu, or open Automation to schedule the upload so it runs on its own.
Part 5: Check the upload
G-Accon writes a QuickBooks Journal Entry ID back next to every line it uploads, so you can confirm each entry made it into the books. That quick check also gives your reviewer peace of mind.
Step 18Check the Journal Entry IDs
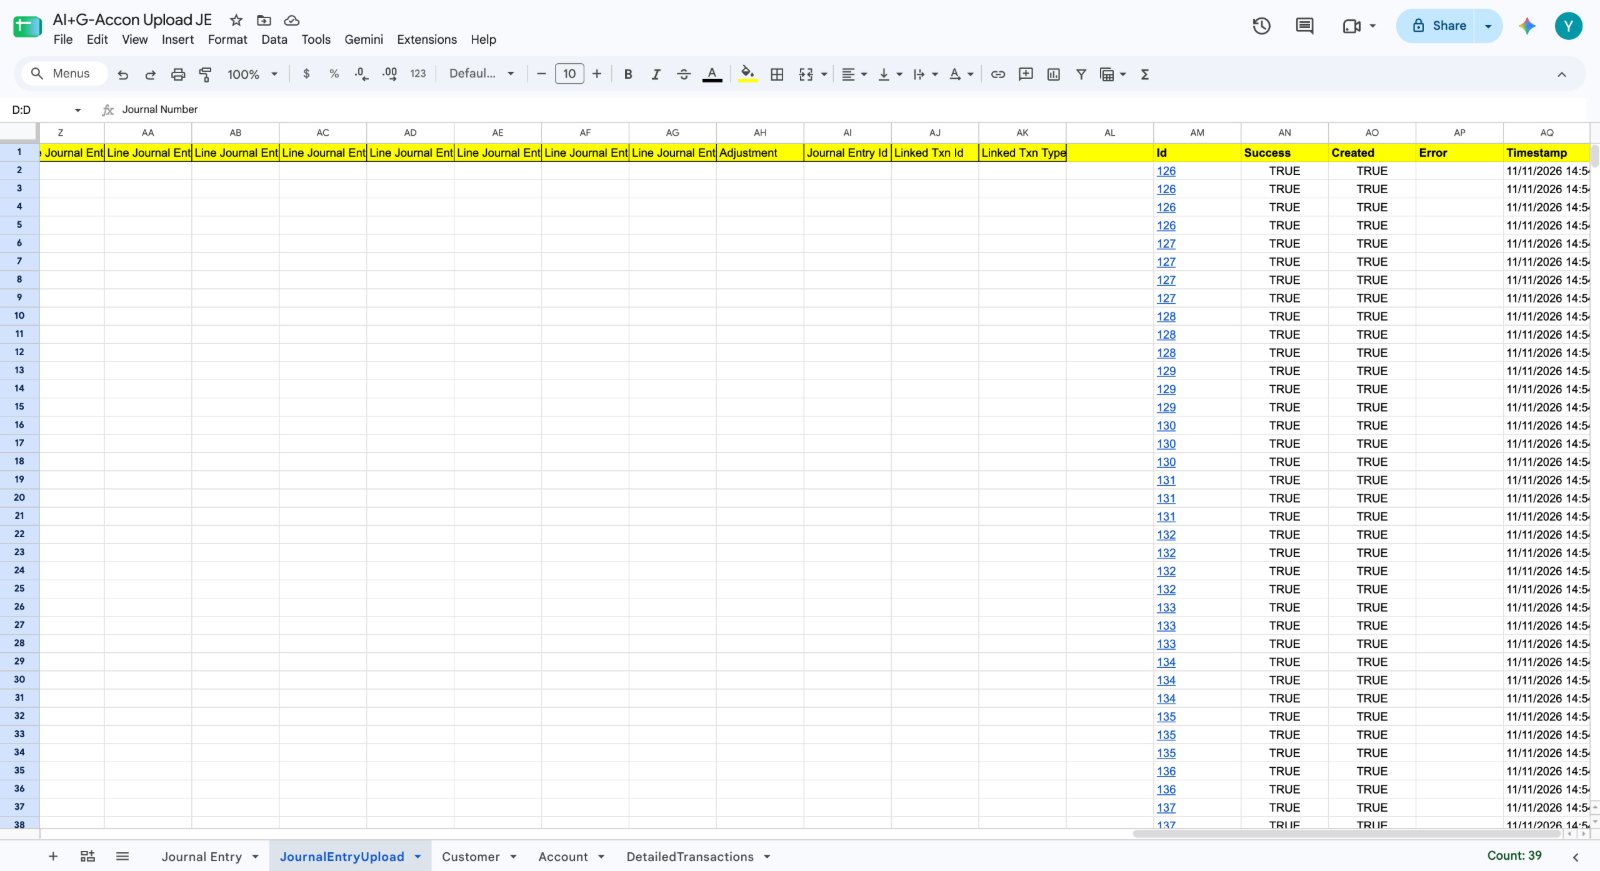
Scroll to the far right of the JournalEntryUpload tab. For every line that uploaded, G-Accon writes back a QuickBooks Journal Entry ID in the Id column, along with TRUE under Success and Created and a timestamp. Hover over any ID and click the link to jump straight to that entry in QuickBooks Online.
Step 19Open the entry in QuickBooks Online
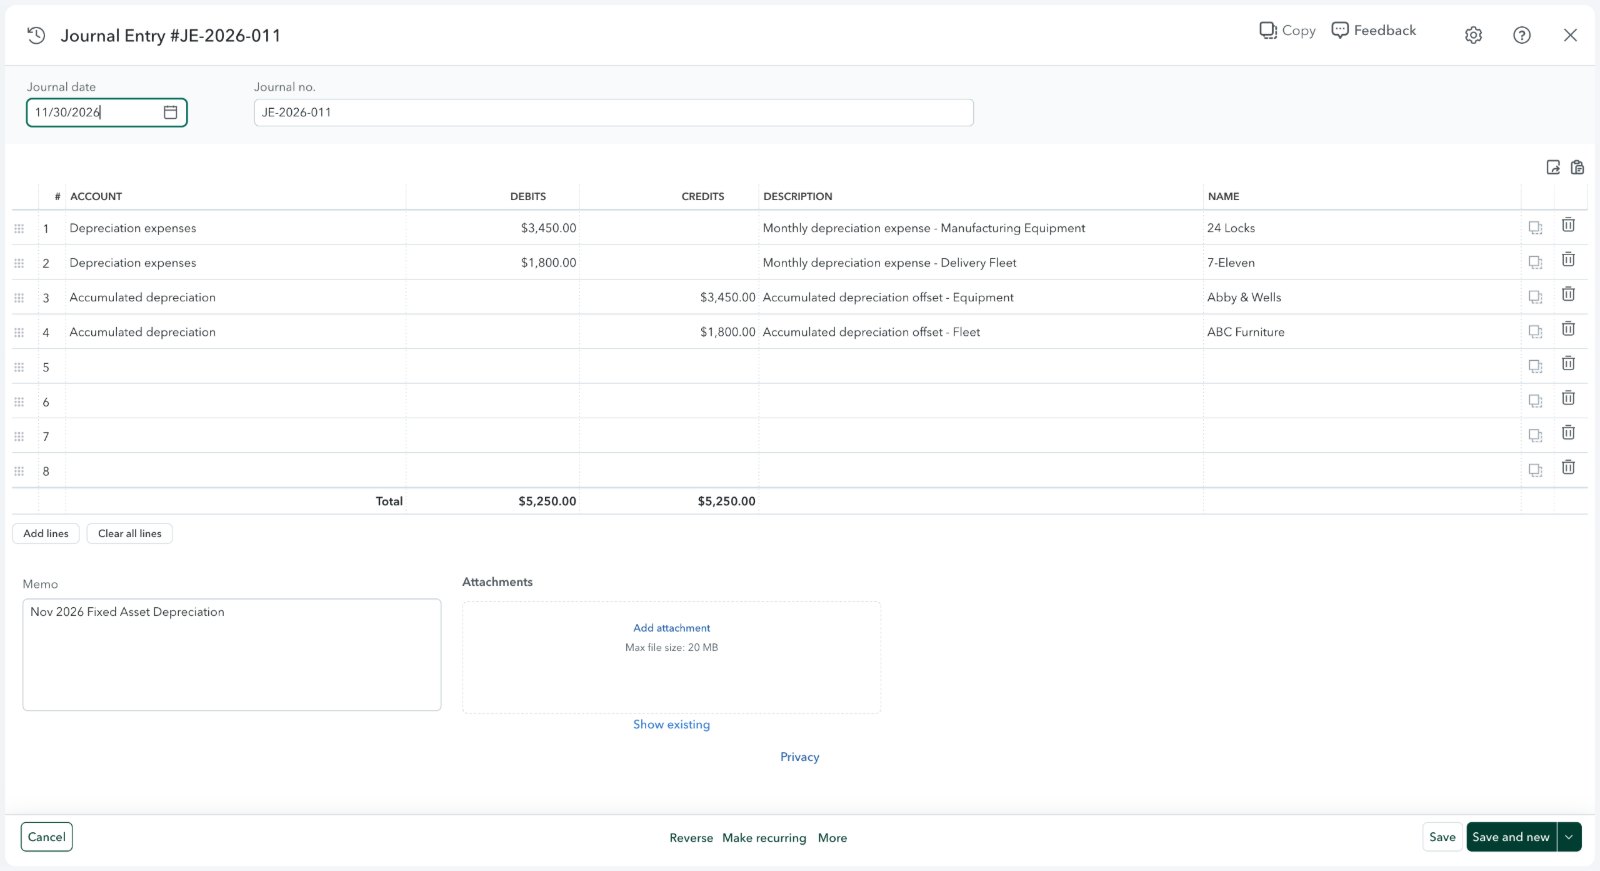
The link opens the journal entry inside QuickBooks Online. In the demo, Journal Entry #JE-2026-011 shows four lines for November 2026 fixed asset depreciation, with $5,250.00 in debits and $5,250.00 in credits, and the memo carried across from your sheet.
Step 20Run a Detailed Transactions report
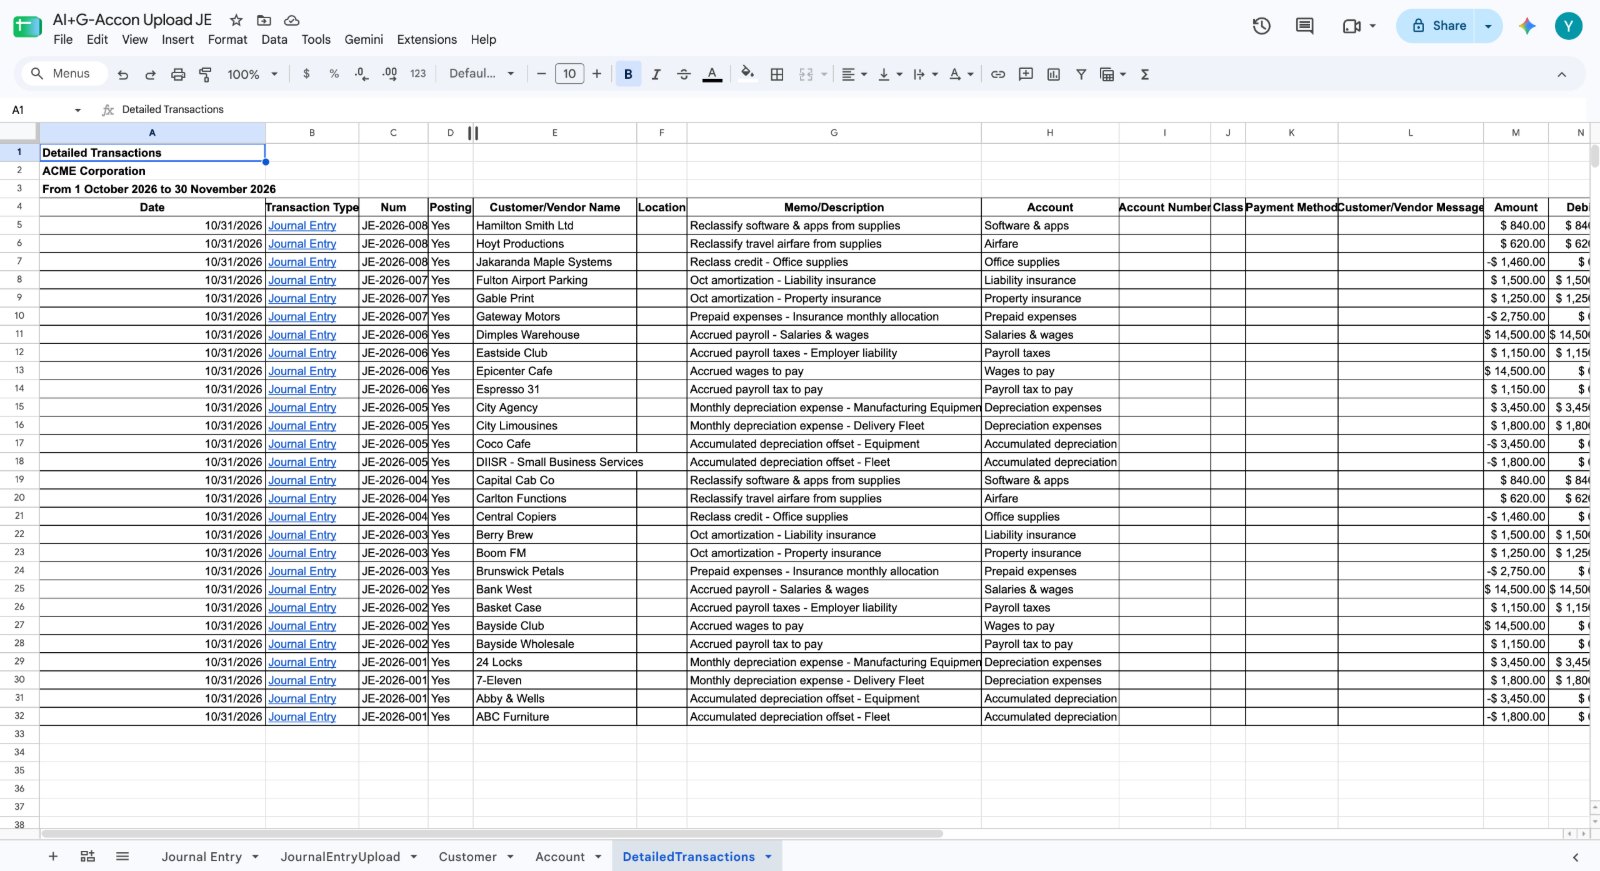
To review the whole batch at once, run a Detailed Transaction Report for your date range. It lands in the DetailedTransactions tab and lists each journal entry with its date, type, number, name, memo, account and amount.
Step 21Refresh the report or automate it
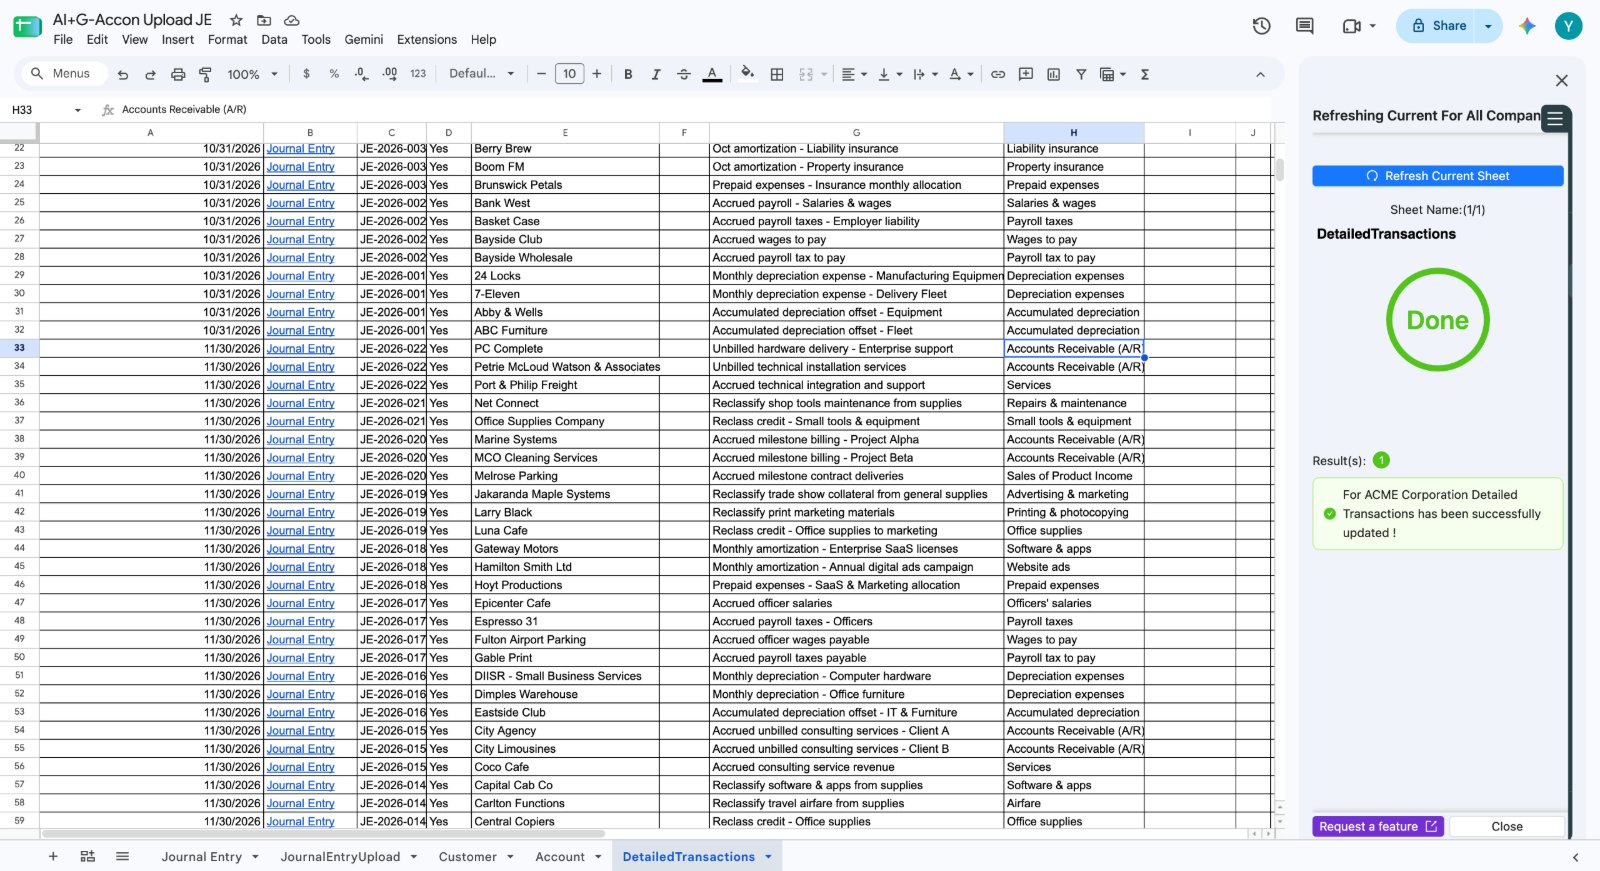
Whenever you upload new transactions, click Refresh Current Sheet in the G-Accon panel to pull in the latest data. If you'd rather not think about it, set up automated refreshes and G-Accon will update the report on whatever schedule you choose.
Wrapping up
That's how you bulk upload journal entries to QuickBooks Online without leaving Google Sheets. You bring your transaction data into Sheets, let Gemini prepare and check the journal entries against your real QuickBooks accounts and customers, then use G-Accon to upload them in bulk and confirm they arrived, all without leaving Google Sheets. Once the mapping is saved and automation is on, next month's close mostly comes down to reviewing what Gemini built and clicking upload.
Already have your entries prepared and just need to send them across? Our guide on how to import journal entries into QuickBooks from Google Sheets covers that shorter route.
Frequently asked questions
Can you bulk upload journal entries to QuickBooks Online from Google Sheets?
Yes. With the G-Accon add-on, you stage your entries in a Google Sheets tab, map the columns to QuickBooks fields once and click Execute and Save. G-Accon then creates every journal entry in QuickBooks Online in one batch.
Can Gemini create journal entries in Google Sheets?
Yes. Gemini opens as a side panel in Google Sheets. Give it a sample of your data and describe the entries you need, and it can build them, balance debits and credits, and check each line against the accounts and customers you downloaded from QuickBooks.
How do I make sure my journal entries balance before I upload them?
Ask Gemini to review and balance the entries so total debits equal total credits. The upload template also shows Total Debits, Total Credits and a Balance Status at the top, so you can spot a gap before anything reaches QuickBooks.
How do I know my journal entries uploaded correctly?
G-Accon writes a QuickBooks Journal Entry ID back to your sheet for every line it uploads, with TRUE under Success and a timestamp. Click any ID to open that entry in QuickBooks Online, or run a Detailed Transactions report to review the whole batch.
Can I automate monthly journal entry uploads to QuickBooks Online?
Yes. Once you save your column mapping, pick Upload to QuickBooks based on Template for Current Sheet next month, or use G-Accon's Automation option to schedule the upload so it runs on its own.
What do I need to get started?
You need the G-Accon for QuickBooks add-on connected to your QuickBooks Online company, access to Gemini in Google Workspace and your raw journal entry data. A staging template, like G-Accon's QuickBooks Online Journal Entry Upload Template, keeps everything organized.
Ready to automate your journal entries?
See it running on your own data with the QuickBooks Online Journal Entry Upload Template.