TL;DR
To build Xero reports in Google Sheets, open Formatted Reports in G-Accon for Xero, pick your report and date range, then filter and style it before you click Execute. The same new layout also handles Custom Reports and consolidated reports across more than one Xero organisation.
Xero is very good at keeping the numbers right, but it was never designed to make them look like your firm's work. The reports it gives you are accurate and fairly plain, so anyone who presents financials to clients ends up rebuilding them in a spreadsheet, adding headers, groupings and a bit of polish before they're ready to share.
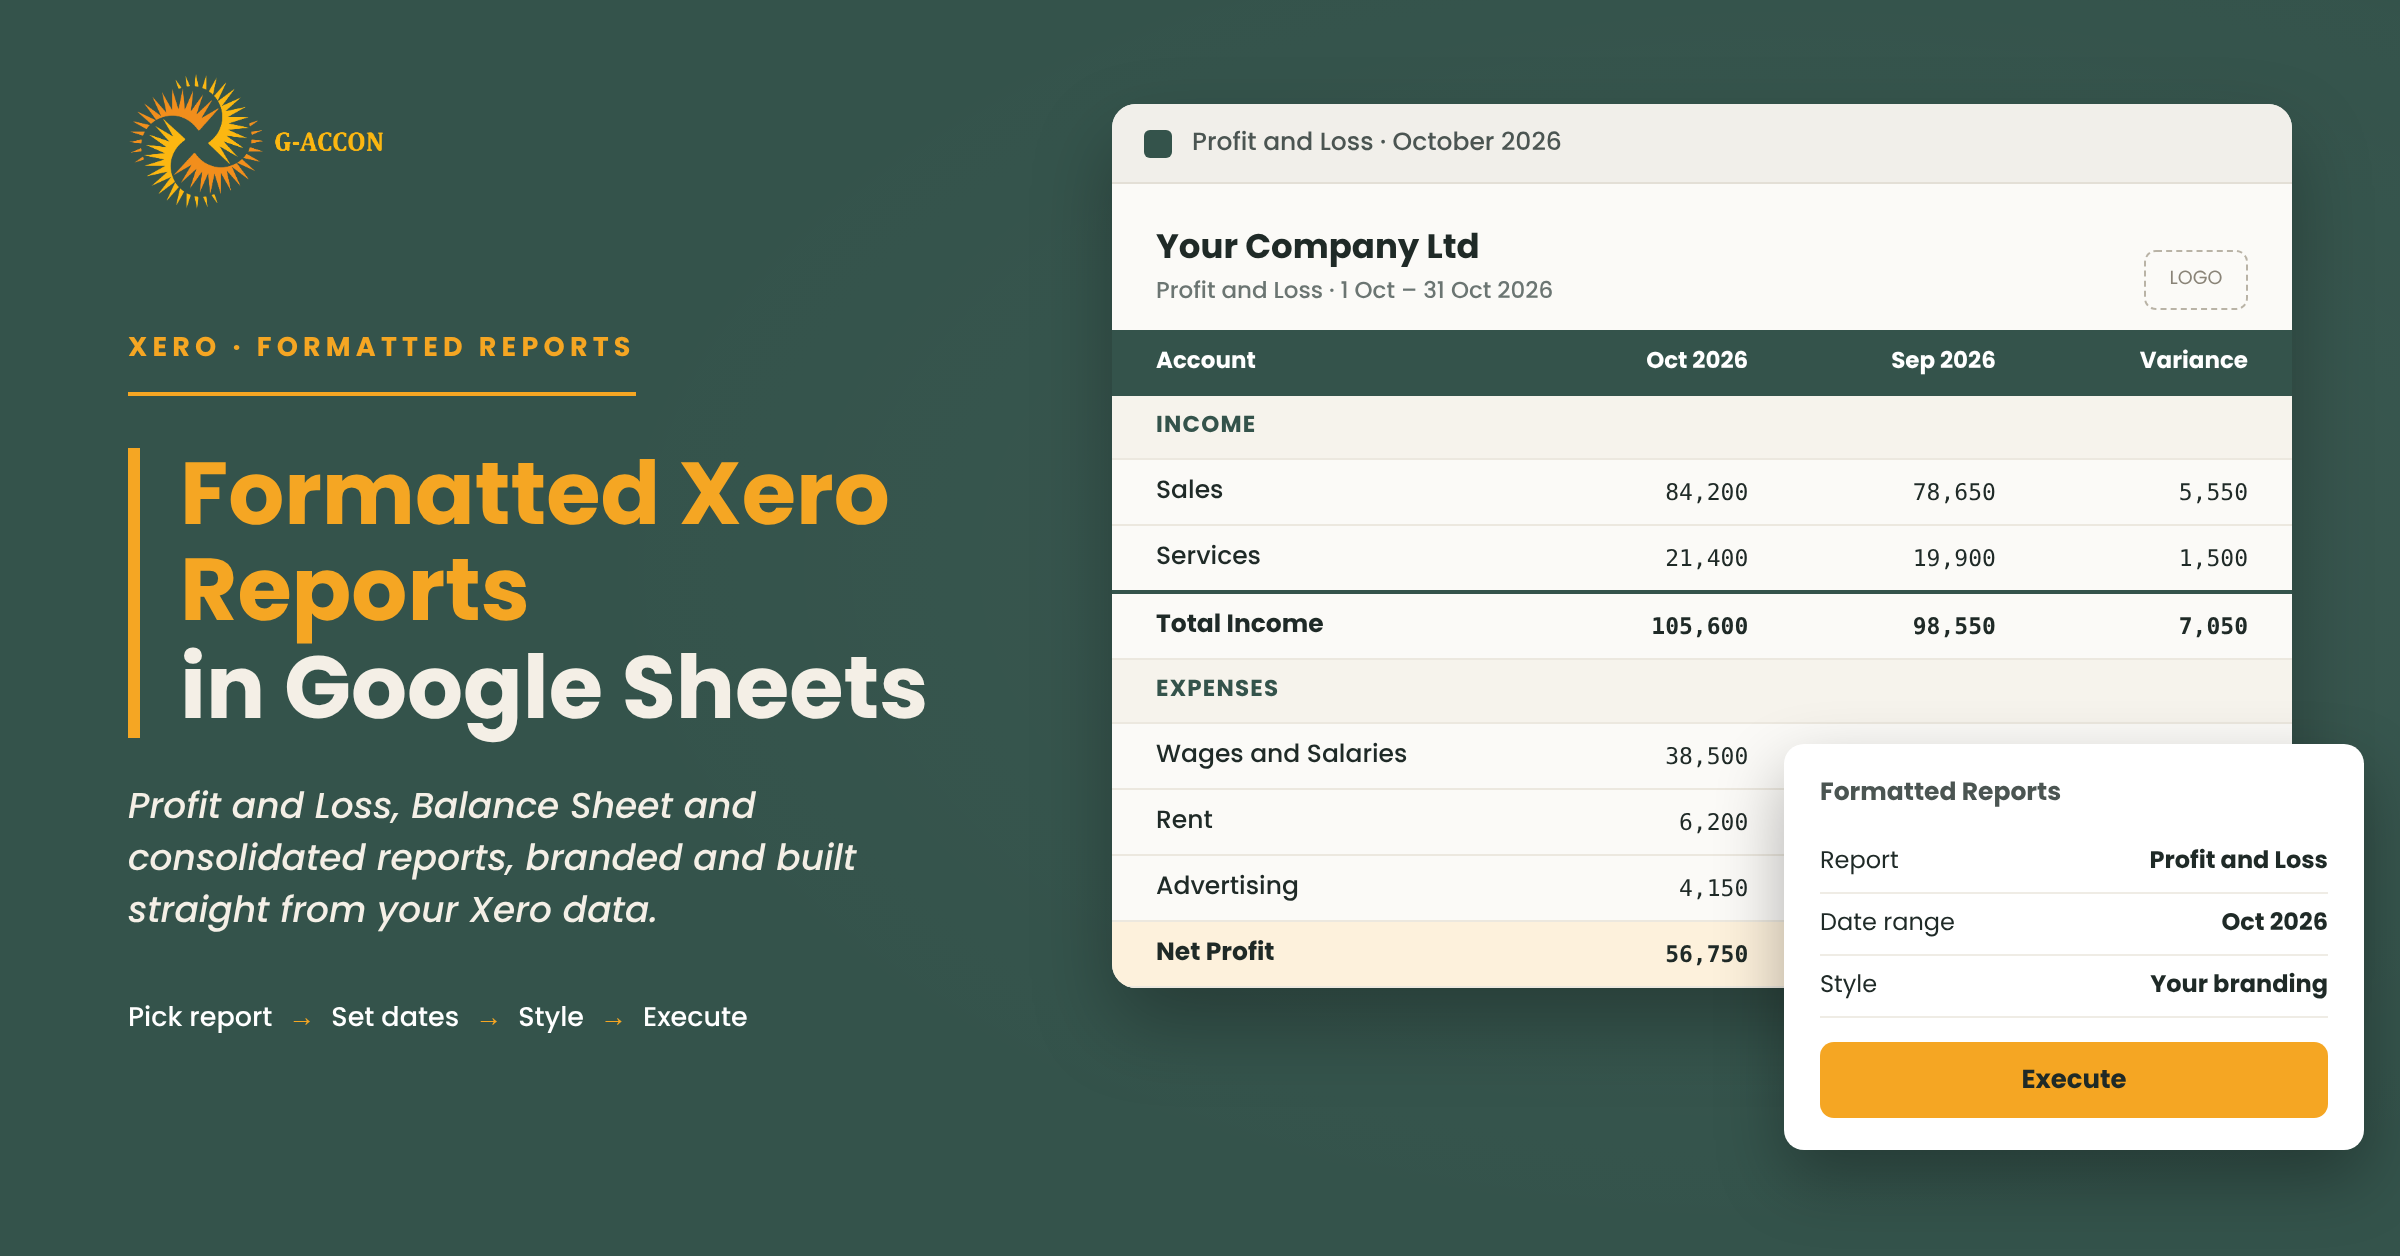
G-Accon's new reports layout for Xero lets Google Sheets handle that part for you. The numbers still come directly from Xero, but the report arrives in the format you designed, with your own date ranges, account choices, colors and logo already in place, so the version you build is the version you send.
The demo below builds three Xero reports in Google Sheets: a formatted Profit and Loss, a custom Balance Sheet and a consolidated Profit and Loss that covers two Xero organisations. You can follow the same steps with your own company file.
Jump to a section
- What you need before you start
- Part 1: Set up formatted Xero reports in Google Sheets
- Part 2: Pick your accounting method, settings and accounts
- Part 3: Style and run your report
- Part 4: Build a custom Xero report
- Part 5: Create a consolidated report for several organisations
- Frequently asked questions
What you need before you start
You only need a few things in place, and most finance teams already have them.
- A Google Sheets file with the G-Accon for Xero add-on installed and connected to your Xero organisation
- An idea of which report you need and for what period, such as a monthly Profit and Loss
- A second connected Xero organisation, but only if you want to try the consolidated report in Part 5
- Your logo, if you want it on your reports (you upload it on the Buy/Manage License page)
Part 1: Set up formatted Xero reports in Google Sheets
Formatted Reports is where you build polished Xero reports in Google Sheets. You'll choose the report first and then tell G-Accon which dates to pull.
Step 1Open Formatted Reports
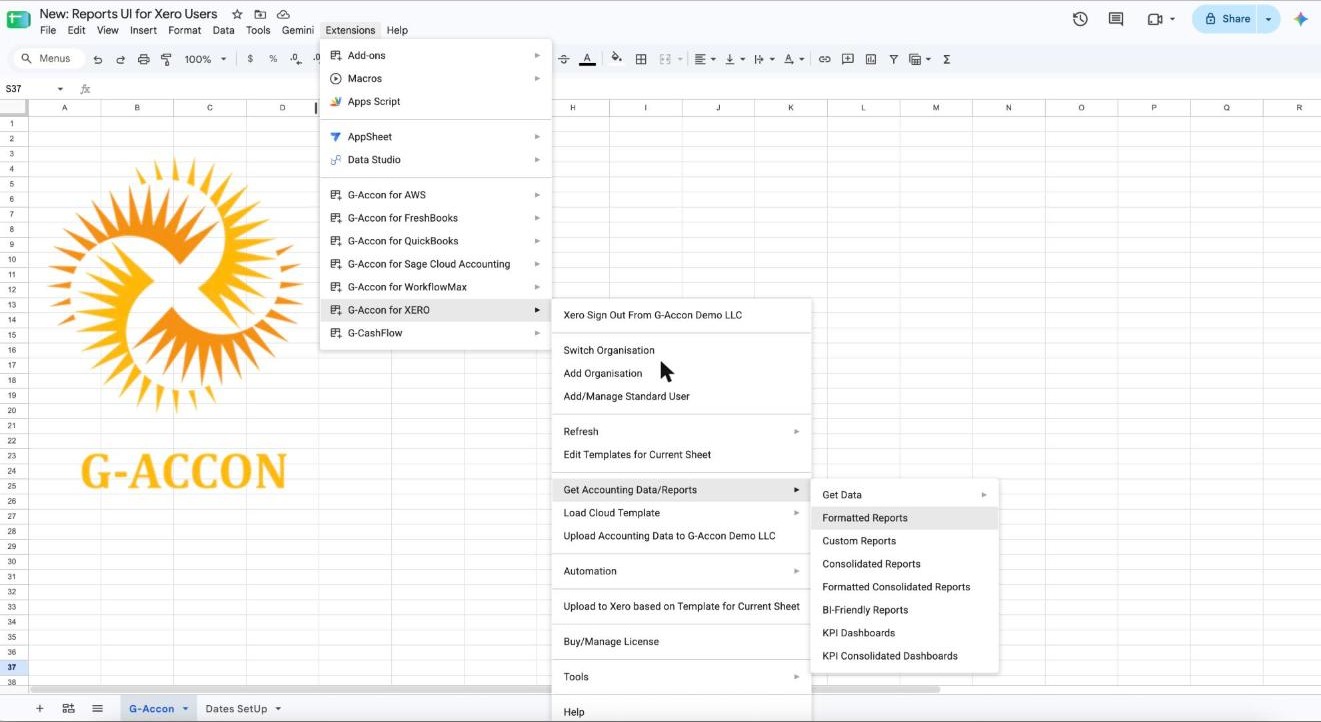
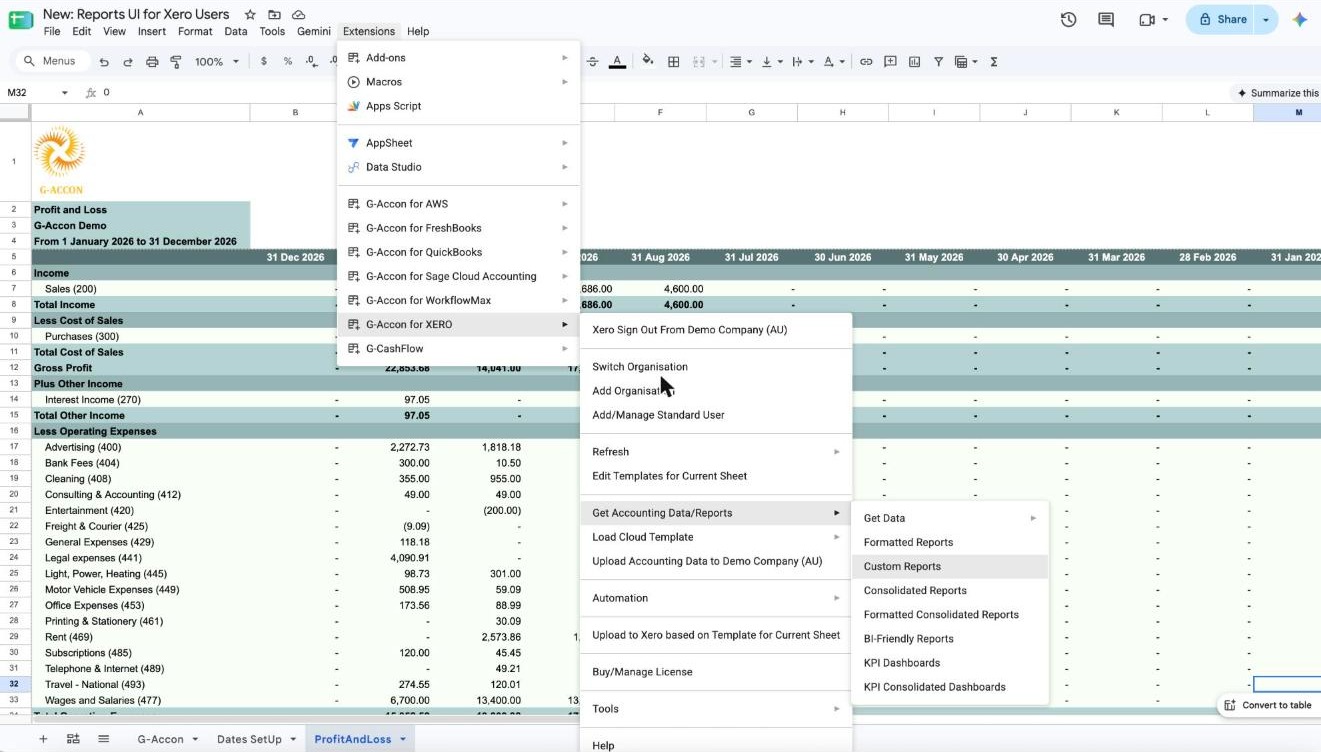
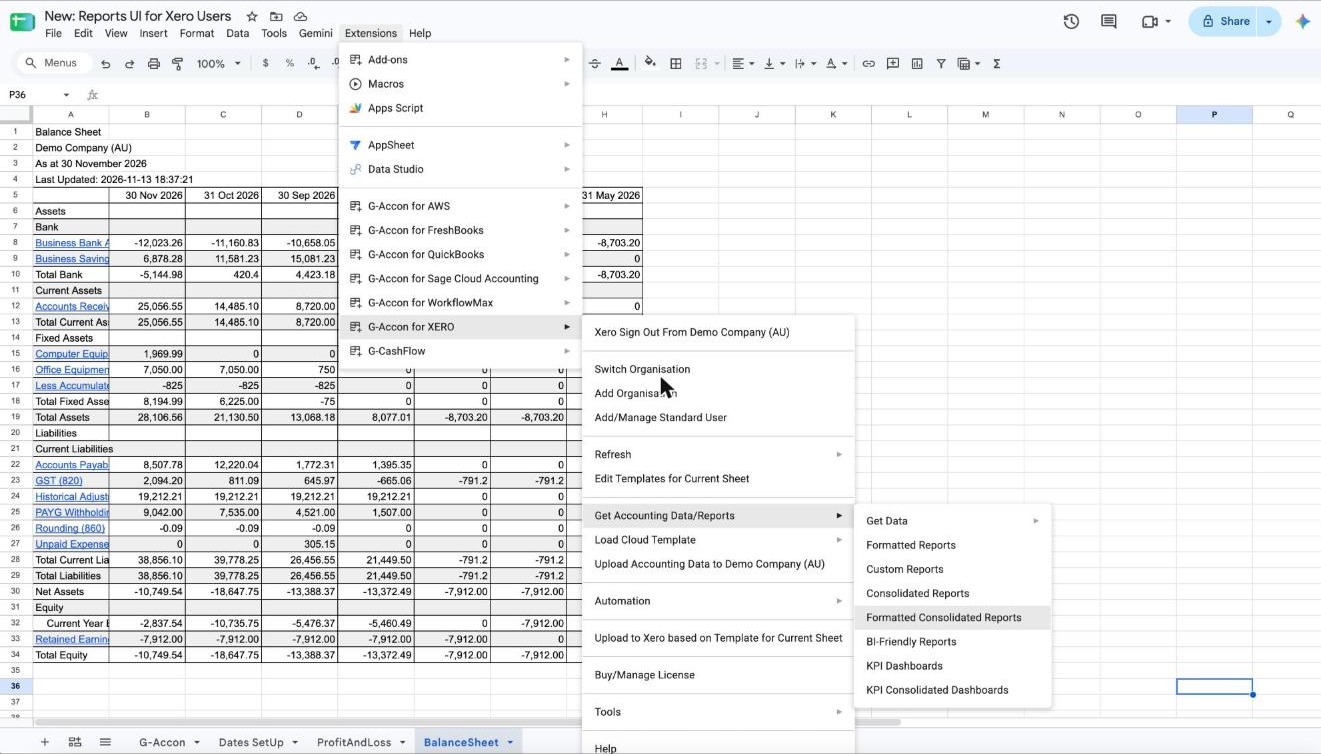
In your Google Sheet, go to Extensions → G-Accon for XERO → Get Accounting Data/Reports → Formatted Reports. The same menu also lists Custom Reports, Consolidated Reports, Formatted Consolidated Reports, BI-Friendly Reports and KPI Dashboards, and you'll use a few of these later in this guide.
Step 2Choose a report group and a report
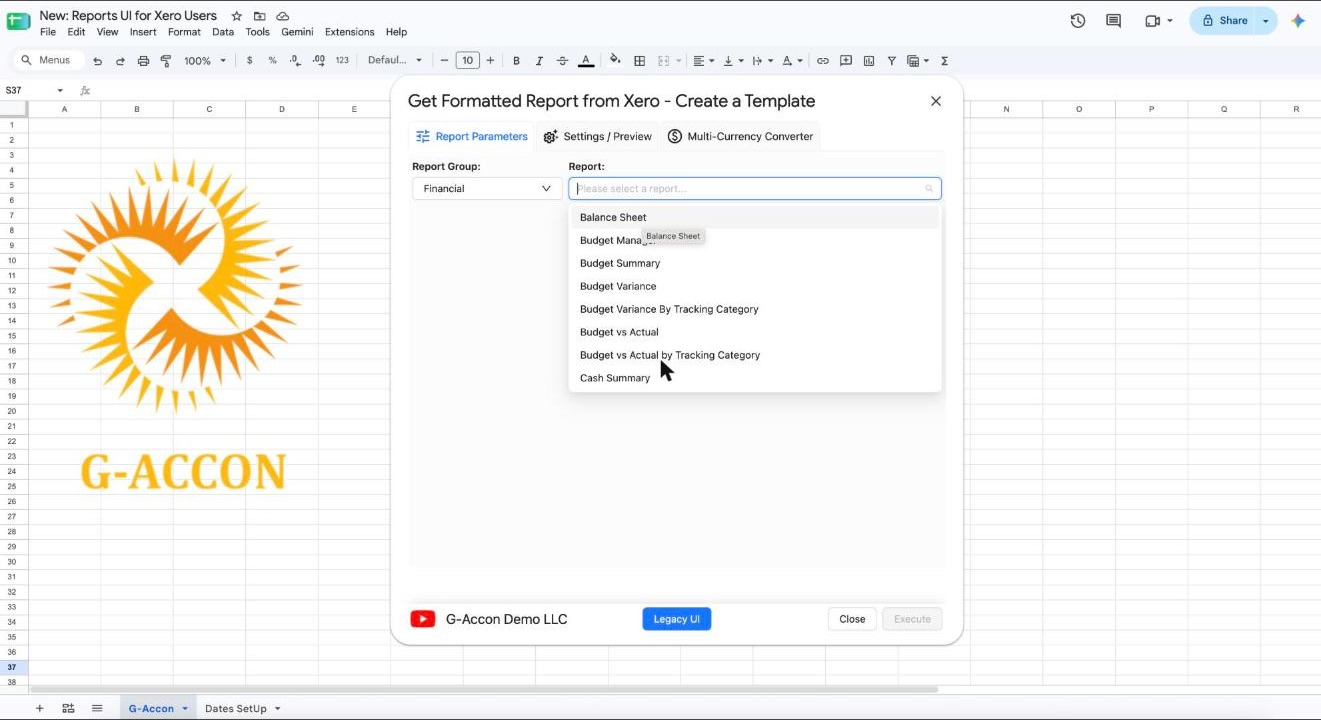
The Get Formatted Report from Xero - Create a Template window opens with three tabs: Report Parameters, Settings / Preview and Multi-Currency Converter. Pick a Report Group first, then choose a report from the Report list or type its name. Under the Financial group, you'll find reports such as Balance Sheet, Budget Summary, Budget vs Actual and Cash Summary. The demo picks Income Statement, which is your Profit and Loss.
Step 3Pick a dynamic date range
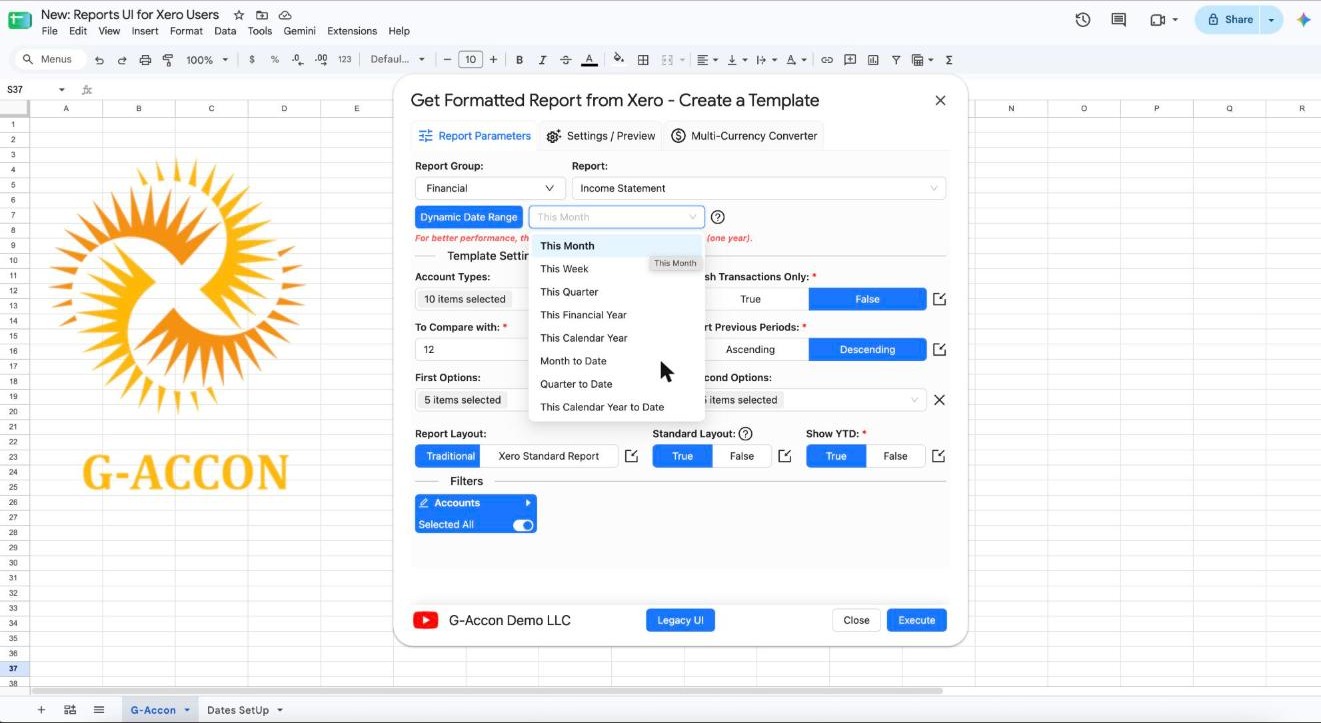
Next, set your dates. With Dynamic Date Range turned on, you choose a rolling period like This Month, This Quarter, This Financial Year or Month to Date, and the report moves forward on its own each time you refresh it. G-Accon recommends keeping the range to a year or less for better performance.
Step 4Or set a static date range
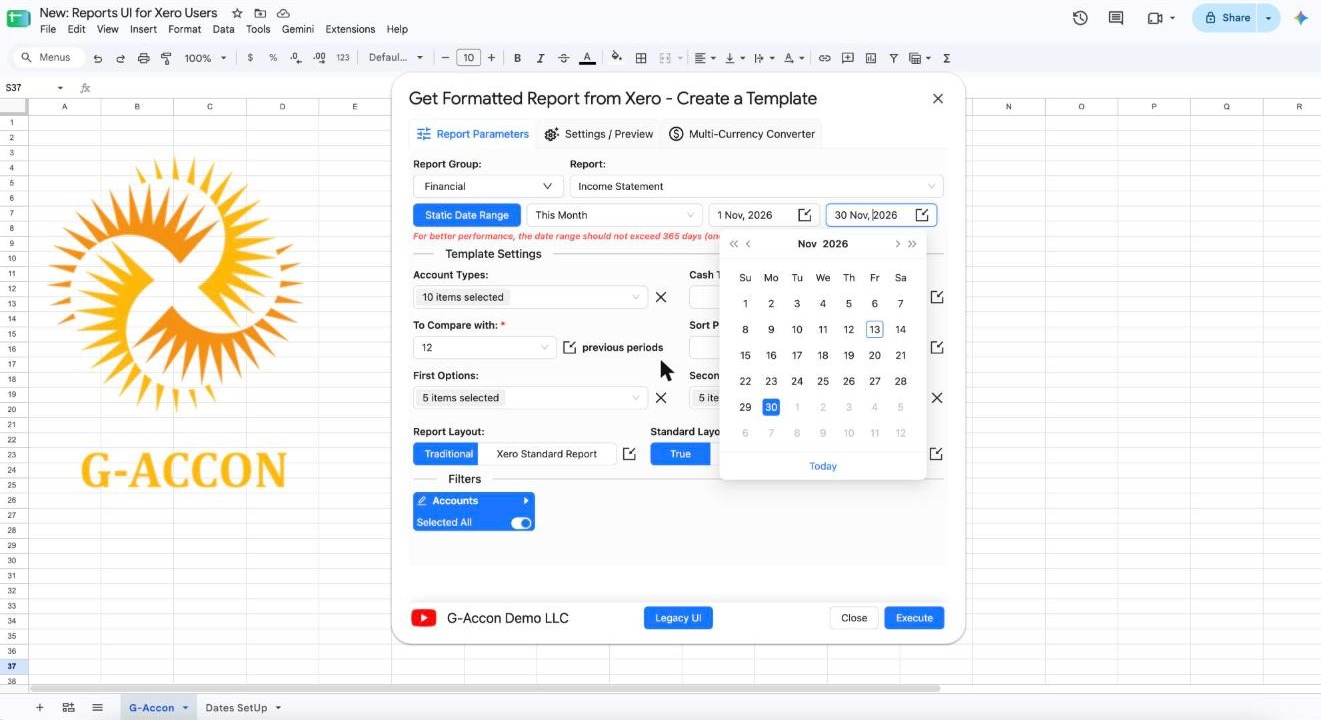
If you need a fixed period instead, click the button so it reads Static Date Range and pick your start and end dates from the calendar. The demo uses 1 Nov, 2026 to 30 Nov, 2026.
Step 5Work out your dates with a Google Sheets formula
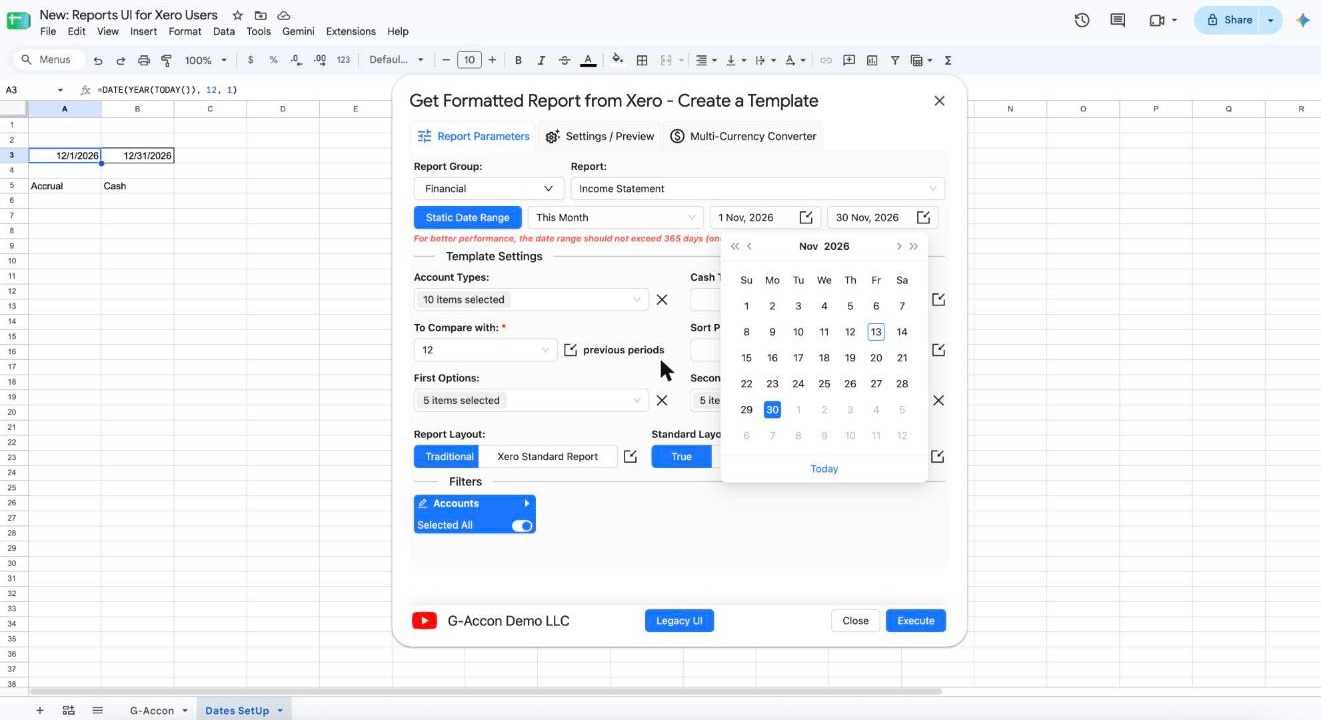
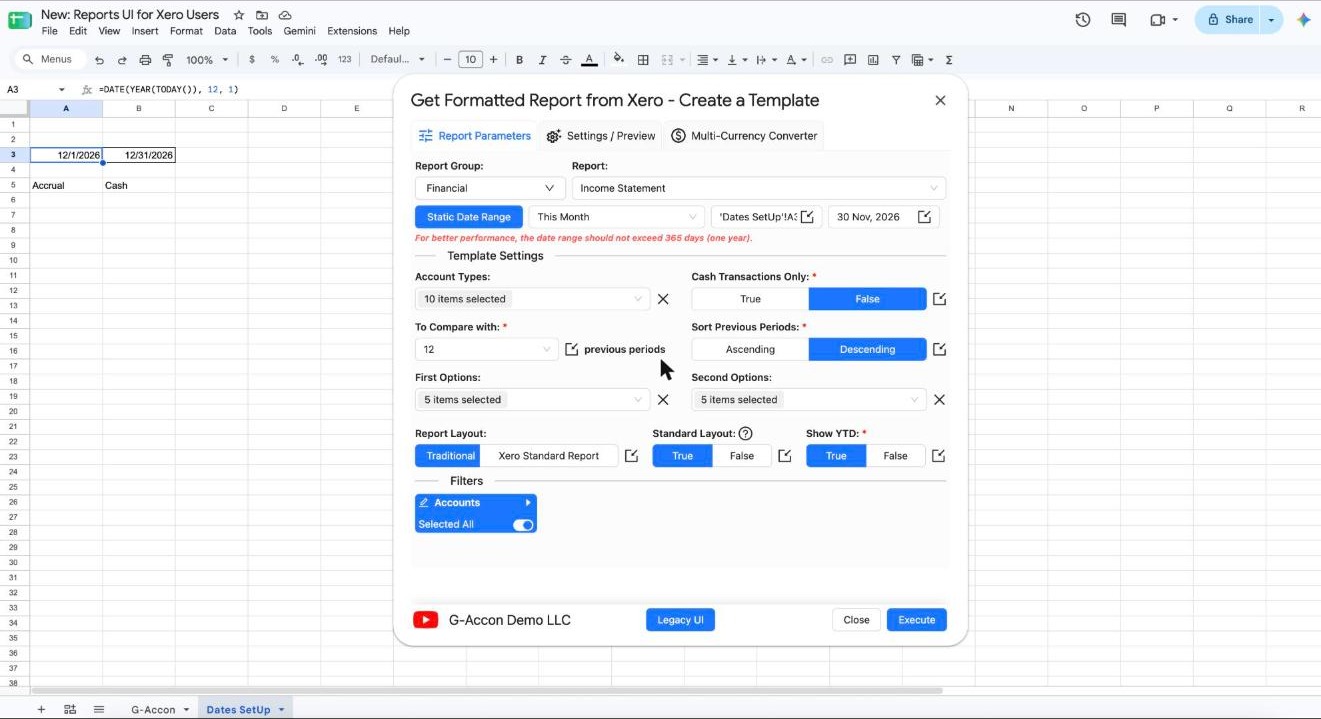
You can also let a formula decide the dates. In the demo, a tab called Dates SetUp has =DATE(YEAR(TODAY()), 12, 1) in cell A3, which returns 12/1/2026, with the matching end date of 12/31/2026 in B3. Because the formula uses TODAY(), it rolls into the new year by itself.
Step 6Link the date to that cell
Click the small cell-reference icon next to the date field, then select your formula cell. The start date now reads 'Dates SetUp'!A3, so the report always uses whatever date that cell shows.
Part 2: Pick your accounting method, settings and accounts
Next, decide how the numbers are worked out and which accounts show up. Each setting has a clear label, so you can see exactly what will land in your sheet.
Step 7Choose cash or accrual
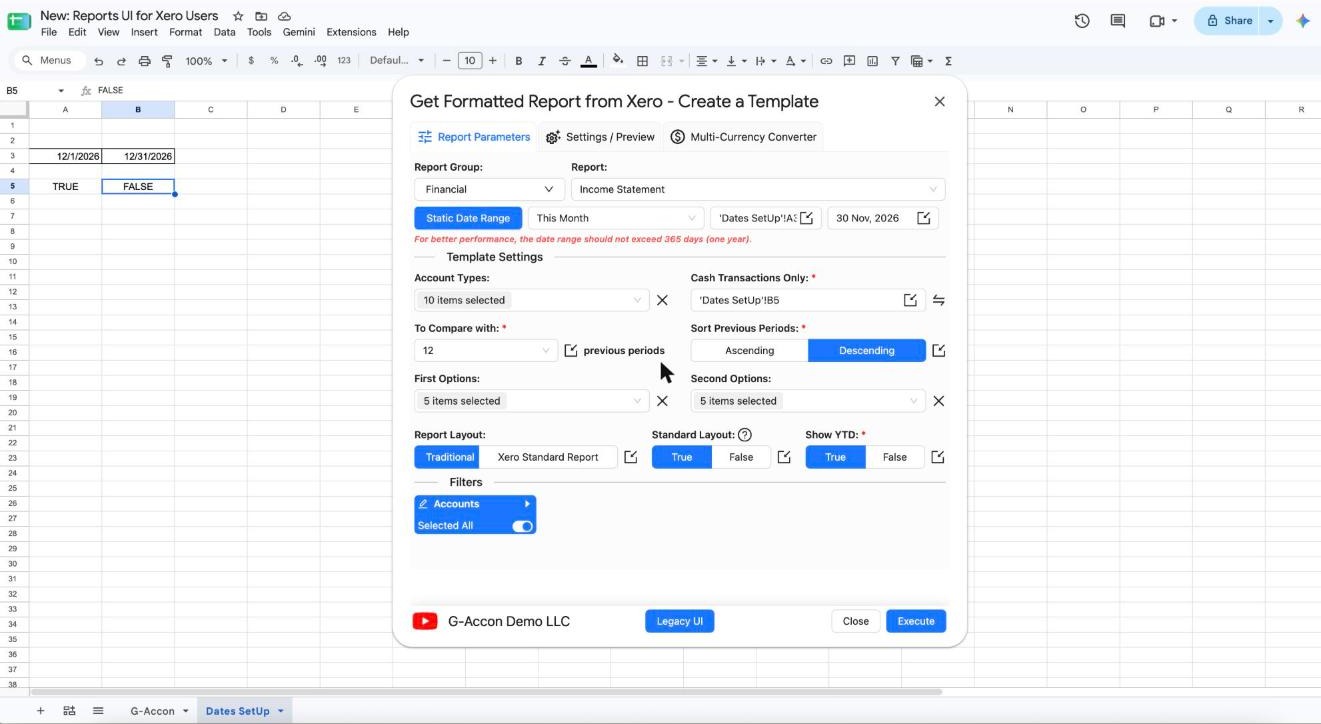
Set Cash Transactions Only to True for a cash-basis Profit and Loss or False for an accrual-basis one. If you're not sure which to use, Xero has a handy guide to cash vs accrual accounting. This setting can point to a cell too. In the demo, it's linked to 'Dates SetUp'!B5, which holds FALSE, and you can use the same trick for settings like YTD and sorting.
Step 8Adjust the template settings
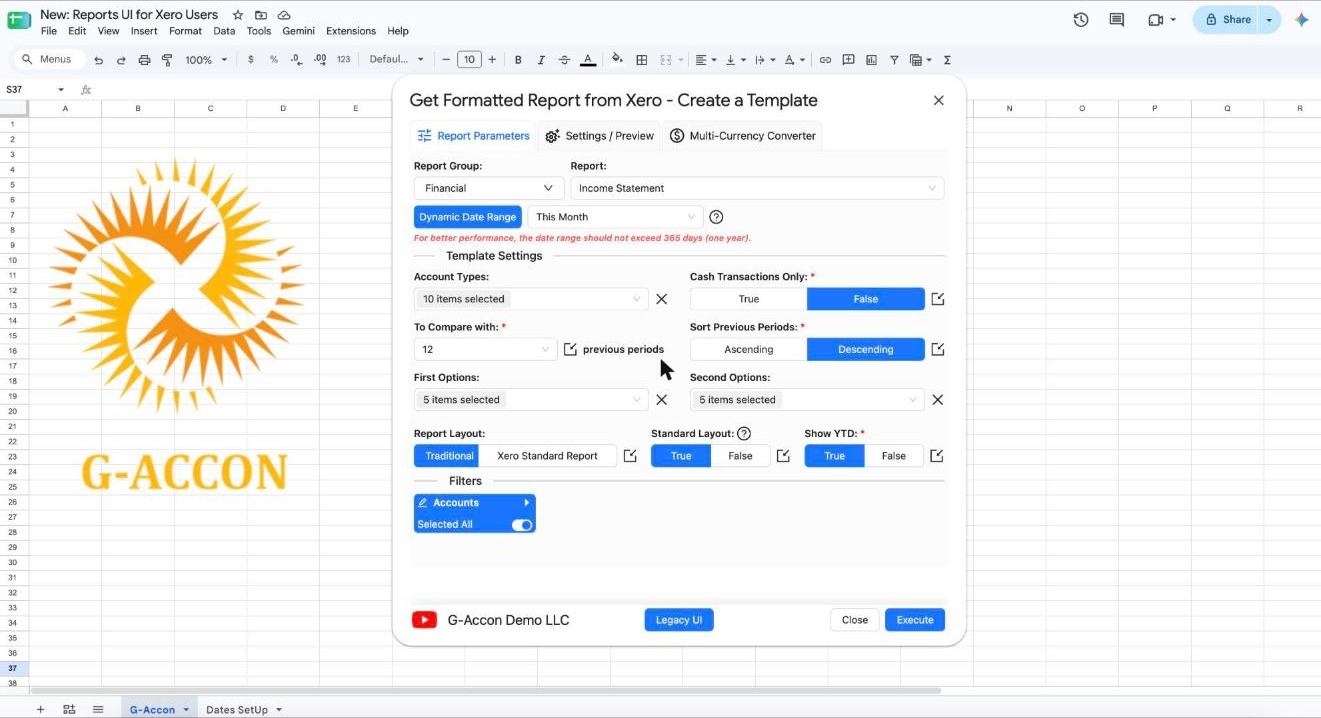
Under Template Settings, you'll find the rest of the report's shape:
- Account Types sets which kinds of accounts appear (10 are selected in the demo)
- To Compare with adds previous periods, such as 12, and Sort Previous Periods puts them in Ascending or Descending order
- First Options and Second Options cover your tracking categories
- Report Layout switches between Traditional and Xero Standard Report
- Show YTD adds or hides year-to-date figures
Step 9Filter to the accounts you need
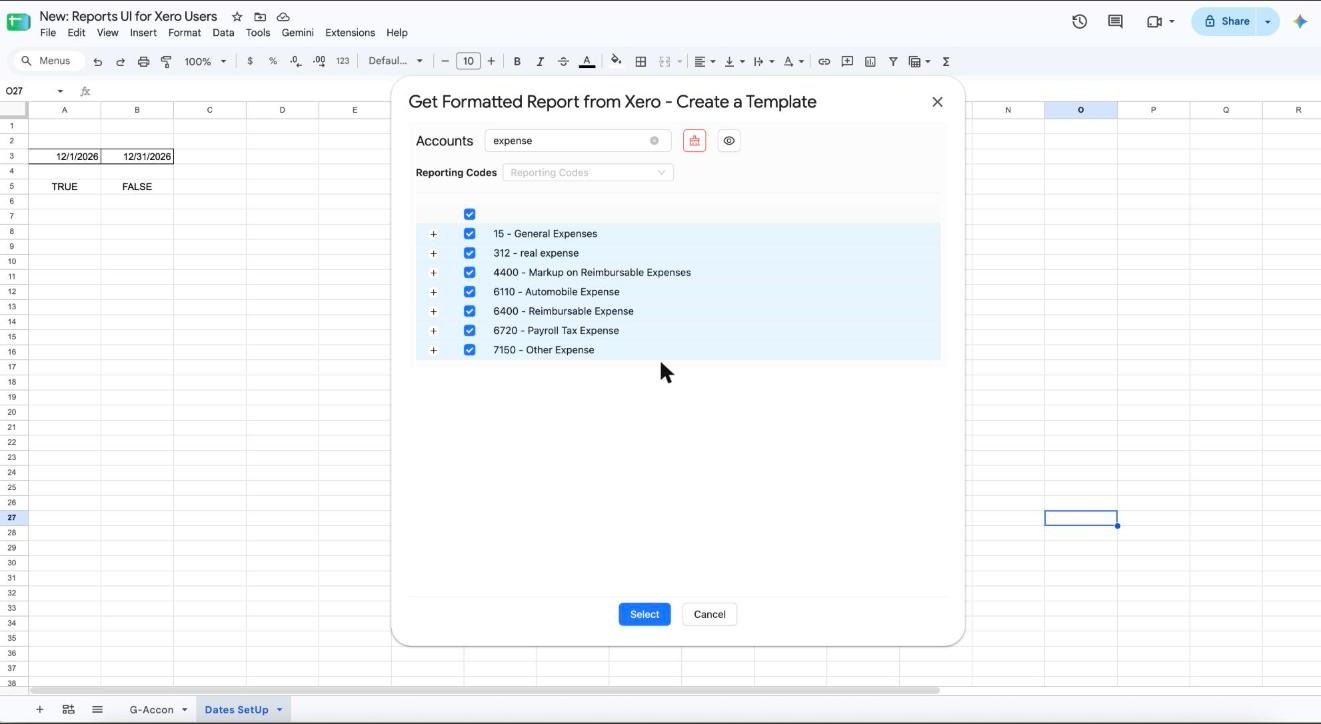
Under Filters, click Accounts to choose exactly which accounts go into the report. You can search by name or narrow by Reporting Codes. In the demo, a search for “expense” leaves only Expense accounts ticked, such as 6110 Automobile Expense and 6720 Payroll Tax Expense.
Step 10Show only your selected accounts
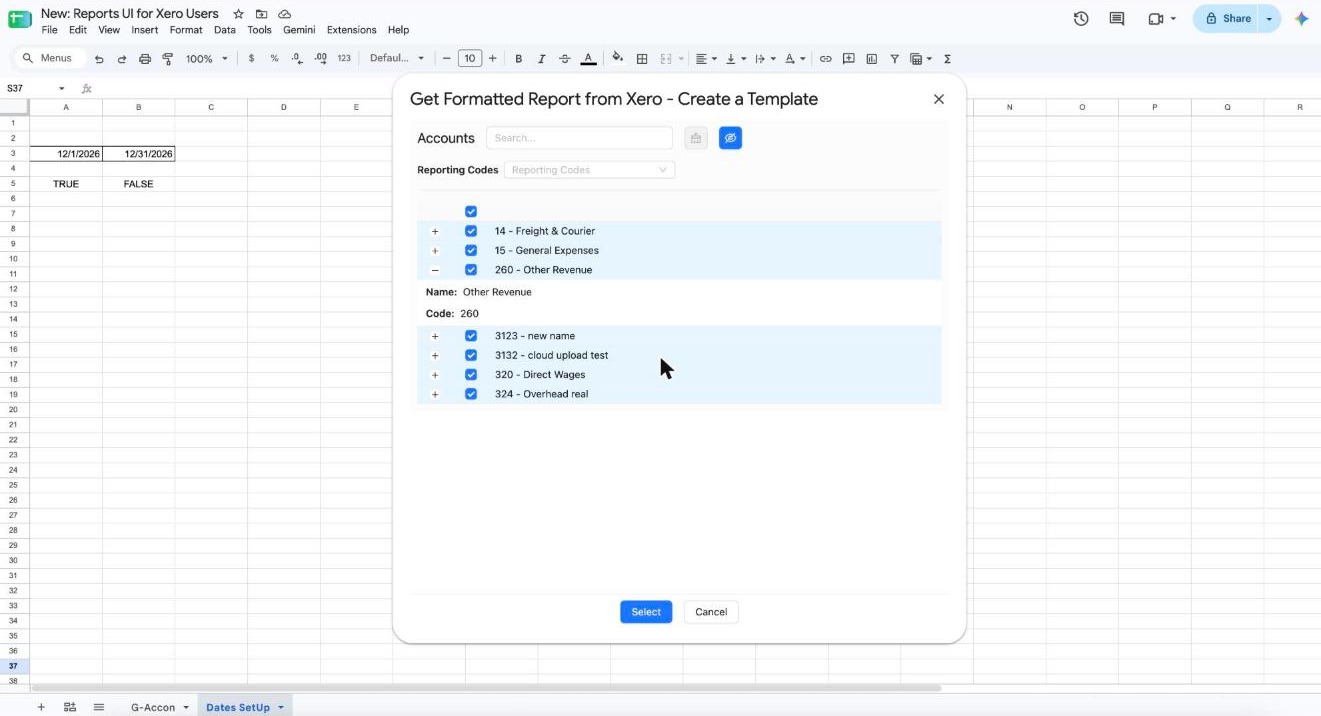
Click the eye icon to show just the accounts you've ticked, which makes a long list easier to check. The red icon next to the search box clears the filters you've set if you'd like to start over. You can also click the + next to any account to see its name and code.
Step 11Select all accounts so new ones show up
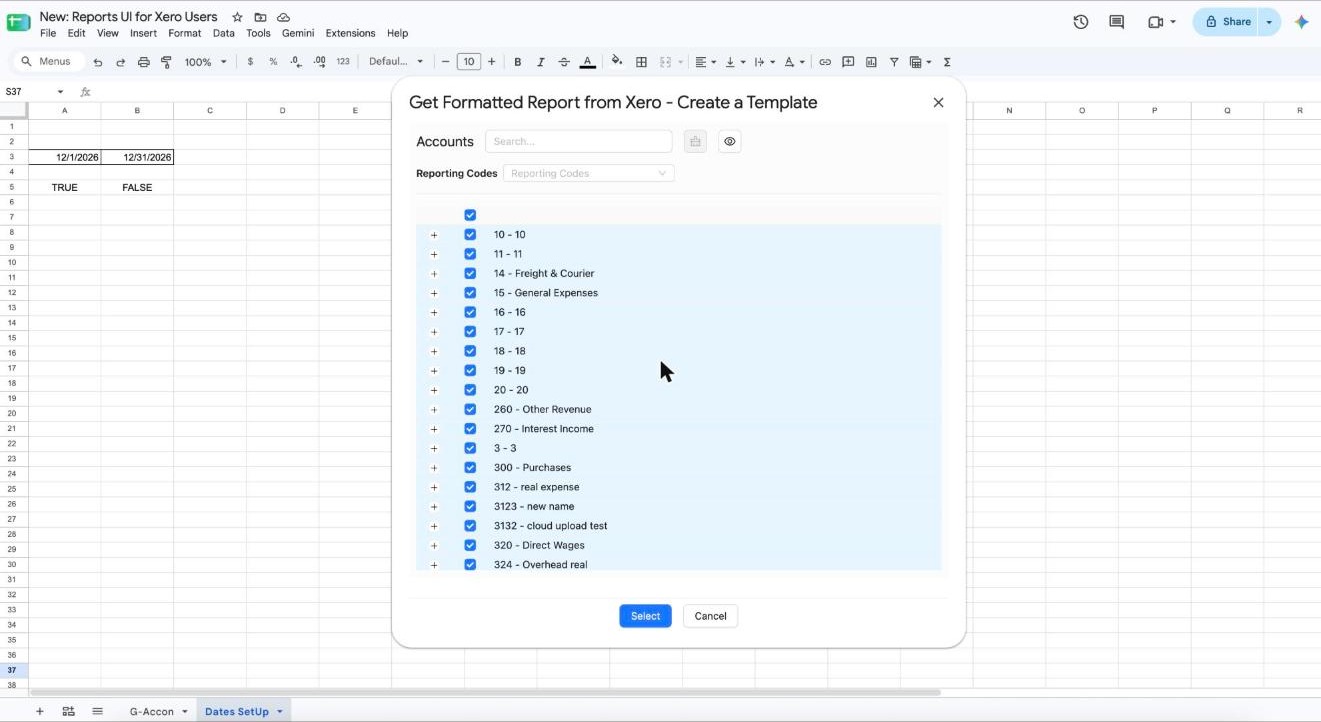
Tick the checkbox at the top of the list to select every account, then click Select. With all accounts selected, G-Accon adds any new accounts from your Chart of Accounts the next time you refresh the report, so nothing new gets left out.
Part 3: Style and run your report
Now make the report look the way you want before you run it. You'll see a live preview as you go, so there's no guessing.
Step 12Open Settings / Preview
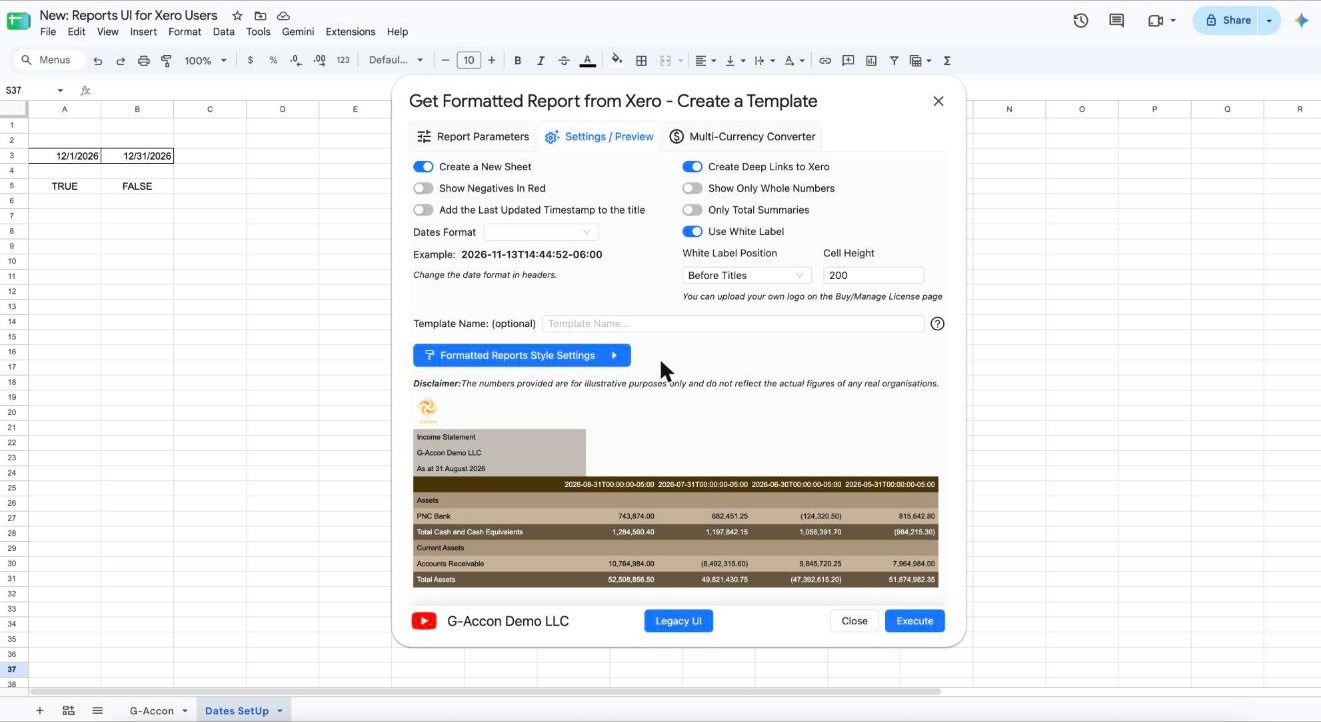
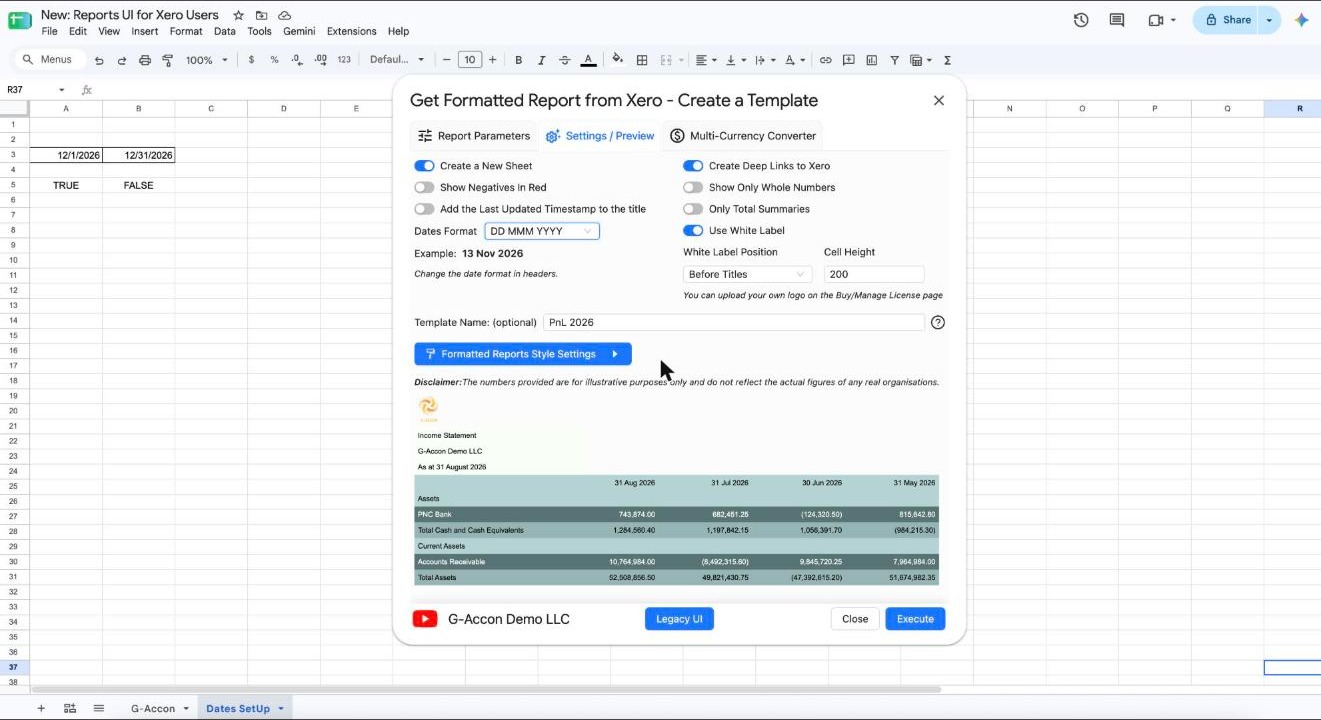
Switch to the Settings / Preview tab. Here you turn on the extras you want, such as Create a New Sheet, Show Negatives In Red, Create Deep Links to Xero, Show Only Whole Numbers and Use White Label. A small preview at the bottom shows how the report will look.
Step 13Pick a theme
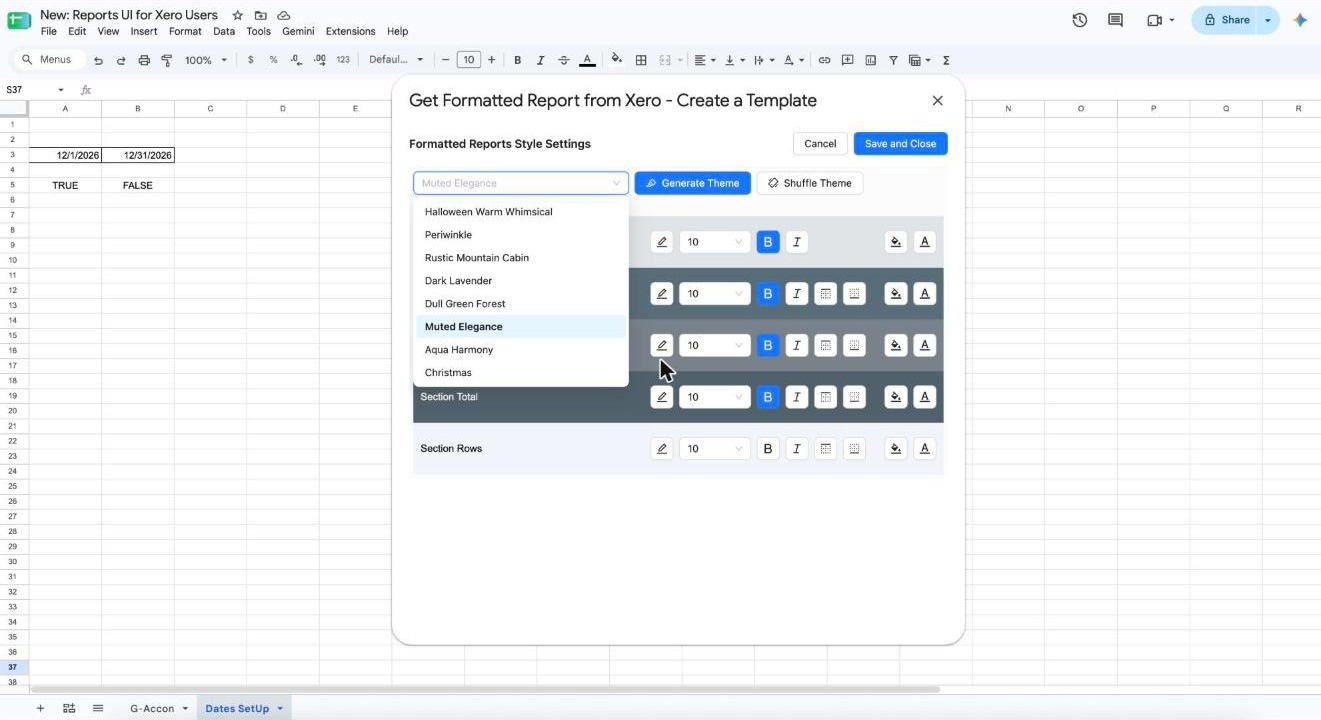
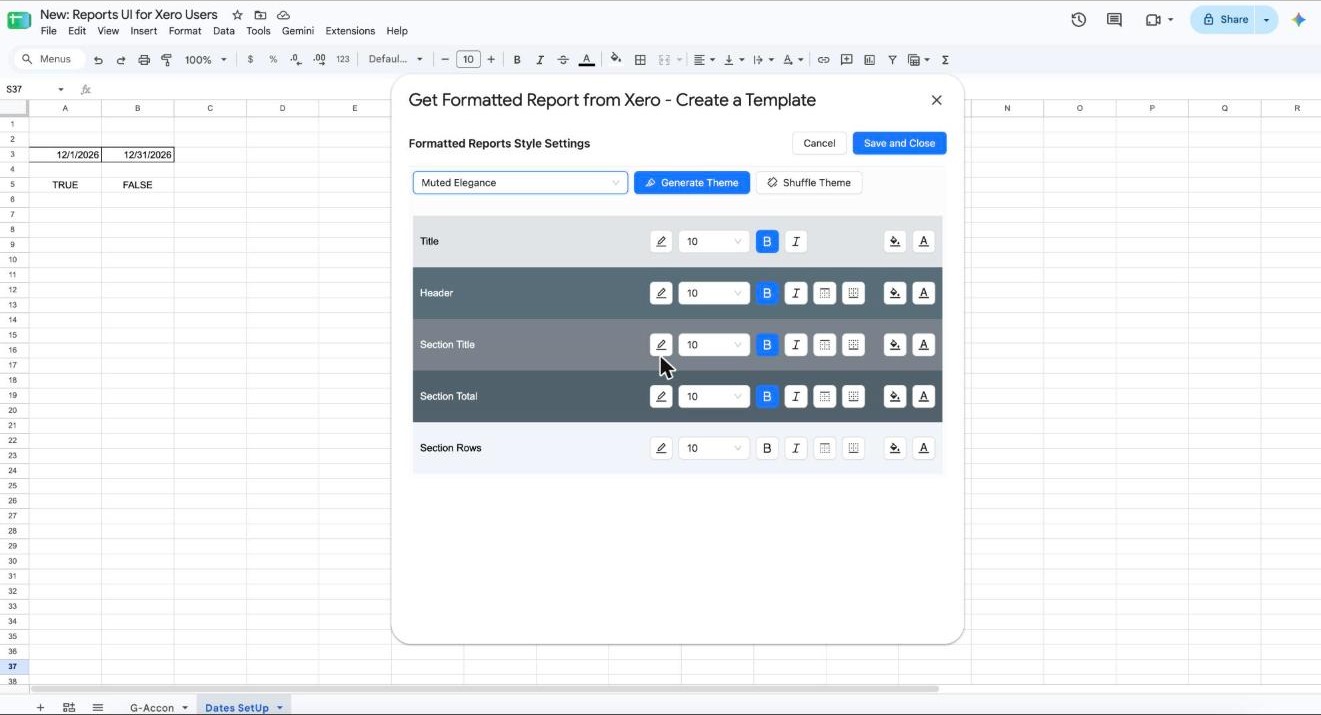
Click Formatted Reports Style Settings to open the styling screen. Choose a ready-made theme from the list, such as Muted Elegance for sophisticated reports or Periwinkle for a fresh, modern look.
Step 14Fine-tune the colours and fonts
Prefer your own design? You can change the Title, Header, Section Title, Section Total and Section Rows one by one, with options for font size, bold, italics, borders, fill colour and text colour. You'll also see Generate Theme and Shuffle Theme buttons next to the theme list. Click Save and Close when you're happy.
Step 15Set the date format, name and branding, then run it
Back on Settings / Preview, pick a Dates Format for your column headers. In the demo, DD MMM YYYY shows dates like 13 Nov 2026. Give the template a name (the demo uses PnL 2026), and with Use White Label on, set where your logo goes. The demo uses Before Titles with a Cell Height of 200. Then click Execute.
Step 16Review your formatted report
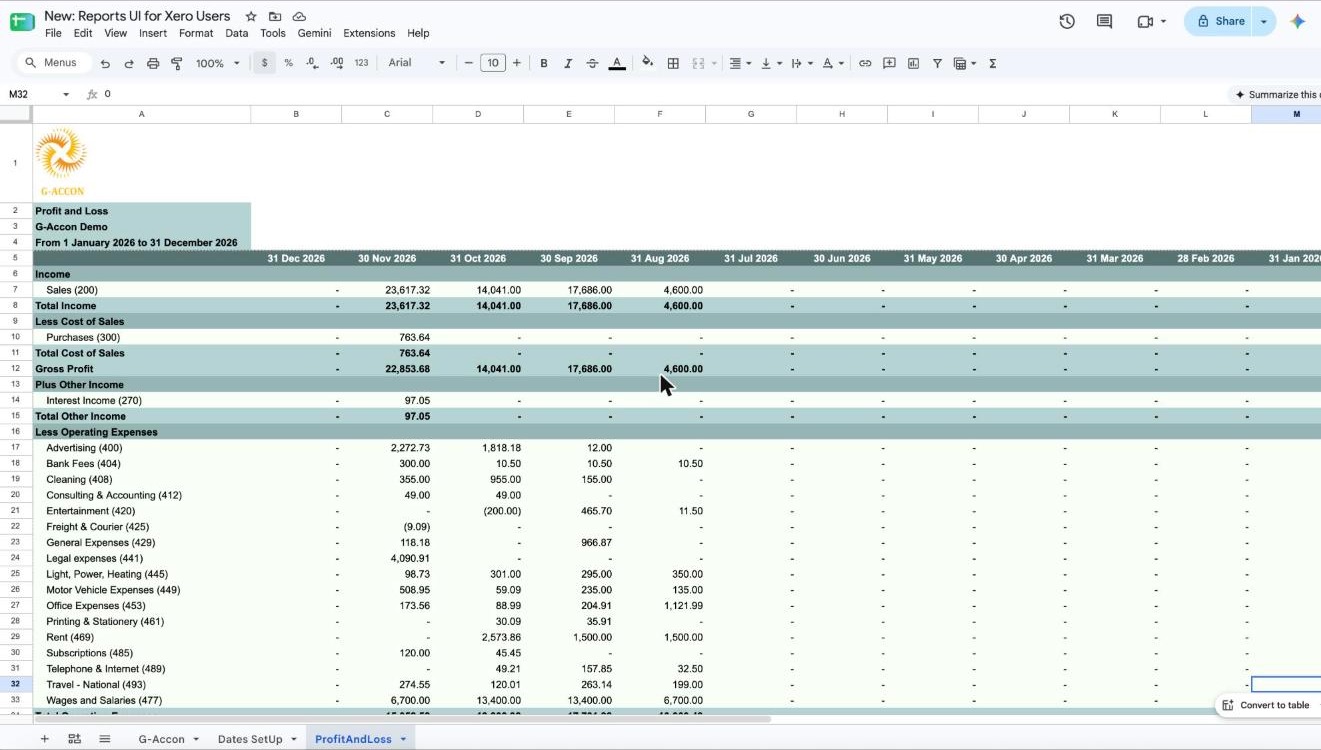
G-Accon creates a new ProfitAndLoss tab with your logo at the top and a column for each month. The report runs from Income through Less Cost of Sales, Gross Profit and Plus Other Income to Less Operating Expenses, with each account code in brackets, like Sales (200). In the demo, Total Income for November 2026 comes to 23,617.32.
Part 4: Build a custom Xero report
Custom Reports gives you plainer Xero reports in Google Sheets, with more control over the layout. It's handy when you want the raw report data laid out your own way.
Step 17Open Custom Reports
Go to Extensions → G-Accon for XERO → Get Accounting Data/Reports → Custom Reports.
Tip: Want to change a report you've already built? Open its tab and go to Extensions → G-Accon for XERO → Edit Templates for Current Sheet to load the saved template.
Step 18Set up the custom report
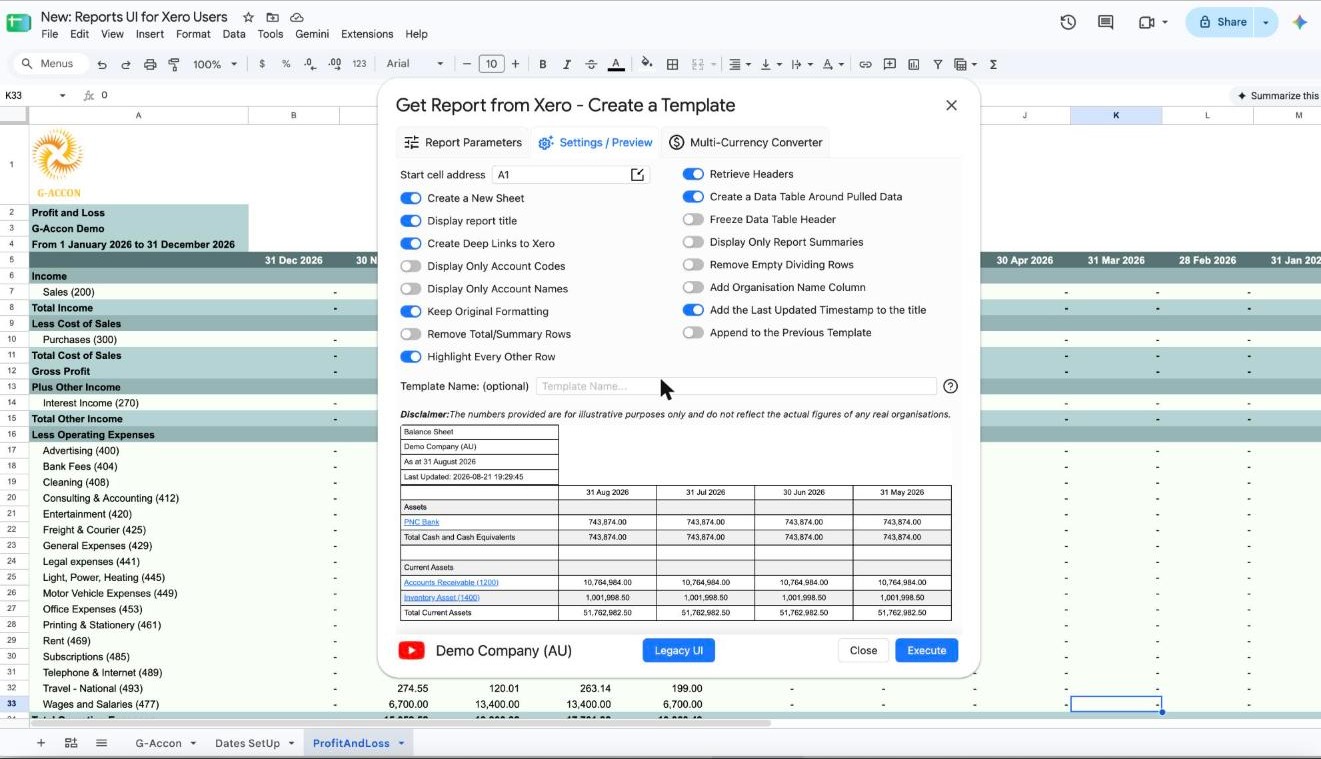
The Get Report from Xero - Create a Template window opens. On Report Parameters, pick your report, date range and accounting method, plus any accounts and filters you need. Then on Settings / Preview, choose how the data lands in your sheet, with options like Start cell address, Create a Data Table Around Pulled Data, Highlight Every Other Row, Add Organisation Name Column and Append to the Previous Template. When everything looks right, click Execute.
Step 19Check your custom report
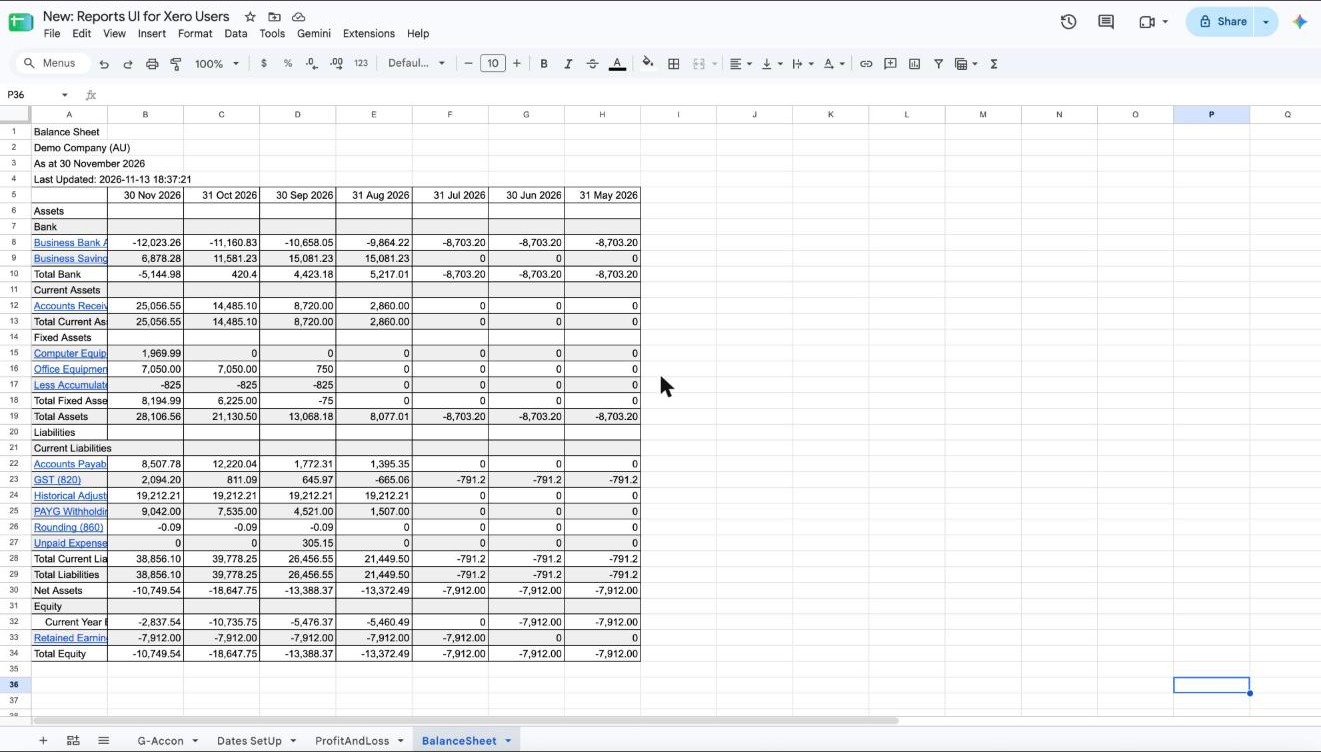
In the demo, G-Accon creates a BalanceSheet tab for Demo Company (AU) as at 30 November 2026, with month-end columns going back to 31 May 2026. Account names are blue links back to Xero, and the Last Updated time sits at the top, so you always know how fresh the data is.
Part 5: Create a consolidated report for several organisations
If you look after more than one Xero organisation, you can combine them into one report. G-Accon converts everything into one currency for you, so you don't have to.
Step 20Open Formatted Consolidated Reports
Go to Extensions → G-Accon for XERO → Get Accounting Data/Reports → Formatted Consolidated Reports.
Step 21Pick the currency and organisations
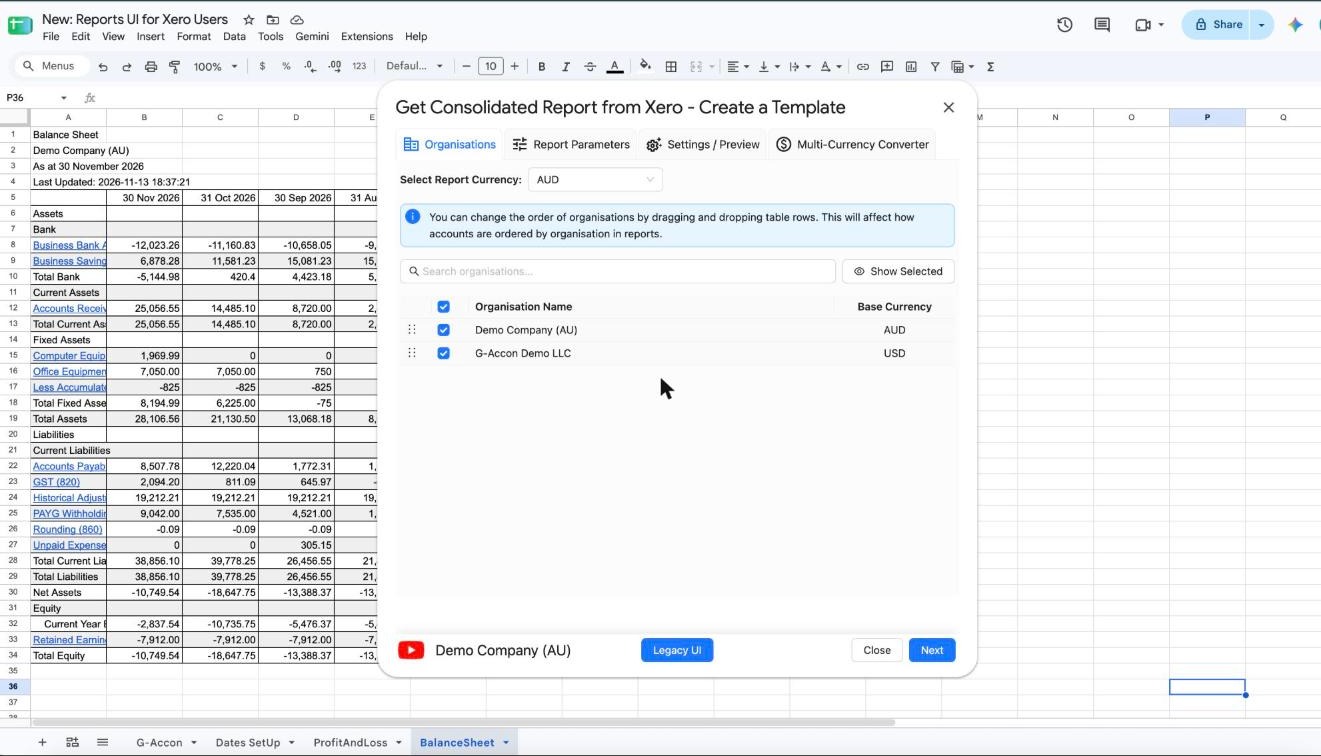
On the Organisations tab, choose the Report Currency and tick each organisation you want to include. The demo uses AUD and combines Demo Company (AU), which reports in AUD, with G-Accon Demo LLC, which reports in USD. You can drag the rows to change the order, which also changes how accounts are ordered by organisation in the report. Then click Next.
Step 22Set the consolidated report parameters
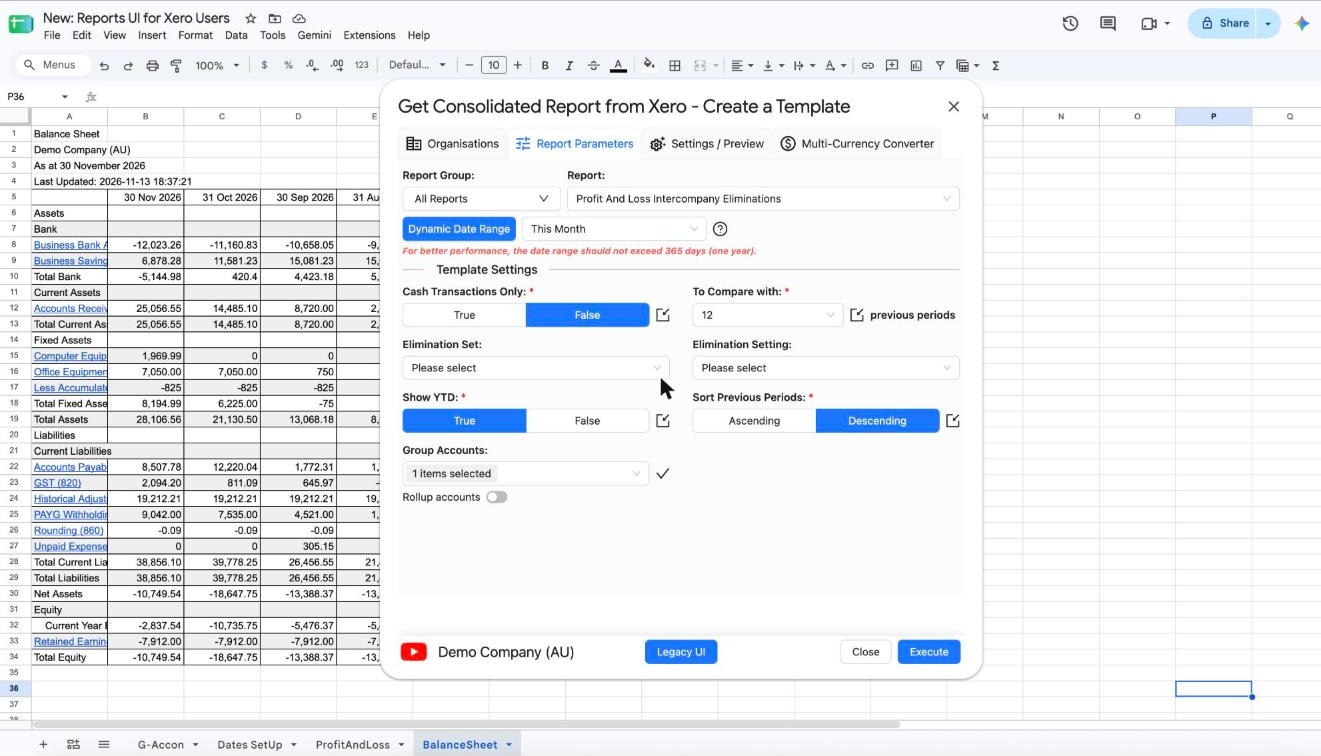
On Report Parameters, the demo picks Profit And Loss Intercompany Eliminations with a This Month date range. You can also set Cash Transactions Only, To Compare with, Show YTD and Sort Previous Periods, along with consolidation options like Elimination Set, Elimination Setting, Group Accounts and Rollup accounts.
Step 23Style it and click Execute
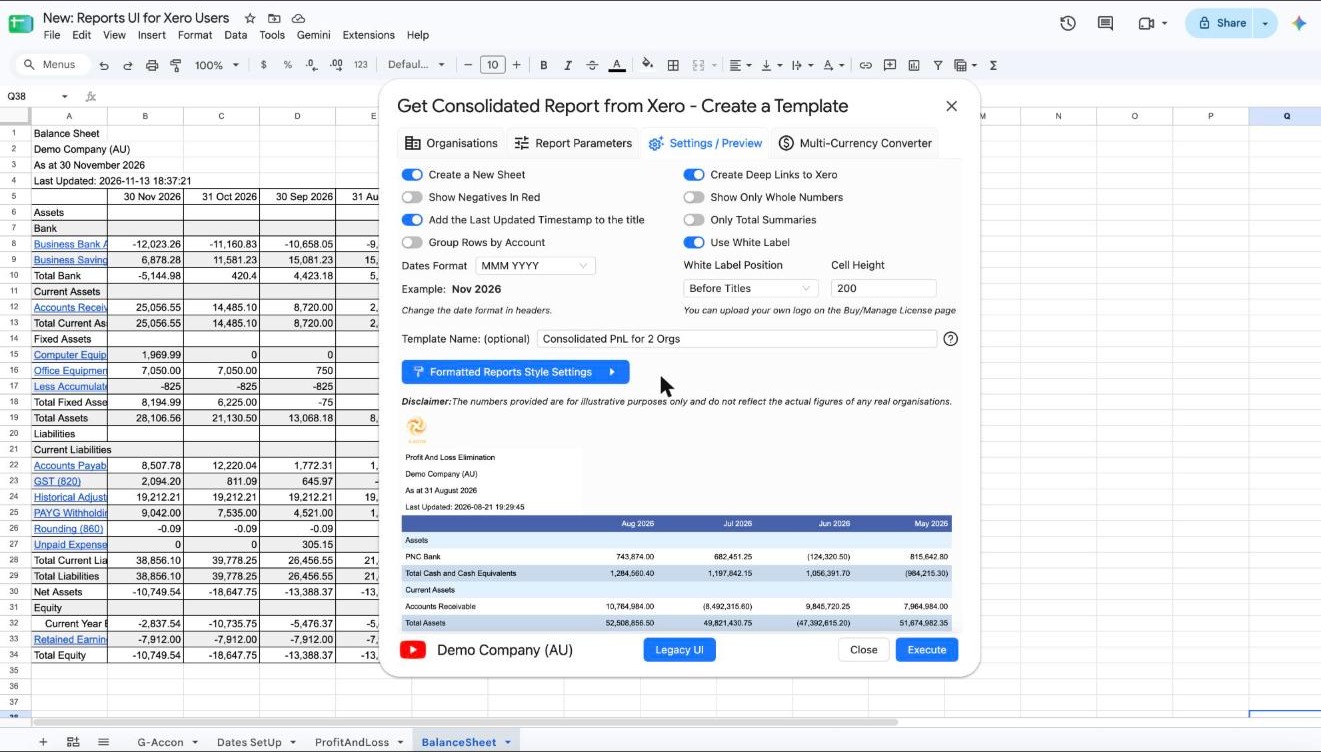
The Settings / Preview tab works just like the formatted report, with one extra option, Group Rows by Account. In the demo, the date format is MMM YYYY (so headers read Nov 2026) and the template is called Consolidated PnL for 2 Orgs. Click Execute to build it.
Step 24Review the consolidated report
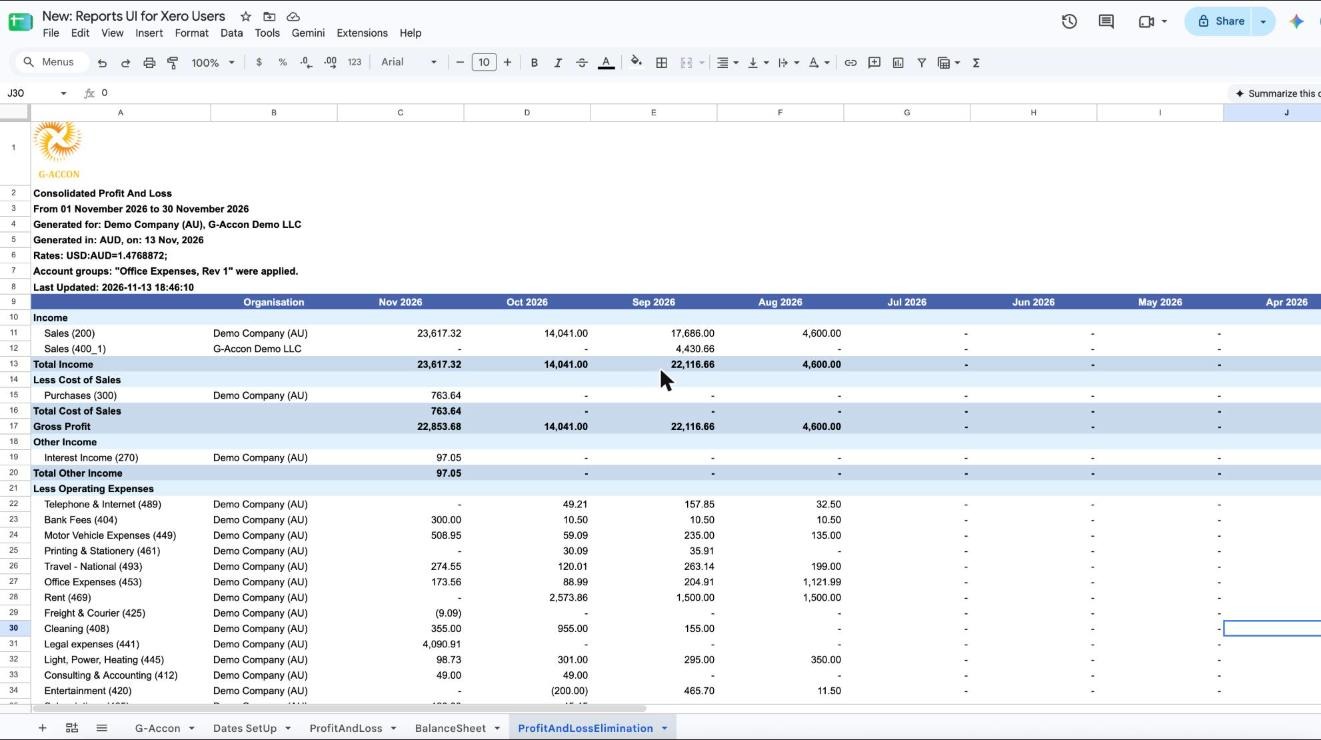
G-Accon creates a ProfitAndLossElimination tab. The header lists both organisations, the currency, the exchange rate used (USD:AUD=1.4768872 in the demo) and the account groups that were applied. An Organisation column shows where each line comes from, so you can see that September's Total Income of 22,116.66 includes 4,430.66 in sales from G-Accon Demo LLC.
Wrapping up
That's how you build Xero reports in Google Sheets with G-Accon's new layout. You pick a report, set your dates and accounts, style it with a theme and your logo, and run it, whether it's for one organisation or several. Since the dates and settings can follow cells and rolling periods, next month's report is mostly a matter of clicking refresh.
Want to keep your reports up to date without lifting a finger? See our guide on dynamically refreshing your Xero reports, or read more about multi-currency consolidated reports.
Frequently asked questions
Can I get Xero reports in Google Sheets?
Yes. With the G-Accon for Xero add-on, you open Extensions → G-Accon for XERO → Get Accounting Data/Reports and pick Formatted Reports, Custom Reports or Formatted Consolidated Reports. G-Accon pulls the report straight from Xero into your sheet.
What's the difference between Formatted Reports and Custom Reports?
Formatted Reports give you styled, branded Xero reports in Google Sheets, with themes, colours and your logo. Custom Reports give you a plainer layout with more control over where and how the data lands, such as the start cell and whether to add a data table.
Can I run a cash-basis Profit and Loss from Xero?
Yes. Set Cash Transactions Only to True for cash basis or False for accrual basis. You can also link that setting to a cell in your sheet.
Will new Xero accounts show up in my report automatically?
They will if you tick the top checkbox to select all accounts in the Accounts filter. G-Accon then adds new accounts from your Chart of Accounts each time you refresh.
Can I combine several Xero organisations into one report?
Yes. Formatted Consolidated Reports lets you pick a report currency, choose the organisations to include and set elimination options. The finished report shows which organisation each line comes from.
Ready to build better Xero reports?
See the new reports layout working with your own Xero data.