Explore step-by-step guides, troubleshooting tips, and best practices to make the most of G-Accon. Whether you're setting up integrations, automating reports, or optimizing workflows, our help center has everything you need to succeed.
Wiki Menu
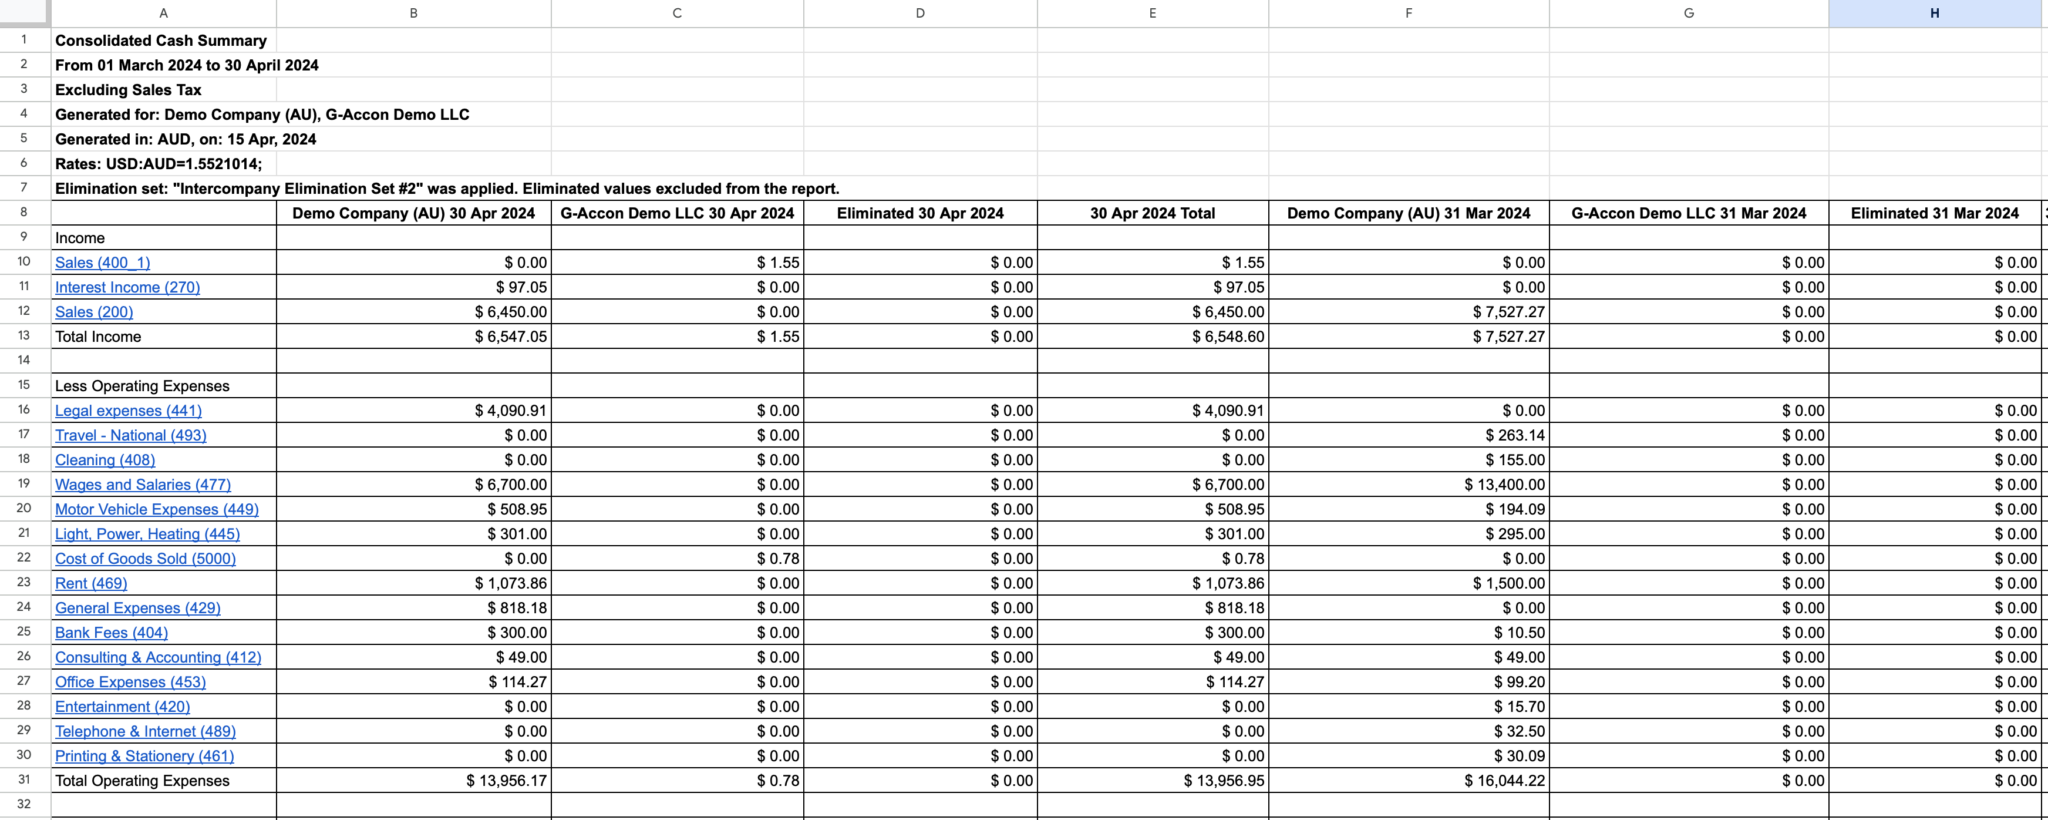
Consolidated Cash Summary by Organisation Intercompany Eliminations
Generate Multi-Entity and Multi-Currency Consolidated Cash Summary By Organization Report with Intercompany Eliminations from Xero into Google Sheets
Generating Consolidated Cash Summary By Organization Report with Intercompany Eliminations:
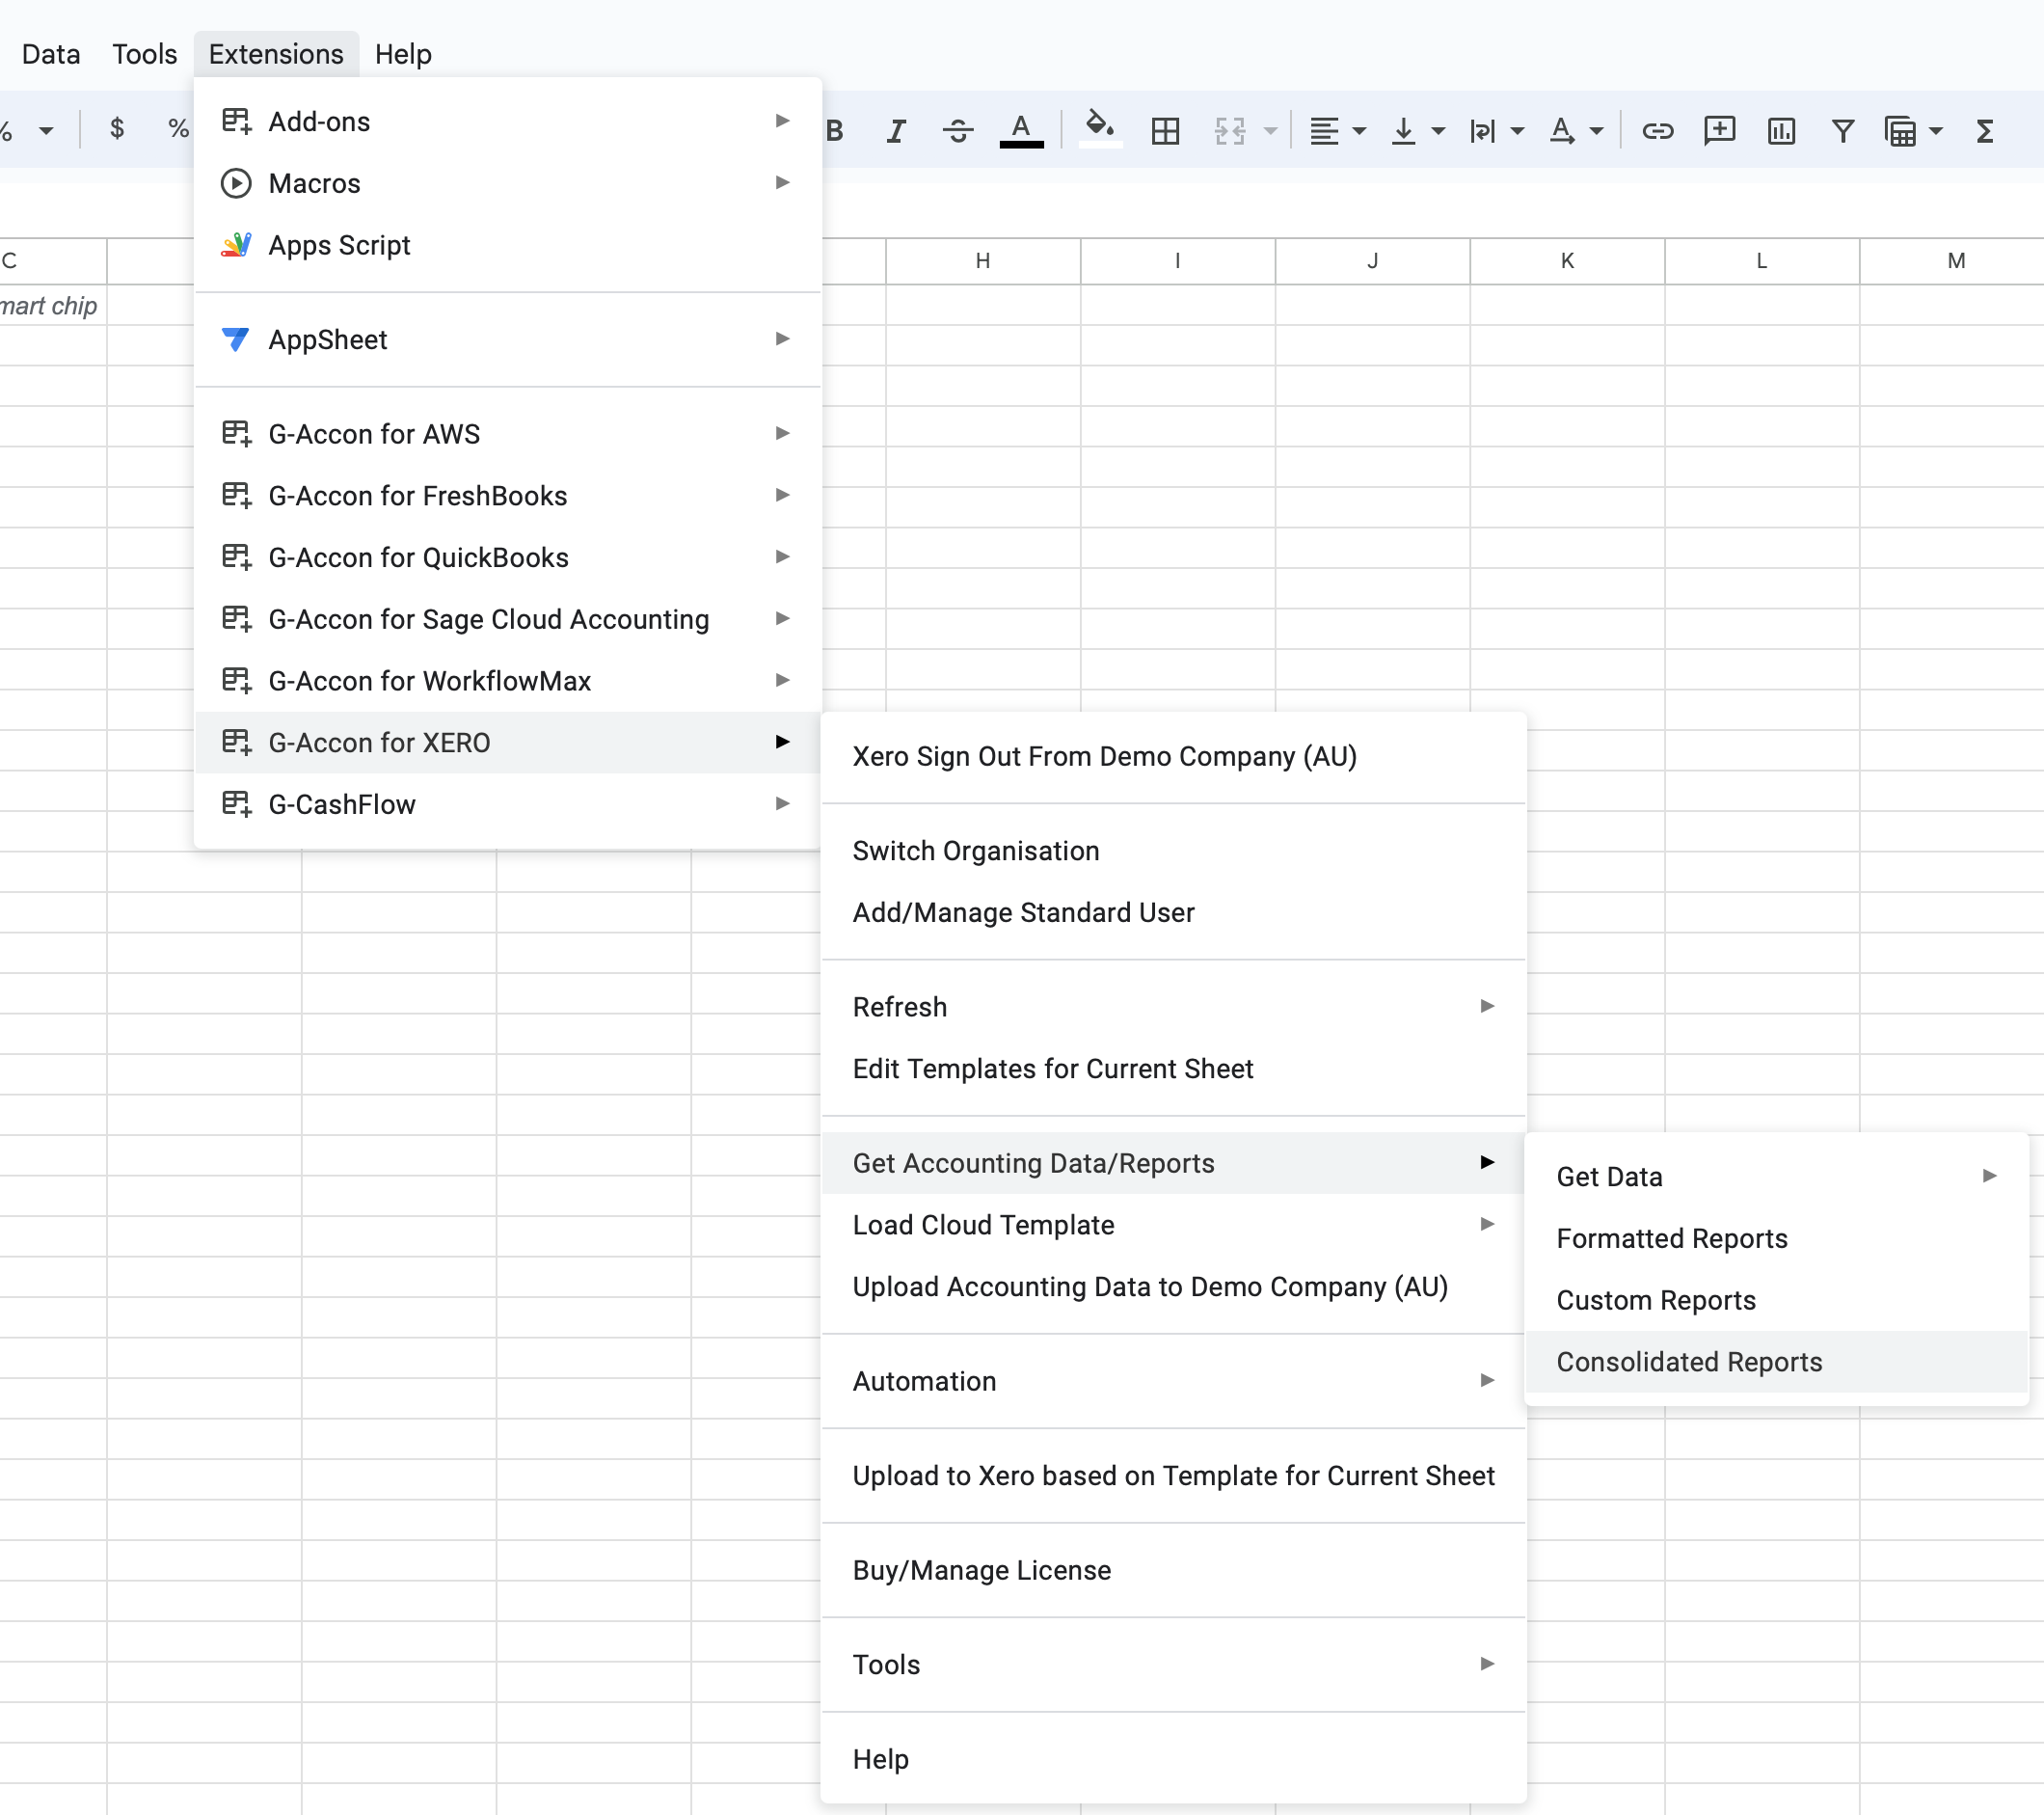
Go to the menu and select "Extensions"
Choose "G-Accon for Xero".
Click on "Get Accounting Data/Reports"
Consolidated Cash Summary By Organization Report with Intercompany Eliminations in Google Sheets
How to design a template for the report?
Select "Consolidated Reports"
Consolidated Reports menu option
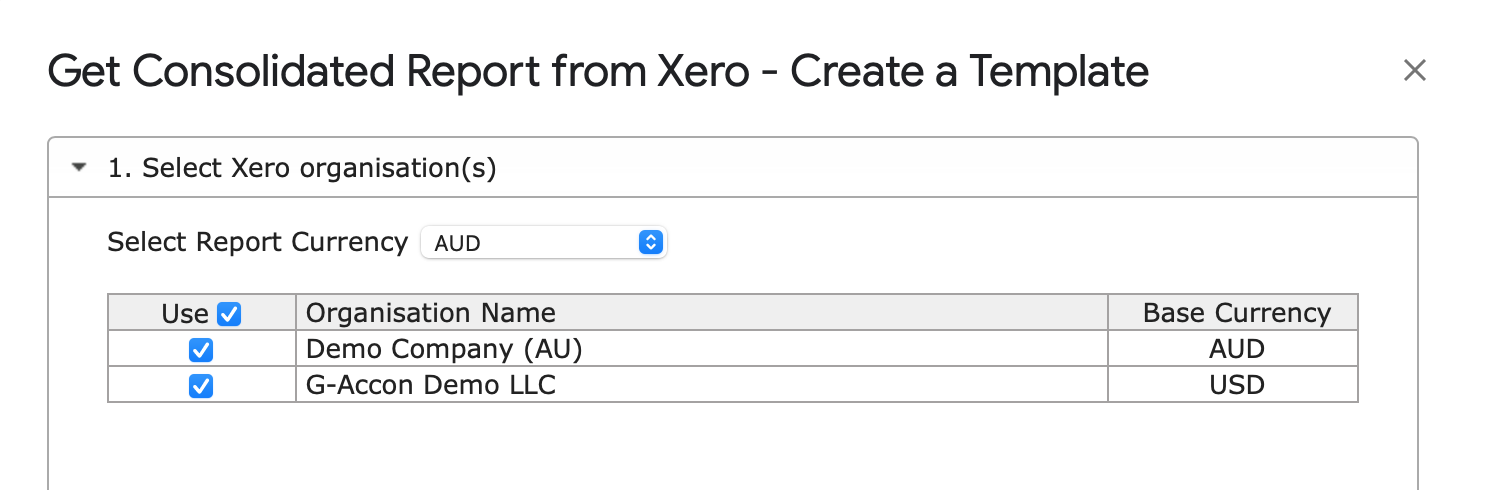
Select the required Xero Organizations/Entities
Select at least two organizations
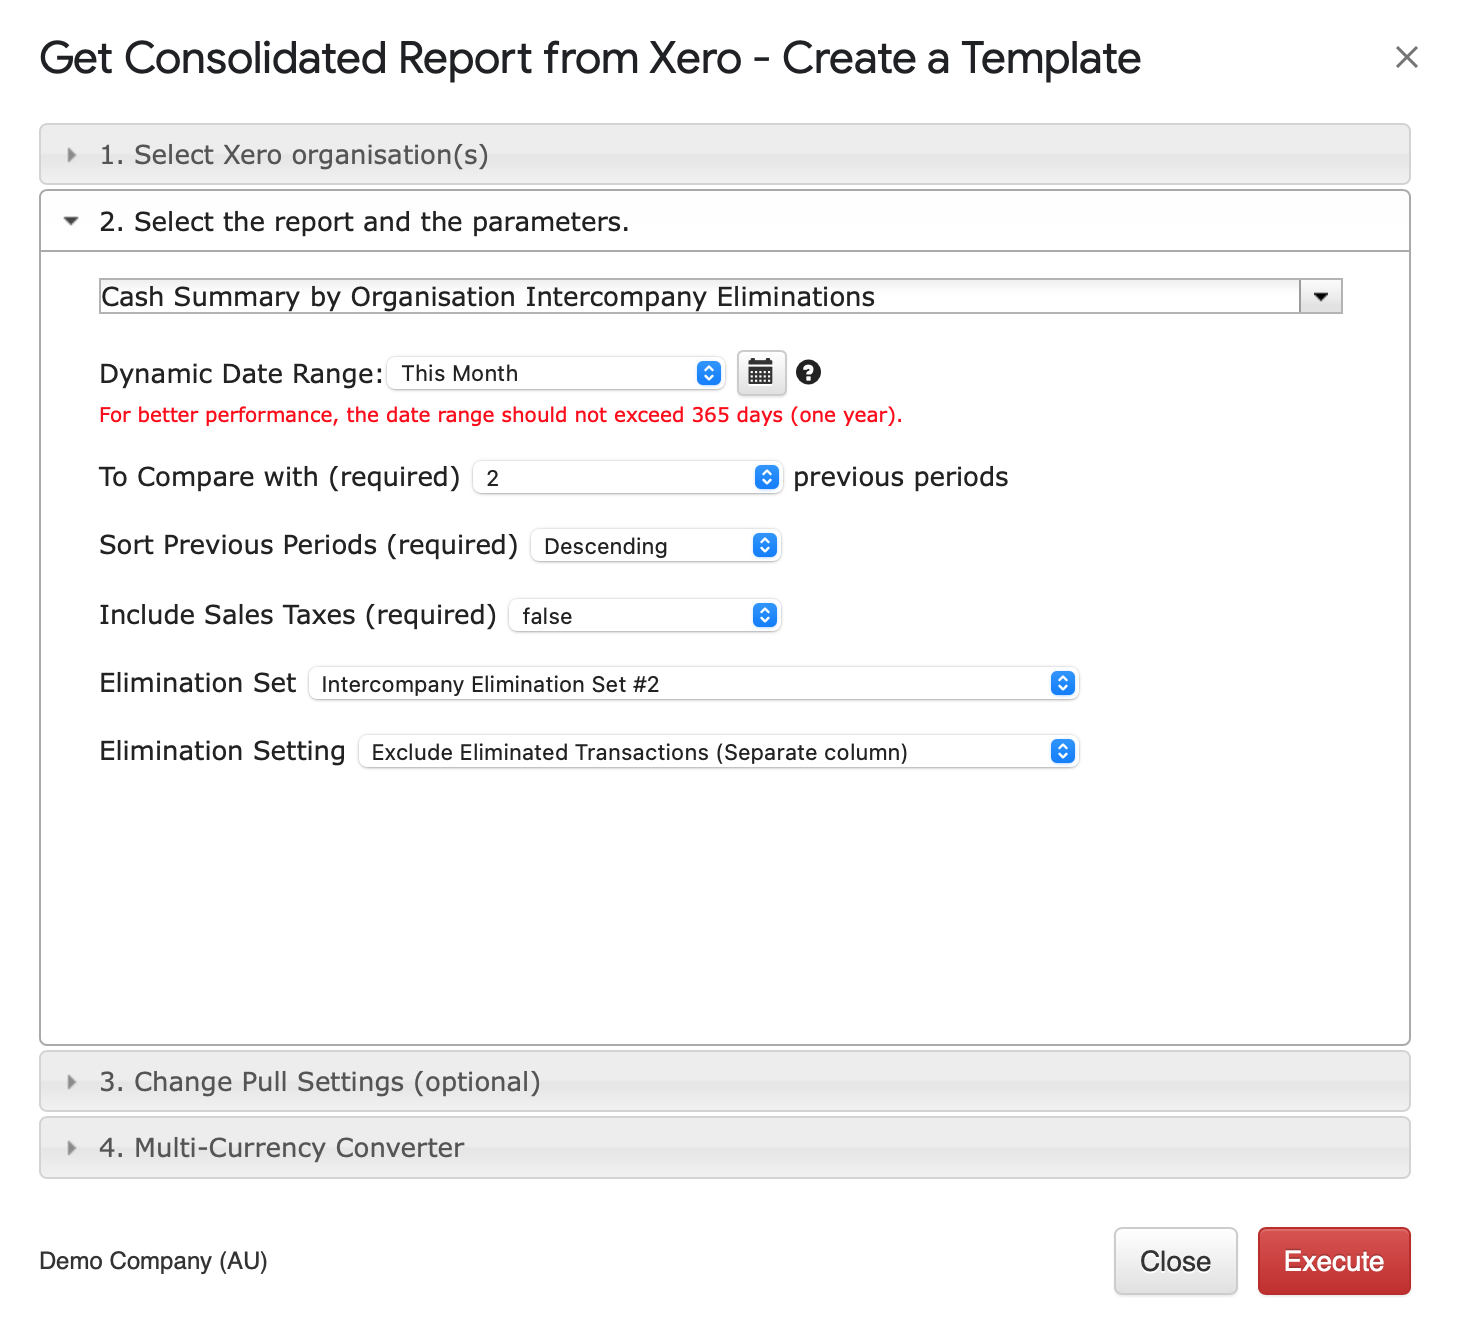
Choose "Cash Summary By Organization Intercompany Eliminations" report from dropdown box.
Select parameters
Required Attributes
There are required and optional attributes for the Cash Summary By Organization Intercompany Eliminations report.
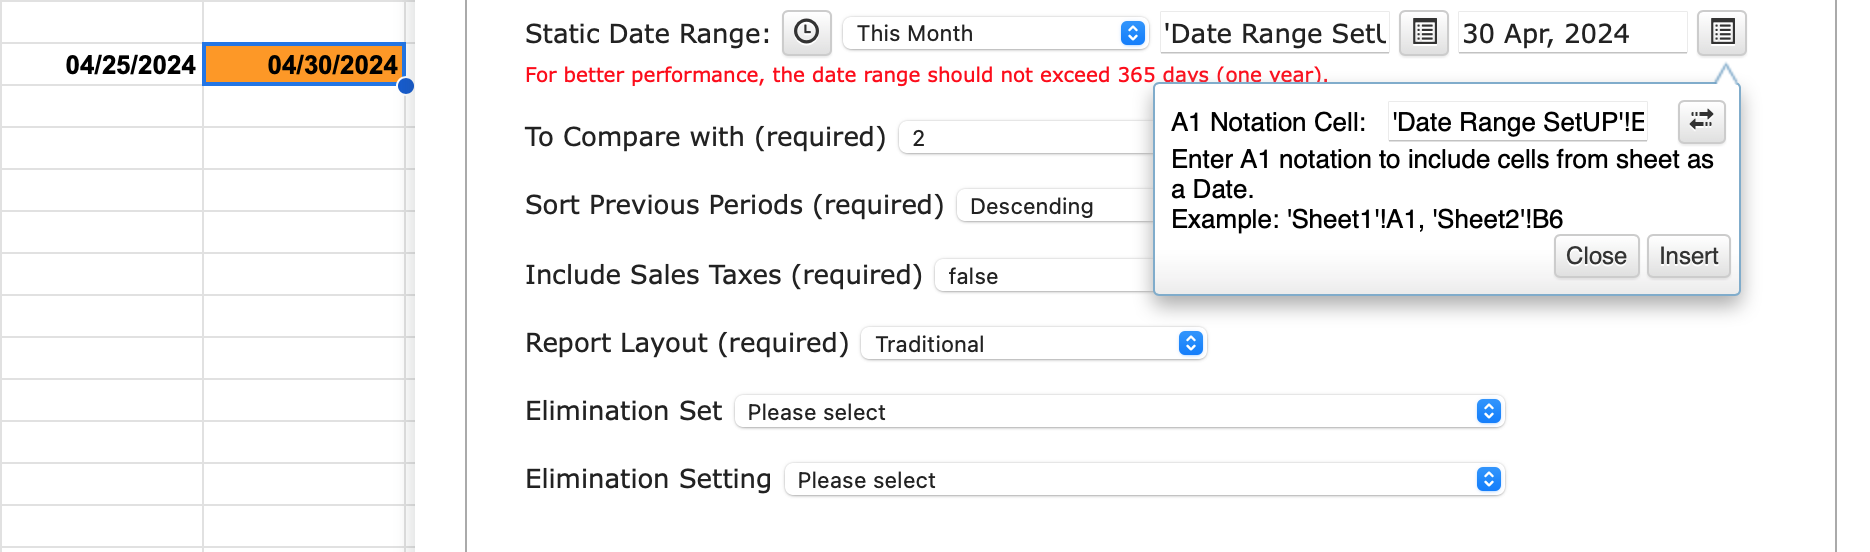
G-Accon for Xero provides the ability to set up the Date Range for your data manually or you can refresh your data dynamically.
Dynamic Date Range: The report data will be calculated based on pre-populated values like Today, This Month, This Quarter, This Year, Last Month, etc.
Static Date Range: Define specific start and end dates.
Custom Date Range: Utilize cell references in your Google Sheet to set custom dates.
To compare with ( ### ) periods
Sort Previous Periods
Include Sales Taxes( required)
Elimination Set
An Elimination Set needs to be created under G-Accon for Xero in the Tools -> Intercompany Eliminations section in order to be used when generating consolidated reports.
Elimination Settings
The Elimination Settings options are:
Exclude Eliminated Transactions: This option excludes transactions that have been eliminated from the dataset and identify in the Elimination Set
Only Eliminated Transactions: This option includes only transactions that have been eliminated from the dataset and define in the Elimination Set
Exclude Eliminated Transactions (Separate Column): This setting excludes transactions that have been eliminated from the dataset, define in the Elimination Set, and presents them in a separate column for clarity or further analysis.
Include Eliminated Transactions (Separate Column): This setting includes transactions that have been eliminated from the dataset, define in the Elimination Set, and presents them in a separate column for clarity or further analysis."
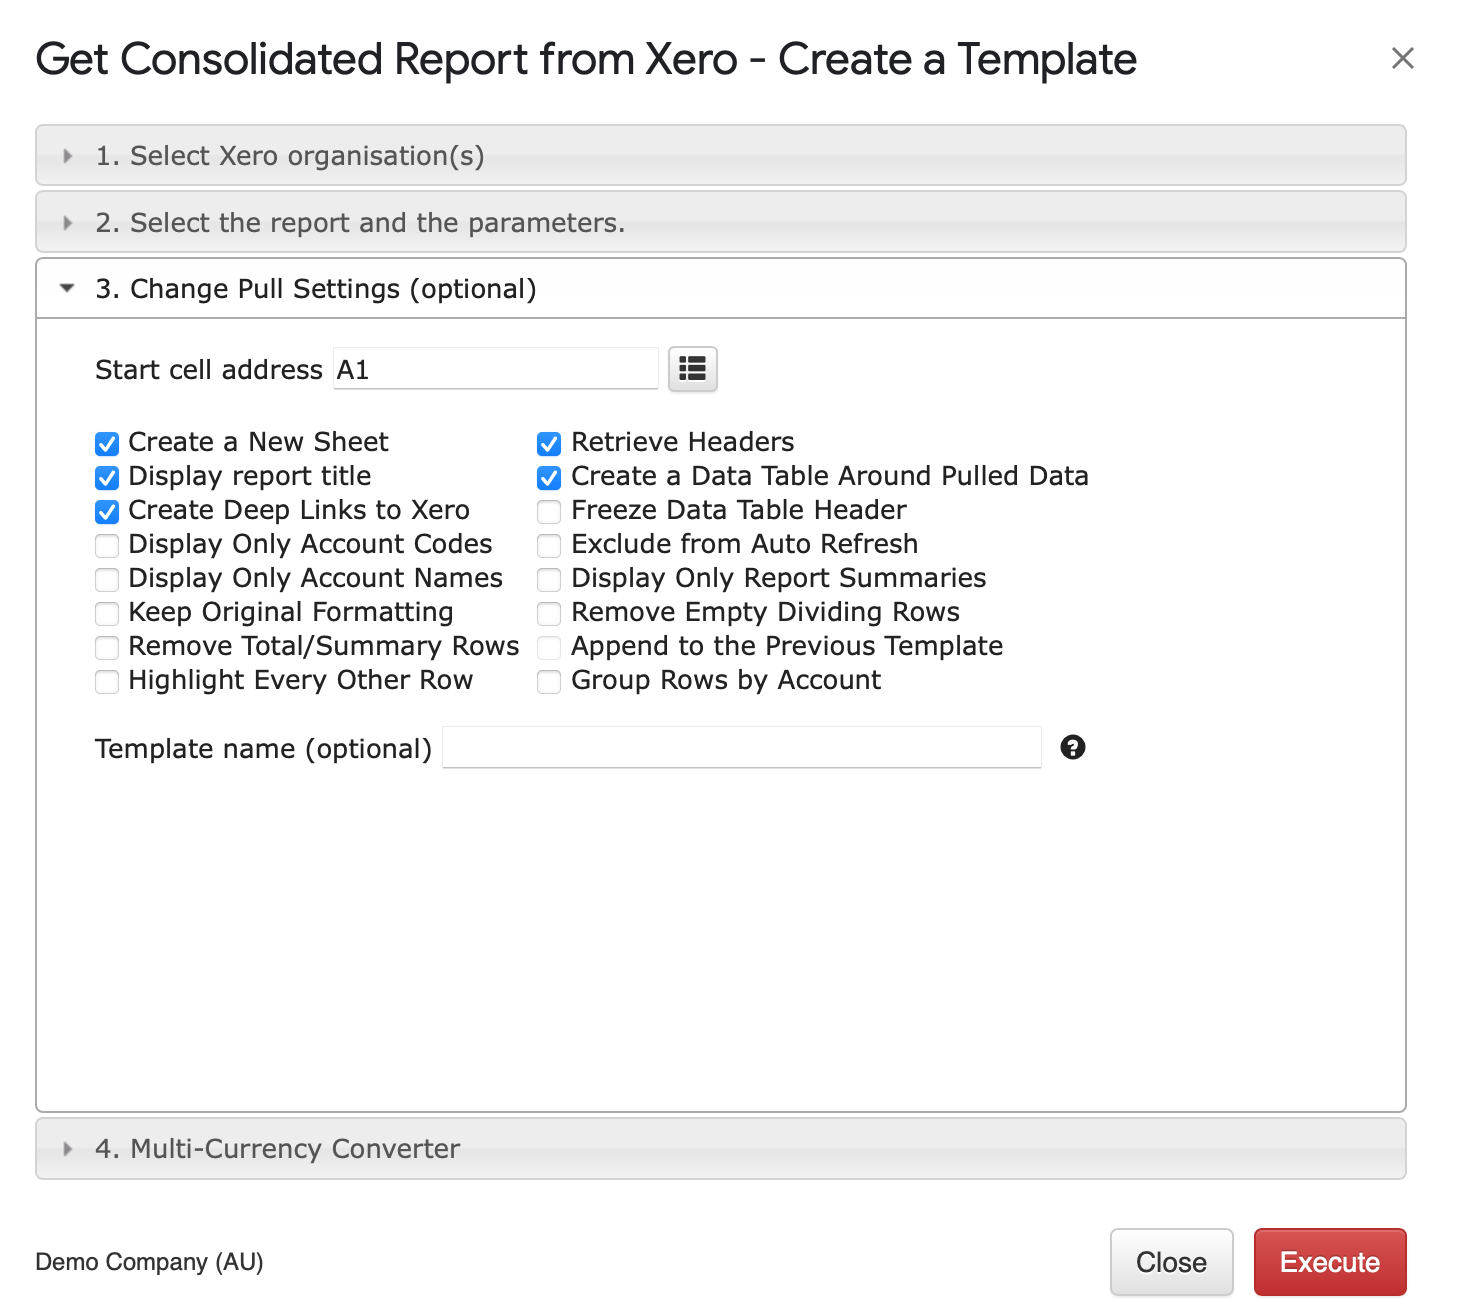
CHANGE PULL SETTINGS
Customize report behavior with these optional features:
Create a New Google Sheet: Generate the report in a new tab or worksheet.
Display Report Title: Include and display the report title within the spreadsheet.
Retrieve Headers: Include and display column titles for your data.
Display Only Account Codes: Display only account codes instead of full account.
Display Only Account Names: Present only account names.
Freeze Data Table Header: Lock the header row or column to keep it visible while scrolling through the data.
Create a Data Table Around Pulled Data: Organize your data into a structured table format.
Keep Original Formatting: Preserve the original formatting of the data.
Remove Empty Dividing Rows: Eliminate any empty rows that separate your data.
Exclude from Auto Refresh (Discontinuing): Prevent the spreadsheet from auto-refreshing, though note that this functionality may be outdated.
Display Only Report Summary: Filter and display only the rows containing summary, no data rows will be displayed.
Remove Totals/Summaries Rows: Remove rows with Totals and Summaries in the report.
Create Deep Links to Xero: Generate links for accessing specific items in Xero.
Highlight Every Other Row: Apply a formatting style to alternate rows to improve readability.
Append to the Previous Template: Add the new data or changes to an existing template.
Add Company Name Column: Introduce a column to include the company name.
Group Rows By Account: Group and display report data by Accounts.
You can also provide the start cell, for instance, A1. And provide the name of the template in Template Name field, for instance, Template Name #1.
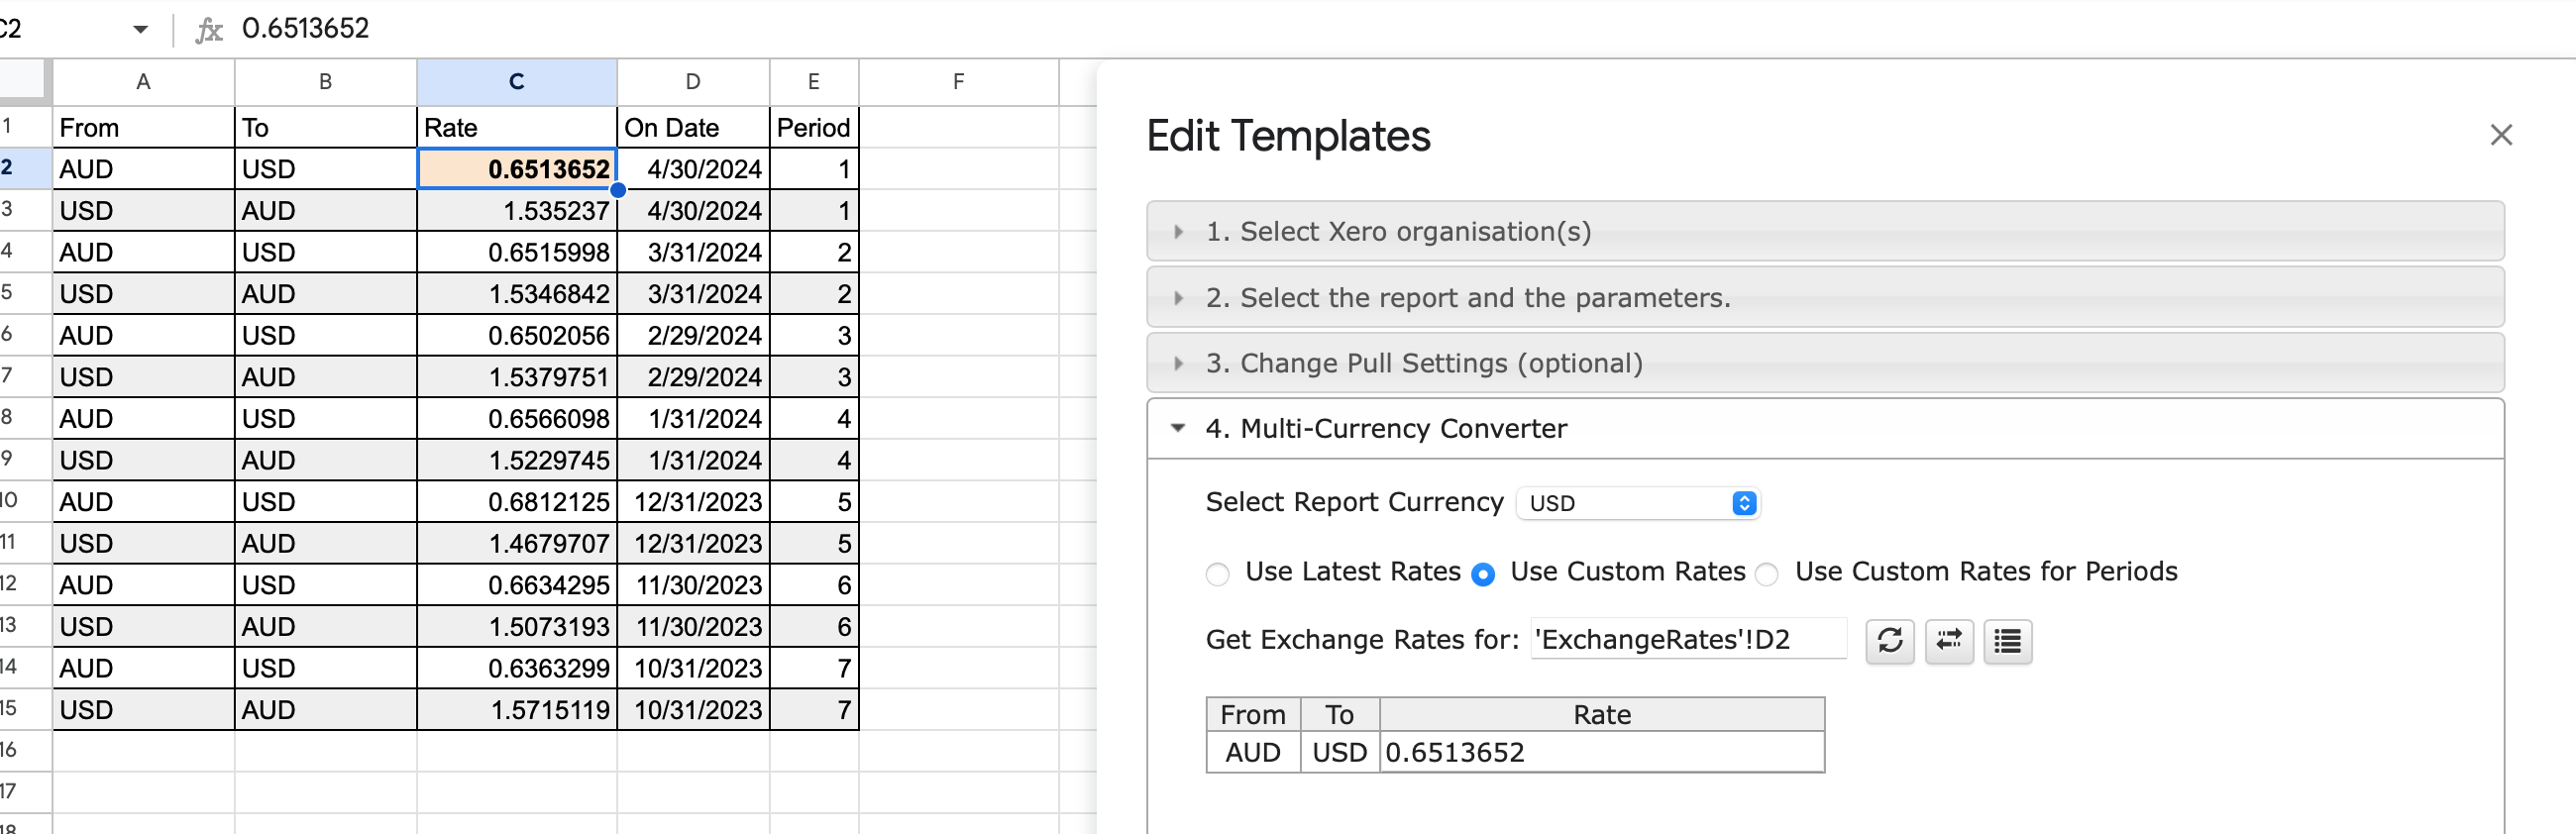
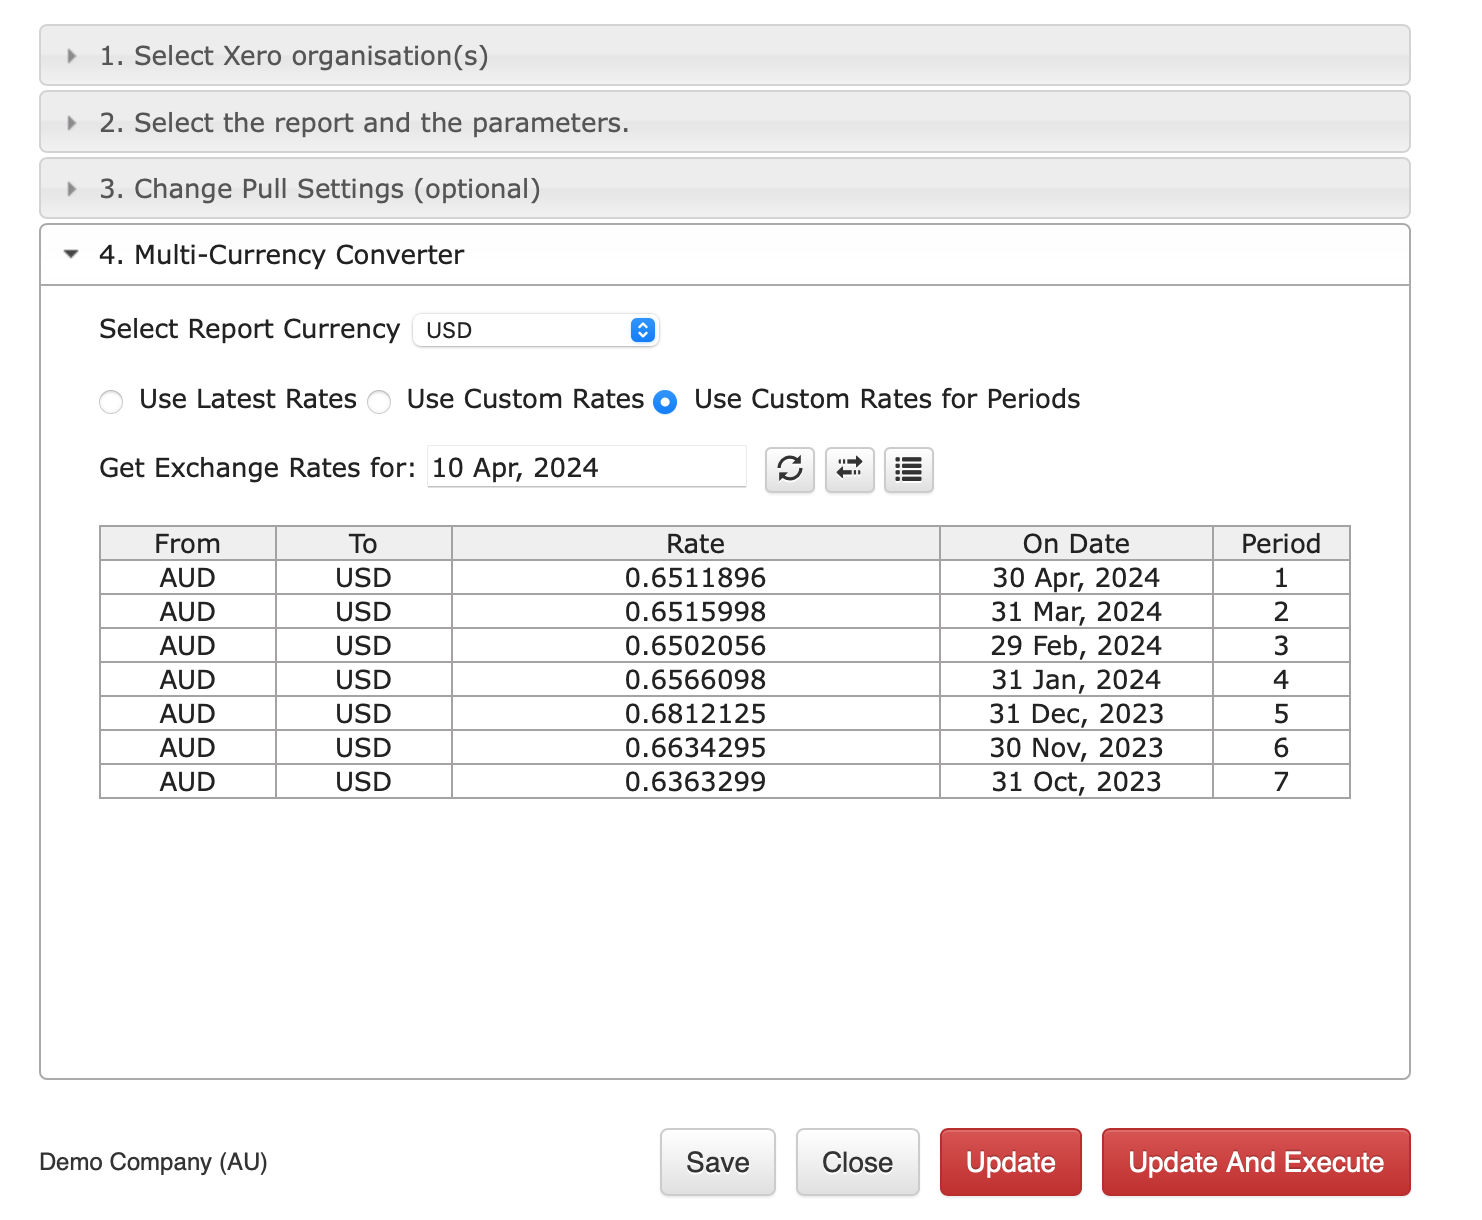
MULTI-CURRENCY CONVERTER (OPTIONAL FEATURES)
If you need to generate the report in a specific currency, follow these steps:
Choose the report currency (e.g., "US").
Decide how to get exchange rates:
Use Latest Rates: The report uses the latest available exchange rate.
Use Custom Rates: Set your own exchange rates for a specific date or create a separate tab with multiple custom rates.
Use Custom Rates for Periods: Set custom rates for specific periods in the same way.
Using Latest Rates: If you select "Use Latest Rates" and click "Execute," the report uses the latest exchange rate from the provider each time you refresh the report.
Using Custom Rates: Choose "Use Custom Rates," specify a date, and decide whether to get rates directly or create a separate tab with custom rates. This feature lets you manually adjust exchange rates for the report.
Using Custom Rates for Periods: Select "Use Custom Rates for Periods" and set custom rates for specific periods. You can use the exchange rate screen or create a separate tab with cell reference for this purpose.
Finally, click "Execute" to generate the report in your chosen currency, and it will appear in your Google Sheet.
Consolidated Cash Summary By Organization Report with Intercompany Eliminations in Google Sheets
In a very similar way, you can generate Profit And Loss and Balance Sheet consolidated reports.
How to schedule automatic data refresh?
To schedule automatic data refresh, follow these steps:
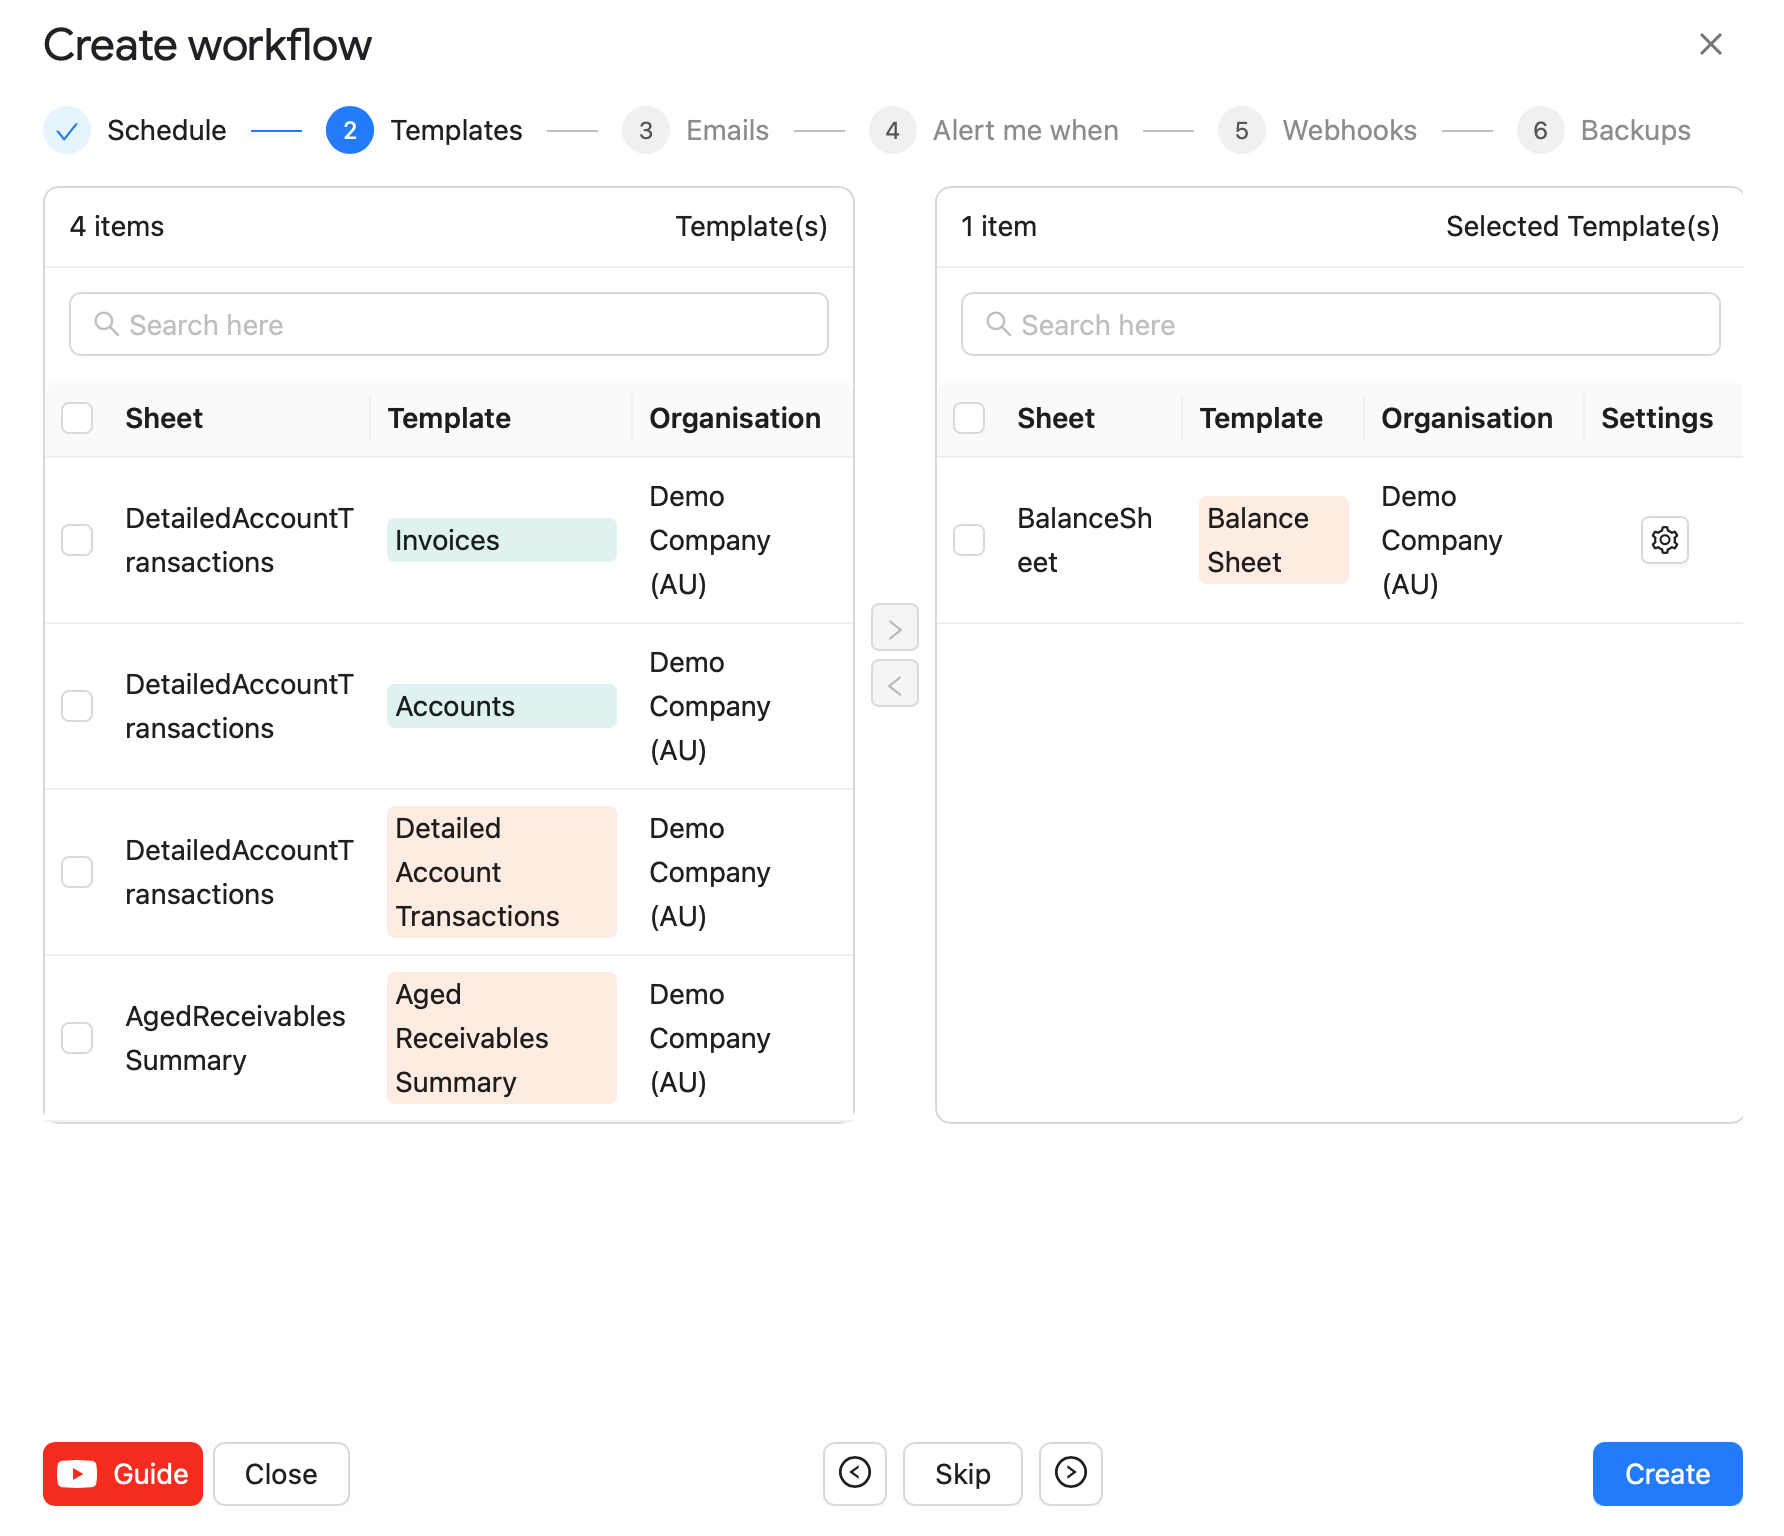
Create a workflow by selecting the "Automation" menu option --> "Create Workflow" option.
In this workflow, you can set up auto-refresh and notification processes.
Automatic workflows allow you to create various workflows, add specific templates, and set different schedules for each workflow.
You can also notify customers, clients, and team members with various automatic notifications, all within the same spreadsheet.
For more details, refer to the "Create Workflow" documentation here.
How modify your report and update your template?
During the refresh process, if you need to modify your report, follow these steps:
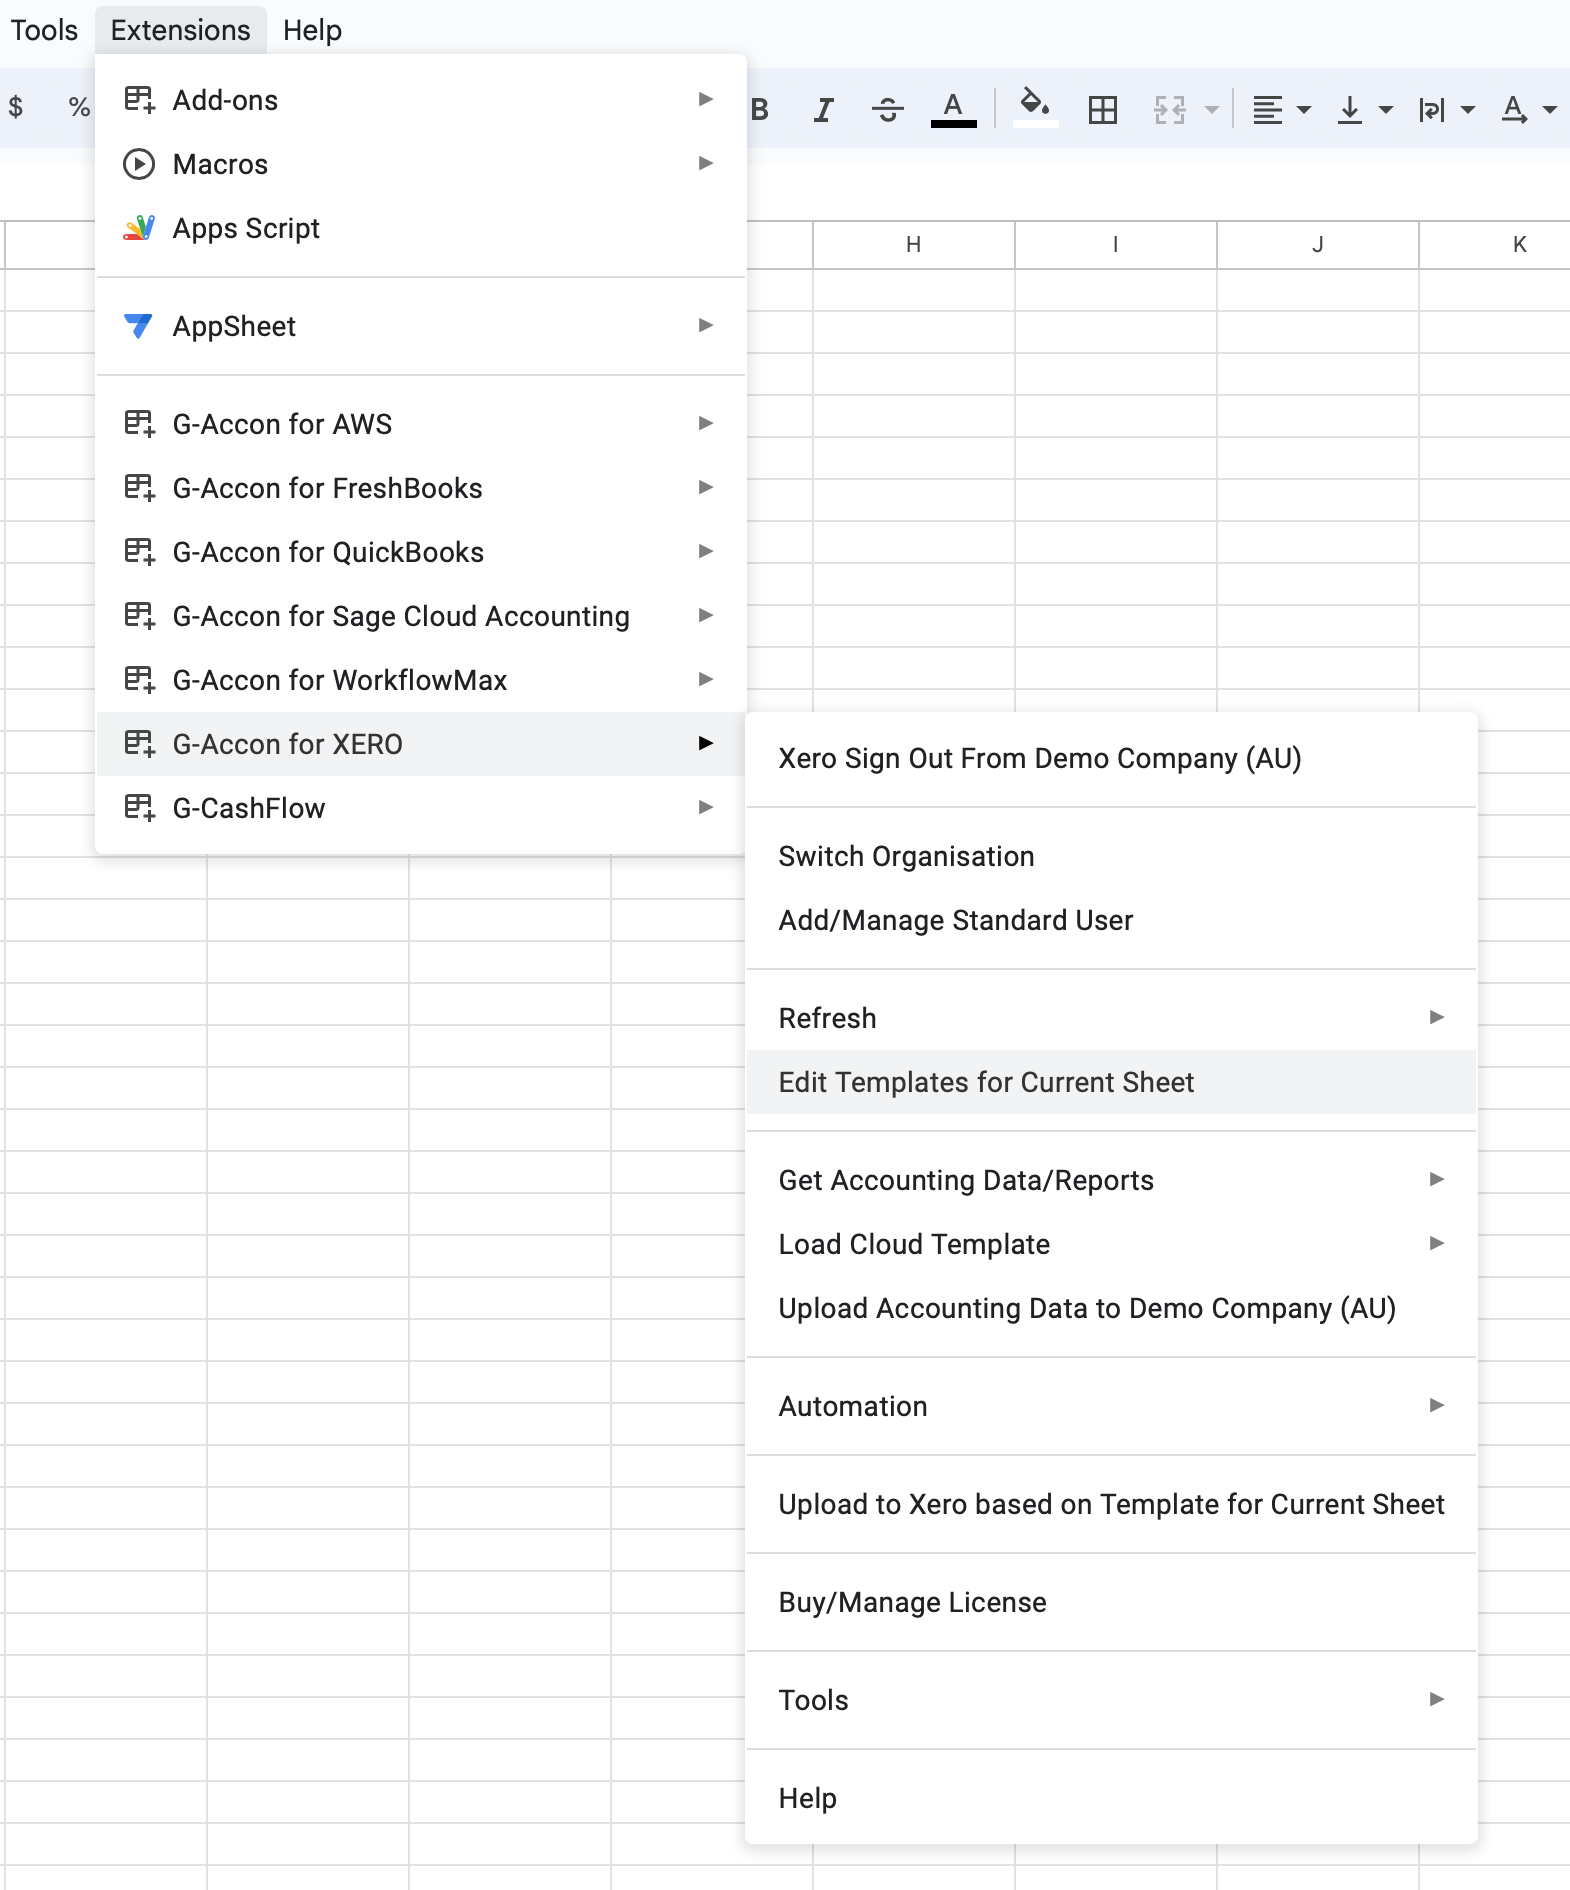
Click on "Extensions" in the menu.
Choose "G-Accon for Xero"
Select "Edit Templates for Current Sheet"
To Refresh and Modify a template there is no need to be signed in into the organization
Select the template, make the necessary changes to it and Update the template or Update and Execute the new query.
To provide the best experiences, we use technologies like cookies to store and/or access device information. Consenting to these technologies will allow us to process data such as browsing behavior or unique IDs on this site. Not consenting or withdrawing consent, may adversely affect certain features and functions.
Functional
Always active
The technical storage or access is strictly necessary for the legitimate purpose of enabling the use of a specific service explicitly requested by the subscriber or user, or for the sole purpose of carrying out the transmission of a communication over an electronic communications network.
Preferences
The technical storage or access is necessary for the legitimate purpose of storing preferences that are not requested by the subscriber or user.
Statistics
The technical storage or access that is used exclusively for statistical purposes.The technical storage or access that is used exclusively for anonymous statistical purposes. Without a subpoena, voluntary compliance on the part of your Internet Service Provider, or additional records from a third party, information stored or retrieved for this purpose alone cannot usually be used to identify you.
Marketing
The technical storage or access is required to create user profiles to send advertising, or to track the user on a website or across several websites for similar marketing purposes.