Explore step-by-step guides, troubleshooting tips, and best practices to make the most of G-Accon. Whether you're setting up integrations, automating reports, or optimizing workflows, our help center has everything you need to succeed.
Wiki Menu
Xero Aged Payables by Contact Report
Export your Aged Payables by Contact report from Xero directly into Google Sheets, with flexible configuration options and automated updates.
Customize your reports with themes, company colors, and white-label branding to create a polished, professional look.
Don't have the add-on yet? Install G-Accon for Xero from the Google Workspace Marketplace first.
To pull your Aged Payables by Contact data into Google Sheets, follow these steps:
Ensure you are signed in to G-Accon for Xero.
Open your Google Sheet and go to Extensions in the menu.
Select G-Accon for Xero.
Click Get Accounting Data / Reports.
Choose Custom Reports.
Select Aged Payables By Contact from the report dropdown.
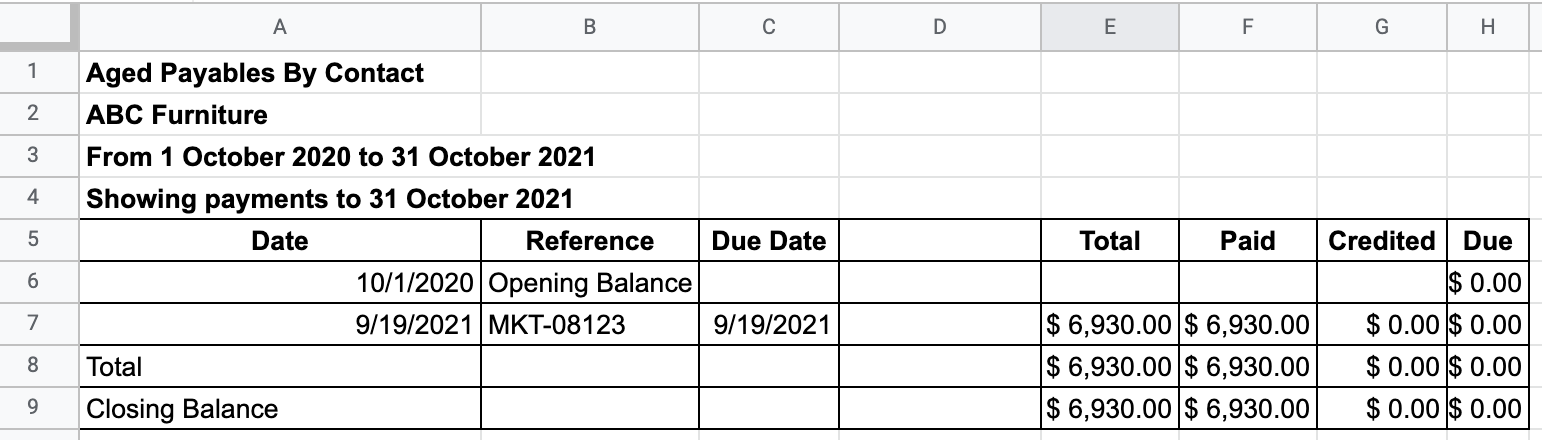
Export Aged Payables By Contact into Google Sheets
How to Create a Template for the Report
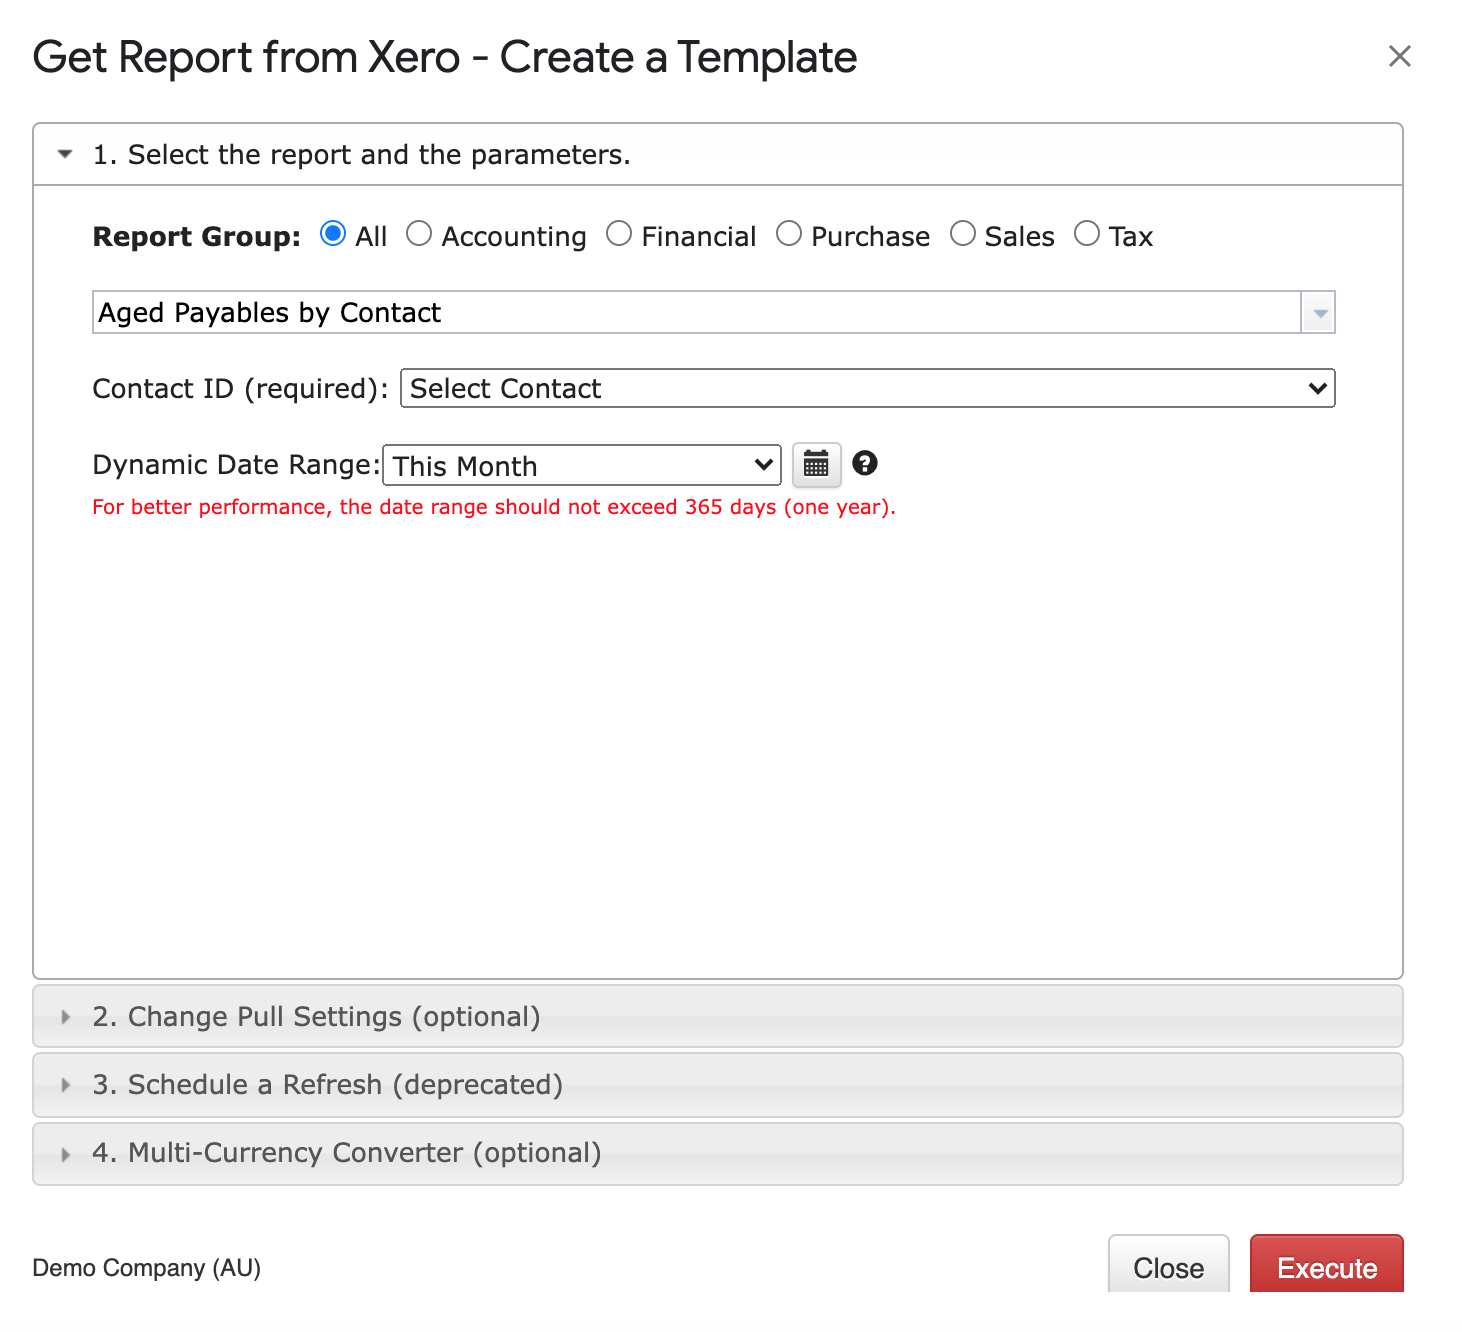
Select Aged Payables By Contact from the Custom Reports dropdown. G-Accon for Xero lets you set up the Date Range manually or refresh your data dynamically. For better performance, keep the Date Range within 365 days.
SELECT PARAMETERS
The Aged Payables by Contact report supports three date range modes:
Dynamic Date Range
Report data is calculated based on pre-populated relative periods such as This Month, This Quarter, This Year, Last Month, and more. Ideal for recurring reports that always reflect the current period without manual date adjustments.
Static Date Range
Define a fixed start and end date for the report. The date range remains unchanged each time the report is refreshed, making it suitable for historical snapshots or period-end reporting.
Custom Date Range
Reference cells in your Google Sheet to drive the report dates dynamically, using the icons next to the "To" and "From" fields. This is useful when date inputs are controlled by a dashboard or input sheet, allowing multiple reports to be updated by changing a single cell value.
REQUIRED ATTRIBUTES
The following parameter must be configured before executing the report:
Contact ID — the report is grouped by contact, so this attribute identifies each supplier in the output.
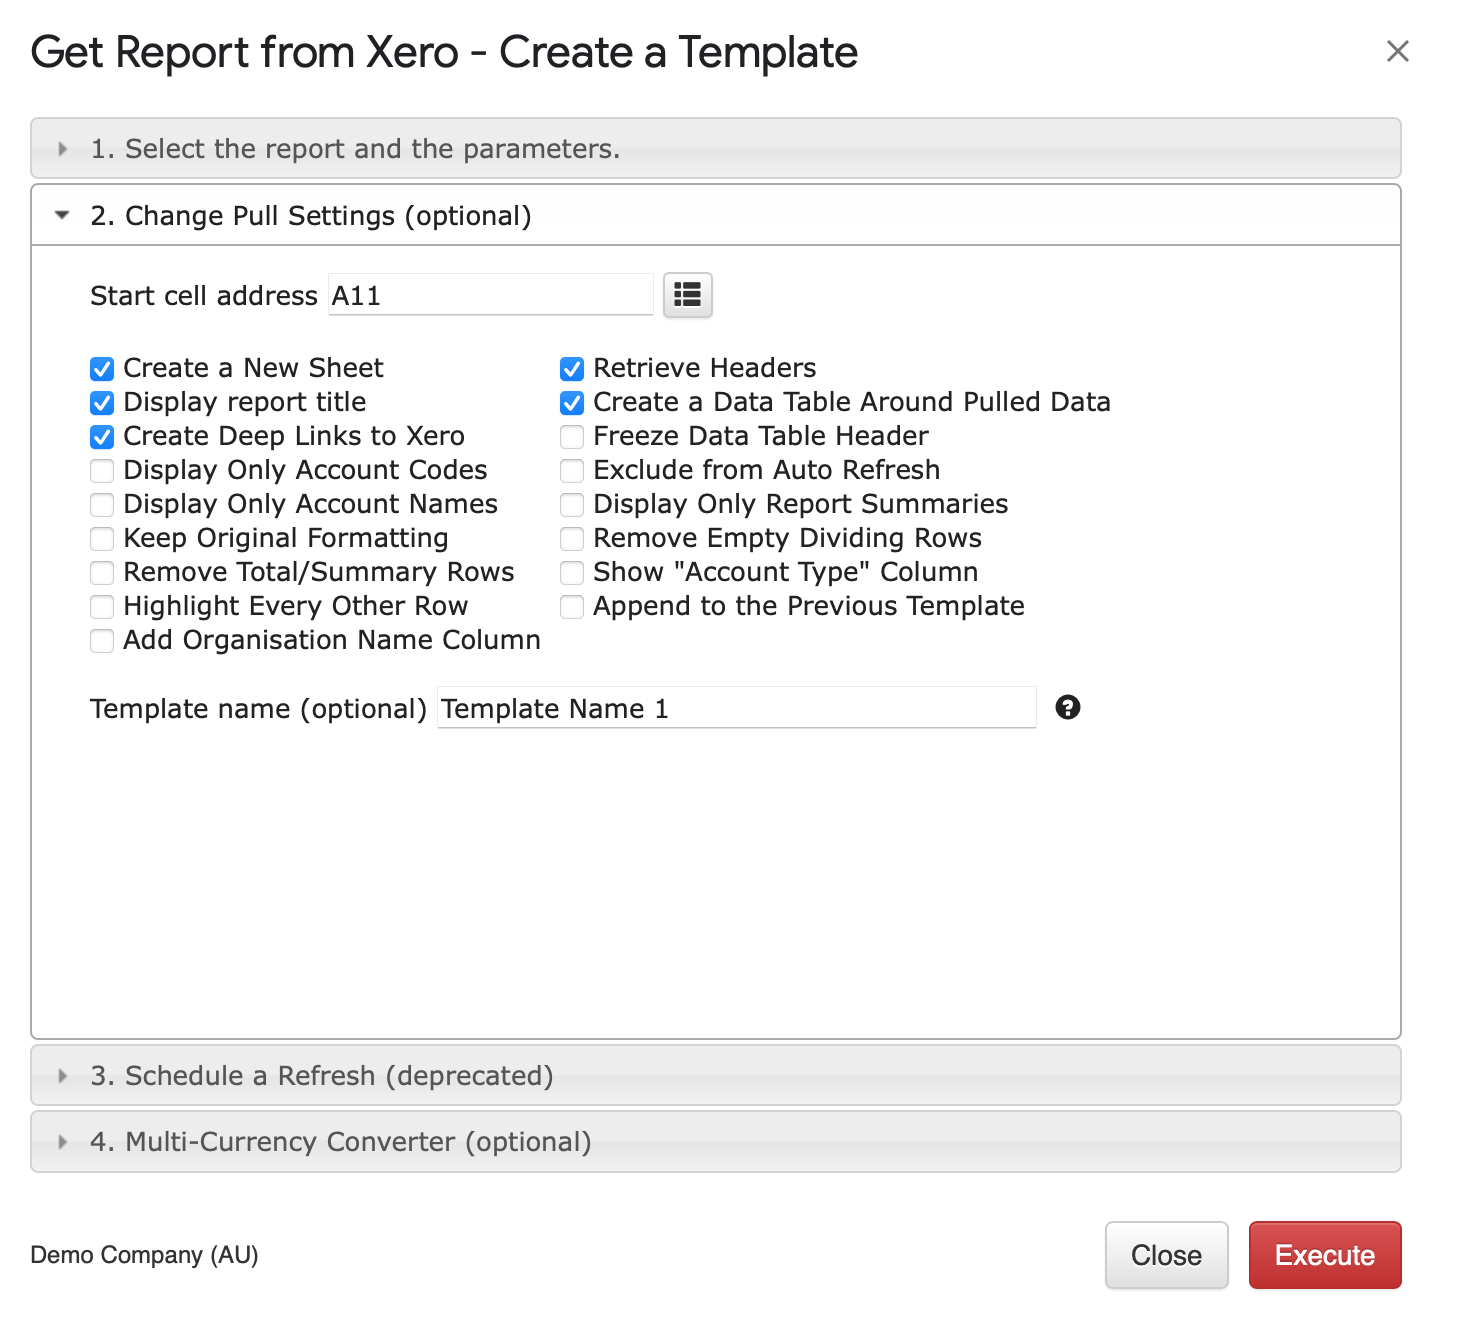
CHANGE PULL SETTINGS (OPTIONAL FEATURES)
The Change Pull Settings tab gives you fine-grained control over how report data is presented in your Google Sheet. All settings are optional and can be combined to suit your reporting workflow:
Create a New Google Sheet — generate the report in a new tab or worksheet.
Display Report Title — include the report name as a header row in the spreadsheet.
Create Deep Links to Xero — add clickable links in the sheet that open the corresponding transaction or contact directly in Xero.
Display Only Account Codes — show account codes in place of full account names.
Display Only Account Names — show full account names instead of codes.
Keep Original Formatting — preserve the formatting applied in Xero rather than using G-Accon's default style.
Remove Total/Summary Rows — strip out subtotal and total rows, returning only line-item data.
Highlight Every Other Row — apply alternating row shading to improve readability across wide reports.
Retrieve Headers — display column titles above your data.
Create a Data Table Around Pulled Data — wrap the output in a structured Google Sheets table for easier filtering and sorting.
Freeze Data Table Header — lock the header row so it remains visible when scrolling through large datasets.
Exclude from Auto Refresh — leave this template out of any scheduled automatic refreshes.
Display Only Report Summaries — show only subtotal and summary rows, hiding individual line items.
Remove Empty Dividing Rows — strip out blank rows used as section separators, giving a cleaner output.
Show "Account Type" Column — add a column indicating each account's type.
Append to the Previous Template — add new data below an existing report rather than overwriting it.
Add Organisation Name Column — prepend a column with the organisation name, useful for multi-entity reporting.
You can also specify a Start Cell (for example, A11) to control exactly where in the sheet the report is placed, and assign a Template Name to identify the report when managing multiple templates in the same spreadsheet. To run the report, click the Execute button, and the data will be populated in your Google Sheet.
Change Pull Settings
How to Schedule Automatic Data Refresh
G-Accon's Automation feature lets you schedule your Aged Payables by Contact report to refresh automatically — no manual intervention needed. You can also configure notifications to alert team members, clients, or stakeholders when a refresh completes.
To set up an automated refresh:
Go to Extensions → G-Accon for Xero → Automation → Create Workflow.
Add the Aged Payables by Contact template to the workflow and set your preferred refresh schedule (e.g. daily, weekly, or monthly).
Optionally configure email notifications to be sent automatically when the refresh completes.
Multiple templates can be included in a single workflow, each with its own schedule.
How to Modify Your Report and Update Your Template
If you need to change the parameters of an existing report — for example to adjust the date range or change filters — you can edit the template directly without rebuilding it from scratch.
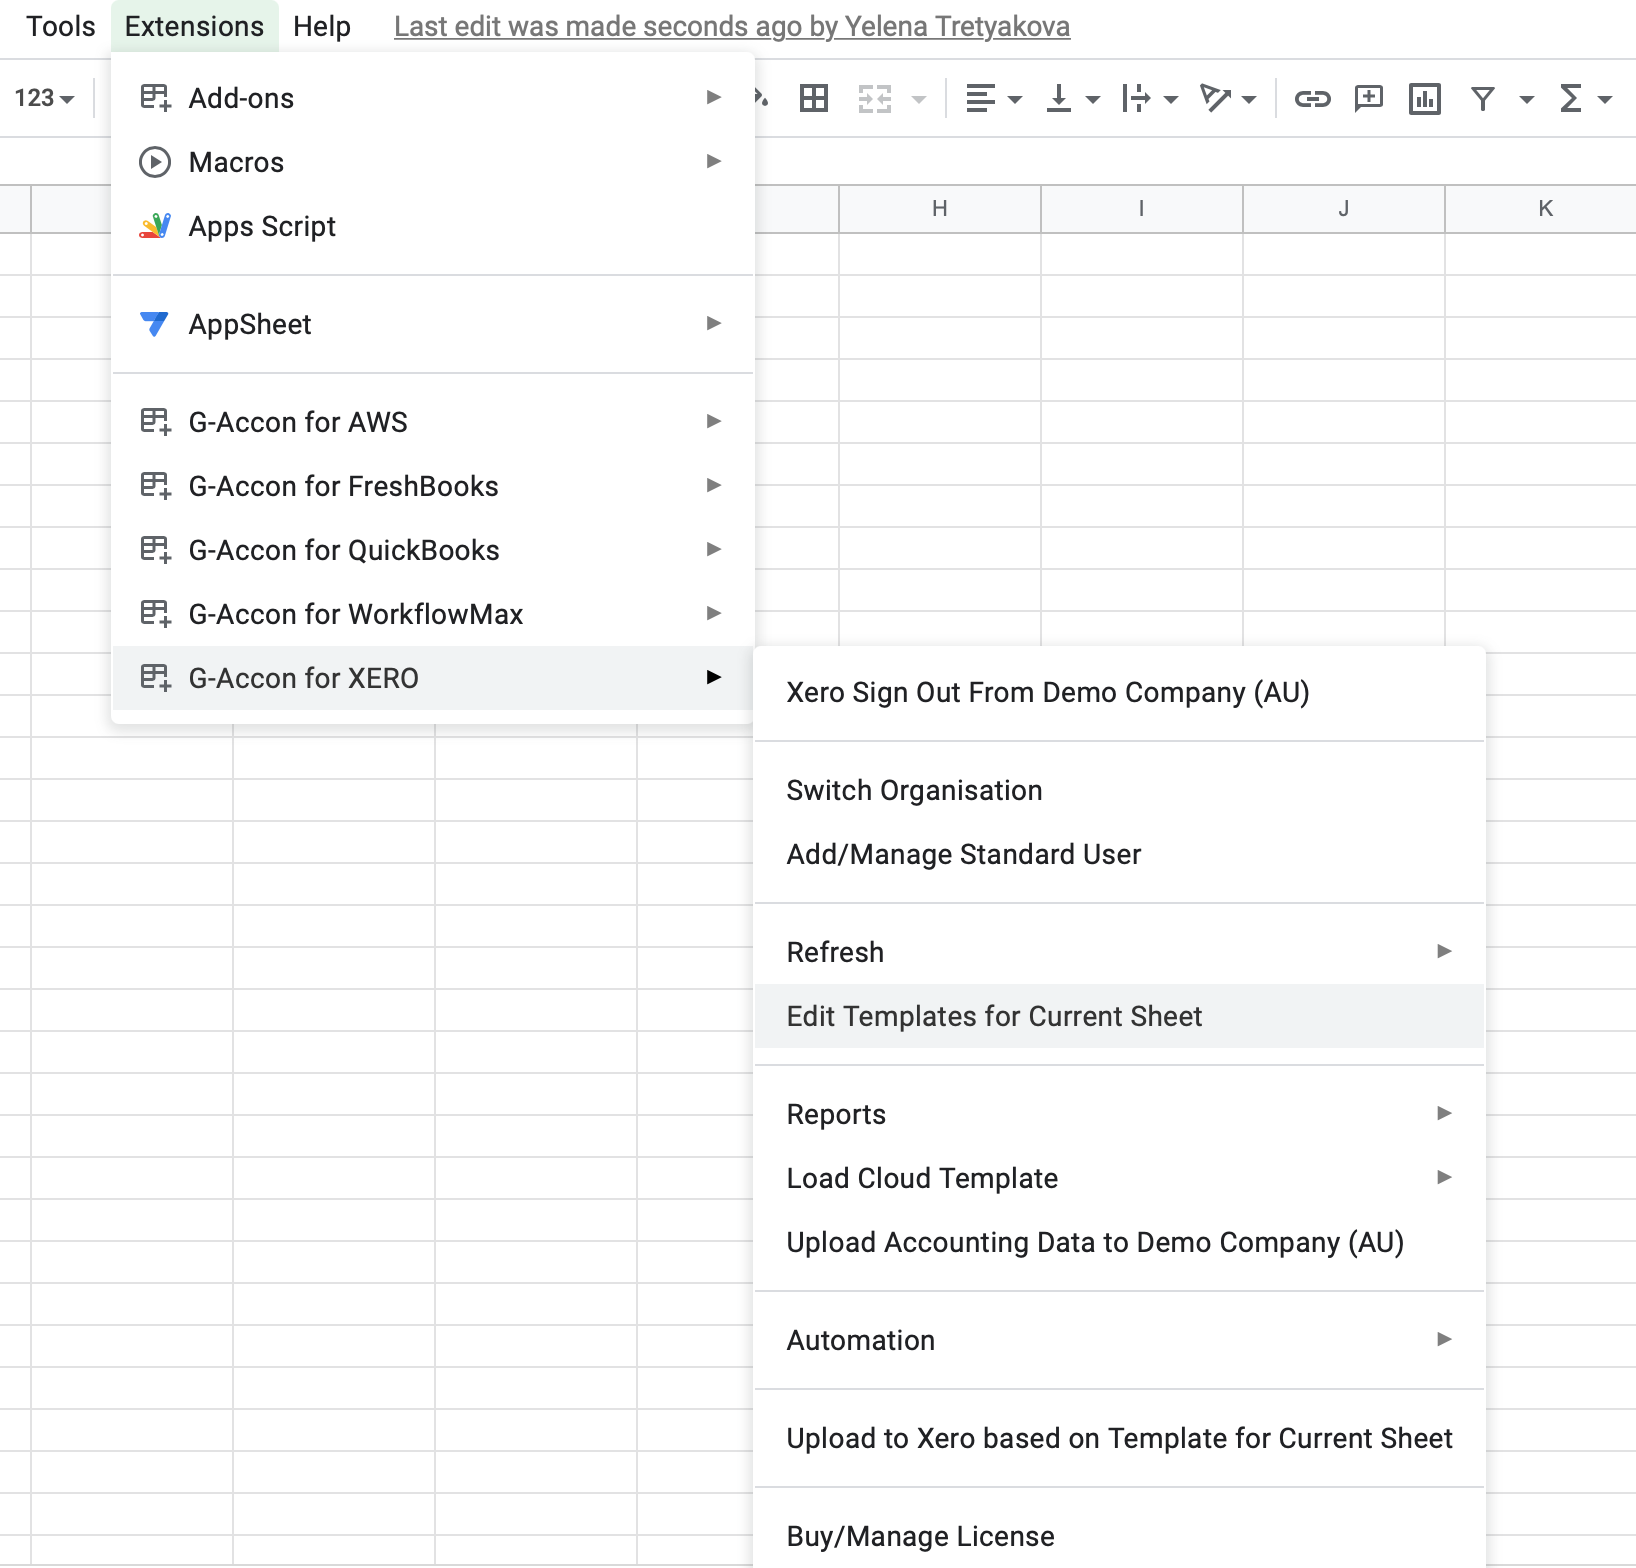
Go to Extensions → G-Accon for Xero → Edit Templates for Current Sheet.
Select the template you want to modify from the list.
Make your changes in the Edit Template panel.
Click Update to save the changes without re-running the report, or Update and Execute to save and immediately refresh the data.
Edit Templates — select, modify, and update an existing report template
Export your Aged Payables by Contact report from Xero directly into Google Sheets, with flexible configuration options and automated updates.
Customize your reports with themes, company colors, and white-label branding to create a polished, professional look.
Don't have the add-on yet? Install G-Accon for Xero from the Google Workspace Marketplace first.
To pull your Aged Payables by Contact data into Google Sheets, follow these steps:
Ensure you are signed in to G-Accon for Xero.
Open your Google Sheet and go to Extensions in the menu.
Select G-Accon for Xero.
Click Get Accounting Data / Reports.
Choose Custom Reports.
Select Aged Payables By Contact from the report dropdown.
Export Aged Payables By Contact into Google Sheets
How to Create a Template for the Report
Select Aged Payables By Contact from the Custom Reports dropdown. G-Accon for Xero lets you set up the Date Range manually or refresh your data dynamically. For better performance, keep the Date Range within 365 days.
SELECT PARAMETERS
The Aged Payables by Contact report supports three date range modes:
Dynamic Date Range
Report data is calculated based on pre-populated relative periods such as This Month, This Quarter, This Year, Last Month, and more. Ideal for recurring reports that always reflect the current period without manual date adjustments.
Static Date Range
Define a fixed start and end date for the report. The date range remains unchanged each time the report is refreshed, making it suitable for historical snapshots or period-end reporting.
Custom Date Range
Reference cells in your Google Sheet to drive the report dates dynamically, using the icons next to the "To" and "From" fields. This is useful when date inputs are controlled by a dashboard or input sheet, allowing multiple reports to be updated by changing a single cell value.
REQUIRED ATTRIBUTES
The following parameter must be configured before executing the report:
Contact ID — the report is grouped by contact, so this attribute identifies each supplier in the output.
CHANGE PULL SETTINGS (OPTIONAL FEATURES)
The Change Pull Settings tab gives you fine-grained control over how report data is presented in your Google Sheet. All settings are optional and can be combined to suit your reporting workflow:
Create a New Google Sheet — generate the report in a new tab or worksheet.
Display Report Title — include the report name as a header row in the spreadsheet.
Create Deep Links to Xero — add clickable links in the sheet that open the corresponding transaction or contact directly in Xero.
Display Only Account Codes — show account codes in place of full account names.
Display Only Account Names — show full account names instead of codes.
Keep Original Formatting — preserve the formatting applied in Xero rather than using G-Accon's default style.
Remove Total/Summary Rows — strip out subtotal and total rows, returning only line-item data.
Highlight Every Other Row — apply alternating row shading to improve readability across wide reports.
Retrieve Headers — display column titles above your data.
Create a Data Table Around Pulled Data — wrap the output in a structured Google Sheets table for easier filtering and sorting.
Freeze Data Table Header — lock the header row so it remains visible when scrolling through large datasets.
Exclude from Auto Refresh — leave this template out of any scheduled automatic refreshes.
Display Only Report Summaries — show only subtotal and summary rows, hiding individual line items.
Remove Empty Dividing Rows — strip out blank rows used as section separators, giving a cleaner output.
Show "Account Type" Column — add a column indicating each account's type.
Append to the Previous Template — add new data below an existing report rather than overwriting it.
Add Organisation Name Column — prepend a column with the organisation name, useful for multi-entity reporting.
You can also specify a Start Cell (for example, A11) to control exactly where in the sheet the report is placed, and assign a Template Name to identify the report when managing multiple templates in the same spreadsheet. To run the report, click the Execute button, and the data will be populated in your Google Sheet.
Change Pull Settings
How to Schedule Automatic Data Refresh
G-Accon's Automation feature lets you schedule your Aged Payables by Contact report to refresh automatically — no manual intervention needed. You can also configure notifications to alert team members, clients, or stakeholders when a refresh completes.
To set up an automated refresh:
Go to Extensions → G-Accon for Xero → Automation → Create Workflow.
Add the Aged Payables by Contact template to the workflow and set your preferred refresh schedule (e.g. daily, weekly, or monthly).
Optionally configure email notifications to be sent automatically when the refresh completes.
Multiple templates can be included in a single workflow, each with its own schedule.
How to Modify Your Report and Update Your Template
If you need to change the parameters of an existing report — for example to adjust the date range or change filters — you can edit the template directly without rebuilding it from scratch.
Go to Extensions → G-Accon for Xero → Edit Templates for Current Sheet.
Select the template you want to modify from the list.
Make your changes in the Edit Template panel.
Click Update to save the changes without re-running the report, or Update and Execute to save and immediately refresh the data.
Edit Templates — select, modify, and update an existing report template
To provide the best experiences, we use technologies like cookies to store and/or access device information. Consenting to these technologies will allow us to process data such as browsing behavior or unique IDs on this site. Not consenting or withdrawing consent, may adversely affect certain features and functions.
Functional
Always active
The technical storage or access is strictly necessary for the legitimate purpose of enabling the use of a specific service explicitly requested by the subscriber or user, or for the sole purpose of carrying out the transmission of a communication over an electronic communications network.
Preferences
The technical storage or access is necessary for the legitimate purpose of storing preferences that are not requested by the subscriber or user.
Statistics
The technical storage or access that is used exclusively for statistical purposes.The technical storage or access that is used exclusively for anonymous statistical purposes. Without a subpoena, voluntary compliance on the part of your Internet Service Provider, or additional records from a third party, information stored or retrieved for this purpose alone cannot usually be used to identify you.
Marketing
The technical storage or access is required to create user profiles to send advertising, or to track the user on a website or across several websites for similar marketing purposes.